Thursday, October 15, 2015

Opportunities to play with wood!

The October / November 2015 public Workshops have been arranged! Here is some info about the first few:


Tuesday 20th October
Carve a Wooden Spoon from seasoned wood.
Using seasoned wood, usually rescued from the waste stream, we will transform these pieces of wood into beautiful functional and/or decorative spoons. We will use mallets and gouges, scrapers and saws, then spokeshaves and rasps in this wonderfully creative process. By the end of the three hour workshop, we aim to each have a completed and oiled spoon.
It's a heap of fun, it's tactile and sensual.
What a delight!


Make a Spoon Carving Scraper from an old saw blade.

Curved scrapers are just the thing for cleaning out the bowls of spoons after we have carved the shape with a gouge and mallet. The steel in the sawplate of old saws is beaut for making your own scrapers - so long as the sawplate is not too pitted with rust. We make them with different radii, and straight sides. The straight sides mean the scrapers can also be used as cabinet scrapers for furniture making. A very versatile tool, and another great type of recycling!


Sharpening Planes and Chisels.
Every woodworker needs to be able to sharpen their tools. The basic cutting tools (other than saws) are a range of planes and chisels. There's nothing like using a sharp plane as it cuts whisper thin shavings with that delicious rising "FFFFSHTTT" sound - or the feel of a razor sharp plane paring material in the tuning of a joint. Yep, it's all about making your tools sharp. In this workshop we will learn to grind and hone our tools so that they are a dream to use. You can bring your own tools to work on, or we will provide you with some of ours to work on. Maybe you are new to this, or maybe you are a bit rusty and want to sharpen up your skills. Either way, come along for a fun evening!


Monday 26th October
Make a Small Picture Frame.
 We will make these the way they used to be made, using a range of wooden moulding planes to create our profiles. We will use rebate planes to create a double rebate on the back - one for the glass and one for the backing. Not sure what all that means? Come along and find out! This is a very satisfying project.


About hammers and nails.
Are you new to woodwork, or have you never really played around with hammers and nails before? This workshop will explore a range of different hammer types and nail types, so that you get to know the right nail for the job and the right tool to drive it in. What is a Warrington Cross Pein Hammer? and why is it the best type of hammer for kids to use? How do you drive in a 4 inch nail, and what type of hammer will do the best job at this?
Does it sound a bit basic? That's the whole idea! This is really going back to basics. Fantastic! Here is an opportunity to get hammered ... responsibly!

Refurbish an old tool.
Do you have some old tools of your grandad's you'd like to clean up? A flea market bargain you want to breath new life into? Then this is the workshop for you, as we will work through the process of how to clean up and restore a range of old tools. You can bring your own tools to work on, or we can provide you with some.
Learn the principles, techniques and tricks, and any old tool can be brought back to life.

A very satisfying process, for those who value the quality of old tools or their previous owners! 

More info about the coming workshops are yet to come...
See the  "upcoming workshops" link for the 2 page program info flyer. 

These workshops will be run at the Heritage Woodcraft Centre, in Canning Vale, Western Australia.

Friday, September 4, 2015

A game-changer: The Heritage Woodcraft Centre.

Apologies to the regular readers for the lack of posts over the last couple of months. So much to write about, and so little time to bash away at the keyboard!

Over the last few months, I have been gradually setting up a dedicated teaching space.
Located in Canning Vale,  this space is being set up for teaching hand tool woodworking.
For years I have been lugging tonnes of gear around, hiring various venues, often only for a day or two, in order to run public workshops across a wide range of woodworking skills and projects. A huge amount of energy and time has been expended to deliver each workshop series. My home has been so full of tools, wood and too much gear! Imagine the idea of having a place set up for teaching, to remove the need to shift so much stuff back and forth and in and out of my ute and trailer each time. Imagine the possibility of running evening workshops, day time workshops, after school workshops, and one-on-one tuition whenever I choose!       Oh yes.... For me, this is a real game-changer.

The Heritage Woodcraft Centre, as I have named this space, offers a whole new era for me.

The first workshop was run at the Heritage Woodcraft Centre on 14th August, with a group of 7 people carving wooden spoons from seasoned wood. A great way to test out the space. I was very excited, I have to admit! It was a lovely session with a delightful bunch of people.
There's plenty to smile about. Beautiful spoons, eh?
I have run my first session of one-on-one tuition there also. Fantastic.

It is so good to be able to just reach up and grab a tool of choice off the wall. Bliss.

Of course, the place is not fully set up yet. The downstairs area is mostly set up and very useable. It is the upstairs area which still needs lots done to it to have it ready to use. A work in progress.

There are no tools in glass cabinets here. They are all "users".
 The latest workshop "Cut Dovetail Joints by Hand" was delivered to a very small group one evening. Despite the mystique, the secret to dovetails is in the marking out. The execution is in the accurate sawing and chisel work. 

Chopping out the waste between the pins.
The moment of truth is when it all comes together...
A pretty good first time effort by one of the participants.
We have some kids workshops lined up for the coming school holidays, and at the start of the coming term there will be a couple of groups of Home Schoolers coming through to do woodwork with us as well.

Meanwhile, I am loving having and developing a dedicated teaching area. I look forward to running a growing number of  workshops at the Heritage Woodcraft Centre, sharing the Joy of Wood with others - young and old alike.

The Heritage Woodcraft Centre - "Where traditions of the past have a place in the future".

Thursday, June 25, 2015

Demonstrating Green Woodworking at the 2015 Wood Shows - Brisbane & Sydney.

There is a growing interest in Green Woodworking across Australia. This has been unfolding for some years in the USA and the UK, but down here in the Antipodes we always seem to catch on a few years behind our cousins in the Northern Hemisphere. (Except in the uptake of new technologies, where Australia funnily enough has one of the fastest uptakes). However, we are talking here about the uptake of ancient technologies...

I went on my Green Woodworking Odyssey to the USA in 2013, and since then have been sharing the joys of Green Woodworking with many people here in Perth, Western Australia. It is a different smorgasbord of timbers here to that traditionally used in Europe and North America. '
Riving a piece of Black Birch into section for spoon carving, at Drew Langsners,  NC, USA.
My focus has been on using timbers obtained from Perths "Urban Forest",'the trees growing in suburban backyards, parks and gardens. The cover of these trees continues to diminish in the guise of "Urban Infill". Theoretically the urban sprawl is to be slowed down by fitting more dwellings into the existing inner suburbs. Perfectly good houses between 30 and 130 years of age are being smashed up with excavators and carted off to landfill. Too often these houses, along with the big established trees in their backyards, are being replaced with characterless high energy "McMansions", which cover the blocks and too often replace trees and gardens with shade sails and brick paving. Bigger houses, containing often less people. So much for urban infill. Goodbye sustainability.  OK, I shall get off my Soap Box...
Çape Lilac (White Cedar) after the tree loppers have done their thing...
Breaking down the log sections, to make them more manageable.
A nice load of fresh very green timber, from a Cape Lilac tree which was being removed.
Meanwhile, there are so many established trees coming out across Perth. Then there are the prunings from parks and gardens. Lots of this goes through the chipper for mulch and too much of it even goes into landfill. Such a waste of a wonderful resource. Let's better utilise this fantastic timber resource!!
Each tree coming down offers so much material - lets use it rather than just chip it!

Enter the wonders and opportunities of Green Woodworking.

While extolling the delights of this ancient and often pre-industrial techniques, knowledge, tools and skills, I have been spruiking the benefits of people experiencing this range of traditional woodcrafts together. However the tools are often hard to find in Australia. We have to get them in from the Northern Hemisphere. The interest grows, but it is hard for beginners to take up these crafts with difficult access to the gear. So the woodworking supplier Timbecon offered  to take me to the Timber & Working with Wood Shows in Brisbane, Sydney, Melbourne, Canberra and Perth this year, to demonstrate Green Woodworking and to check out the interest across the country.

BRISBANE, QUEENSLAND,  15-17 May 2015.
Hence last month I was at the Brisbane Wood Show, and shortly I will be at the Sydney Wood Show. Brisbane was a fantastic time, and it was great to meet many other spoon carvers, and to hear that spoon carving is growing rapidly in popularity over there, with a growing interest in green wood spoon carving and other aspects of green woodworking. It confirmed my understandings.

While in Brisbane, the following story was produced by QUT Media students. Check it out:


Thanks to the crew from QUT for making this little clip about the Brisbane Wood Show.

I had a great time, and it was exciting to find so much interest in green woodworking amid the crowd at the Brisbane Show, and to meet so many spoon carvers too.


SYDNEY, NEW SOUTH WALES, 12-14 June 2015.

My display at the Sydney Timber & Working With Wood Show evolved a step further, as I started to create a better look with a "Tool Wall".
The start of the evolution of the traditional tool wall. 
The Double Spring Pole Lathe has pride of place. It draws a crowd!
View from the other side - MK III Shaving Horse, chopping block and small bench.
The pics above were taken on the first morning just before the place was opened to the crowd.
Once the doors were opened, it was all flat out, for three days. A great experience.
Shaping a Lund Stool top in the Shaving Horse, using a drawer knife.

Again, there was lots of interest shown in Green Woodworking - the stool bodging and spoon carving I was demonstrating. Good to meet more spoon carvers in the crowd.
Cutting off the protruding leg ends on a small Lund Stool. A block plane with clean them off.

MORE TO COME...

Next up I will be demonstrating Green Woodworking at:
 the Perth Wood Show, 7-9 August,
the Melbourne Timber & Working with Wood Show, 11-13 September,
and the Canberra Timber & Working with Wood Show, 6-8 November.

Thanks to Ross Gobby of Timbecon for creating these fantastic opportunities for me.

Maybe I'll see you at one of the Shows?...  Come and introduce yourself to me.

Saturday, June 6, 2015

The finishing touch to a Staircase Handrail.

A while ago, I finally completed the handrail to the staircase I had written about in several earlier posts I have been meaning to tell the story, so here it is. Lets tell it in pictures:

The handrail awaits its end, which will curve down and around the corner.


The original profile my customer found on the internet in the USA.
I worked out the process on a 5 stage machining process.


Planning the curve. From above it needs to match the radius of Tread #2's curved nosing.
Over its length it needs to drop the height of one Riser.


Laying out the blocks ready to make the laminations, following the details on the horizontal and vertical axes. 

Laminations glued in place, with epoxy resin.

View from above, Cramps doing their job as the glue dries..

Meanwhile, as the glue dried I made up the jig for shaping the curve.

Cramps off, glue dry. Time to shape the block.

Router jig moves back and forth and around the curve to shape the outside surface radius. 

Router jig doing its job beautifully.

Planning the downward curve, by wrapping a piece of hoopiron around from point to point.. 

After the sweeping curve was cut out, it was shaped to square in section with a spokeshave. 

Beginning the routing process. This is the underside.

Power tools can only do so much. Then it is down to good old hand tools.
Here selecting the right radius moulding plane.

The shaping process continues. Getting there...

Planning the joints, top and bottom.

After careful planning and accurate marking out, the bridle joint is cut.
The top joint is progressing well... 
A little more fine tuning and we'll be there.

Top joint now glued and cleaned up.

The finishing curve now polished and ready to finalise the bottom joint.

The lower joint involved a steel bolt, epoxied into the wall and into the end of the handrail. 
Looking good.

Another view of the completed curve, fitted and fixed.

Job done.
 What a satisfying task this was. It was very tricky, too. Of course, it is the really tricky stuff that I love to do, so after making such a beautiful staircase it was a delight to finally make this final finishing touch to the handrail.

I wonder when I'll get to craft another staircase?...
The view up the top flight.

Friday, May 29, 2015

Combining a Shaving Horse and Bowl Carving Bench - My "Mk III" Shaving Horse.

I've got about 8 shaving horses, which I use for running public workshops. I had previously made a batch of shaving horses from packing crate material and other recycled wood, which I did a post about  in July 2014.
Since then I have made another version, like a super-modified saw horse. Let's call it the Mk II - a multifunctional shaving horse and bowl carving horse combo. My favourite horse, it is about 7 feet long, has fixed legs, and a heavy vise built into the tail of the bench. All this limits its portability.
Some of the original shaving horses, English Bodger style on the left and Dumbhead style on the right.

The Mk II Shaving Horse / Carving bench combo. A beautiful beast - with a tail vise!
The Mk II has fixed legs, as it is a supermodified saw horse at it's core. Being all jarrah, it is heavy. It is very versatile in its holding capacity, but there are times when it is too big or tricky to transport. 

I was invited by Timbecon to demonstrate Green Woodworking at the Brisbane "Timber & Working with Wood" Show on 15-17 May 2015. With my gear needing to be transported three thousand kilometres across the continent, I had the need to make a portable and versatile bench fairly quickly to catch the truck. Hence the Mk III was conceived. I was going to Brisbane, as the Mk II was not going to be friendly to ship on a pallet of stuff.

OK, so lets make a shaving horse combo which will be easier to ship. This means its got to have folding or removable legs...

Deciding on the Characteristics of the Mk III.Shaving Horse.
I built my first shaving horse, Mr Smiley, at the legendary Roy Underhill's Woodwright's School in North Carolina in late 2013. This was a classic "dumb-head" style, made entirely by hand from timber we mostly extracted from the forest using cross-cut saw and axe, then fashioned with side axe, adze, shaving horse, draw knife, brace and bit, etc. Amid the stable of horses at Roy's, there were a couple of shaving horses of the English Bodger's style. I particularly liked this style.
Me using Mr Smiley. I left him in Roy Underhill's Woodwright's School stable. 
Mr Smiley, with embedded Australian $2 coins for eyes. 

Horse-cam. Making Mr Smiley's walnut legs on an English Bodger's style shaving horse at Roy's.
Not sure why, but I seem to prefer the English Bodger's style of Shaving Horse. Hence the Mk II and Mk III were both made in this style.

Veritas Tools used to have free Shaving Horse plans available on their website, which I saw before planning the Mk II. One of the things which caught my eye was the use of the back end of the bench/seat for additional holding options. Now there was an idea...


When doing bowl carving, I have been using a very low wide-topped saw horse which has dog holes in its top for gripping he bowl blanks. What if these functions were built into the back end of a shaving horse? When I made the Mk II, I even installed a big vise in the back end of the bench. Awesome.

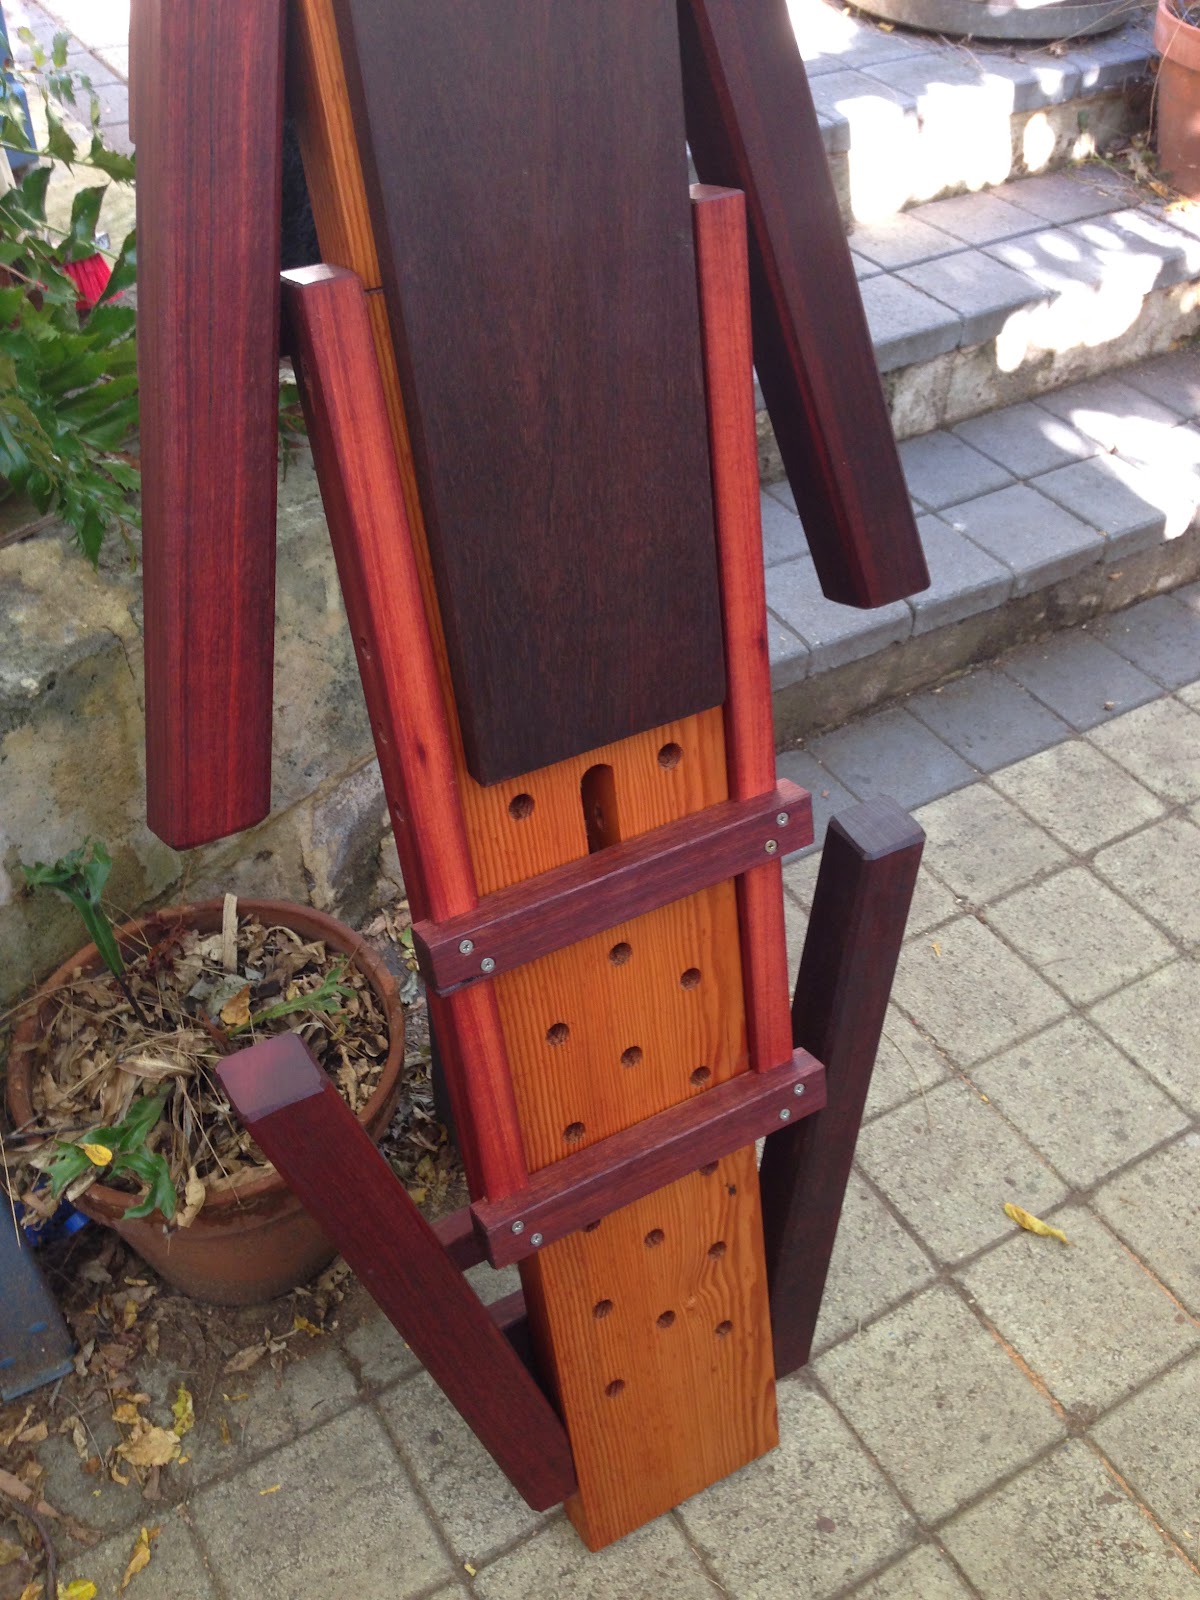
As the Mk III was to be portable, I would make the horse a little shorter than the MkII, put a twin row of dog holes in the bench for bowl carving, and not install the vise (which would add a lot to the weight).

Of course, it would be made from recycled wood. I happened to have a couple of ancient house beams, of Oregon (known outside Australia as Douglas Fir). I docked one of these to length, dressed the stick, and bored dog holes in it. It would be a nice solid bench/seat. Jarrah would be used for the legs, treadle frame, the ramp, and the bench accessories. The legs would fold, and be held flat to the bench when packed flat, using a couple of coach screws. To put up the legs, undo the coach screws, fold the legs out, and wind in the same coach screws in at the base of the struts. Solid as a rock.

The horse/bench folded flat, with all the accessories.

Fold up the legs, and wind in the coach screw at the base of the prop.
The assembled shaving horse. A rotating head on the treadle frame.
Variability with 3 hole positions in the bench, and 3 holes in the treadle frame.
Rotating head, and a sliding support block under the ramp.
Bowl holding on edge. The foot vise is fantastic. You sit behind the end post.
A couple of sets of folding wedges and side blocks.
Great gripping power when adzing out bowls.
Holdfasts go well for holding work too.
Not a bad beast. Solid, reliable, and versatile.
It's also much easier to ship and to pack away than the Mk II.
You still need a small box to hold the bolts, head, and accessories.
The Mk III takes about 5 minutes to assemble, creating a very solid saving horse, bowl carving bench, and general low bench. ... I do miss that tail vise though!

I love the way ideas evolve...
The Mk III was test driven for the first time at the Brisbane Wood Show. A nice horse too.
The film crew from QUT did a story around my demo area.
Here you can see the Mk III in action, ridden by Bernie the Journo.
This pic gives an idea of the size of the horse.

Don't worry, I am already thinking about the possible characteristics of the Mk IV!!
The buzz-"phrase is "Continuous Improvement", isn't it?


Note:  GOOD NEWS!
It is exciting that so many people are interested in Green Woodworking.

As a consequence I have been contacted by an overwhelming number of people seeking more info and measurements for the Mk III Combined Shaving and Bowl Carving Bench.
You will be pleased to learn that I will have detailed plans for sale in the near future, soon after the upcoming launch of my website. Yes! A proper website after all these years! This should be on line before Christmas 2017. There will be other plans available too, and other resources, as I am always cooking up new devices, like my new Tilting Bowl Carving Bench. 

Here are a few pics of the prototype. A couple of tweaks and small changes, and this awesome device will also be up on the new website with plans available for sale.  


The bowl blank is held between the two end stops by a pair of folding wedges.

The Tilting Bowl Carving Bench has 4 angle positions in which your bowl blank can be held.
Flat (0 degrees), 30 degrees, 45 degrees and 60 degrees. 

Work raised in the 60 degree position. It also can be held at 45, 30, and 0 degrees (flat, as per the previous pic)


In the flat position it is also good for paring with your gouges after the adze work.


Remember, Folks, plans for the MkIII Shaving Horse (a combined Shaving Horse and Bowl Carving Bench) and the Tilting Bowl Carving Bench will both be be available soon just after the launch of our new web site - along with other plans, plus lots of free information and inspiration to help you on your green woodworking journey.

I just love to share the joy of traditional woodworking with others.
Wood is a gift from the trees. Honour the trees by making beautiful things from them.

Greg Miller, Perth, Western Australia.  31 October 2017.   

Note: the plans are now available to purchase. They are quite comprehensive, being 9 A3 pages made up of scale drawings and some photos, but you can always print them out in A4 if you wish. Available in pdf format, the cost is AUD$50, which in the current exchange rate is approx US$37. To all those who have been waiting, my sincere apologies. I had hoped the plans would be available on my hew website, but this is not yet operational.

To purchase these plans, go to our Etsy Shop!
Kind regards,
Greg.