Wednesday, December 1, 2010

Woodworking, East Timor Style.

I have just returned from 3 weeks in East Timor. This was my fourth volunteer stint in East Timor in the last 3 years. Once again I was there to assist with building projects, in support the work of the local NGO, Fundasaun Lafaek Diak (The Good Crocodile Foundation).

Whenever I am in East Timor, I like to take pictures of carpenter/joiners at work. There is building going on everywhere, so little carpentry shops are busy making large numbers of windows and doors, as well as other items like furniture and coffins.
A pic of some fairly standard windows and doors in a new house. Vents above are pretty normal.

East Timor was a Portugese colony for 450 years. The older joinery from this era is beautifully made, in the traditional european methodologies and techniques. Wedged mortice and tenon joints, etc.
However, Indonesia invaded in 1975, and from this period until Independence in 2002, the Indonesian way of doing joinery was to become the norm. It still is the way things are mostly made. The joints in windows and doors are primarily stub mortice and tenon, pegged but not draw-bored. Glue is not always used in the joints. Quality tends to be poor by western standards, probably limited by the rudimentary tools and equipment available to tradesmen, and the lack of training and skill development opportunities. The timber used is usually fairly green. Buzzers and thicknessers are very rare. When power is available, timber is ripped to size with home made table saws, docked to length with power saws and dressed to size via the use of power planers.

Table Saws
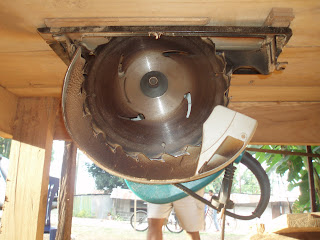
A typical home-made table saw.
A power saw is fixed to the underside of the top, as per the pic below.


Gaspar setting the fence on his table saw.

The table saw in action, ripping door stiles to size.

At a different joinery shop, I found out how the fielded panels are made using a table saw...

These doors have been temporarily put together ready to measure up and make the panels.

A stack of door panels ready to go.

Question: the Profile of the panel... how was it made?

Answer: An angled fence was used to cut the profile around the panel, on all sides. Simple but effective.

These guys make a lot of joinery using the table saw in their workplace.

Dressing timber.
Most timber starts out as big flitches, usually measuring 8" x 4" x 13 feet long. They are broken down sometimes in the timberyards over big old sw benches and sometimes by the carpenter/joiners themselves using their table saws or power saws. Once broken down, then need to be dressed to the final dimensions. However buzzers and thicknessers are a very rare commodity...
Mataeus using a power plane to dress up a stick into a door frame stile. This is the standard method, tool and bench combination used all over East Timor for this task.
This power planer is a monster! It has 6 inch blades. Here used to dress an 8 inch wide board. 

A hard working power planer. The sound of these workhorses is ever present in the background of the cities of Dili and Baucau and hundreds of villages around East Timor at the moment. There is a lot of builiding going on.

Hand Tools.
Power is intermittent and in many places non-existent. All carpenter/joiners have a few hand tools which they use. Good quality tools are very hard to find, and too expensive for most people to afford. Improvised tools are a common sight.

These tools were on the ground where they were being used. Good quality claw hammers are hard to come by. This one has a bent handle just below the head. Then of course there is the gympie, too.
It is common for tradesmen to work on the ground. Let's have a closer look at some of these tools:

 This bevel edged firmer chisel has had the wooden socket handle replaced with a nut and a piece of water pipe.

This small handsaw has been sharpenned many times. There is very little set on the saw teeth, and the teeth are filed at a low angle creating longer teeth than we would use in the West.

 Mateaus is skilled in the use of his small adze. Here he is shaping the horns on the tops and bottoms of the window frames. This will be used to house them into the masonry walls.

A home-made wooden plane. Instead of a wooden wedge the blade and chipbreaker are held in place with a bent piece of mild steel rod. The plane iron has come from a standard No4 or No5 metal plane. These irons are also commonly used as chisels, developing an amazing mushroom end through use!

What every carpenter needs. A bucket of nails. Most nails available are flat heads rather than bullet heads.

This mortice guage I found at a different carpenter/joiner's shop. The spurs are made from nails.

Workshops.
Most workshops are a room and/or an open space under a roof at the front of the house.  Here are a couple of pics of different carpenter/joiner workshops:

Church pews under construction at this workshop in Baucau.

I took this pic in the village of Beculi a couple of years ago. A very typical small workshop.

Gaspar outside his home and workshop.

Another joinery shop, this one outside of Baucau. I bought some nice teak from this establishment.

A bed head under construction.

A tradesman at his bench in his workshop.

Across nations and cultures, there is so much that we woodworkers have in common. I am reminded of this whenever I am in East Timor. I love to visit joinery shops and talk to carpenter/joiners (within the limits of my Tetun language skills!)

While we may use some different tools and different techniques, there is something at the core which is common to us all.  It's a wonderful thing, eh?


Friday, November 26, 2010

Pure poetry in wood!

There is something beautiful and wonderful about a traditional wedged mortice and tennoned door. Proven over centuries, this method of making doors using frame-and-panel construction is a delight to make and to behold. It is very satisfying when it all comes together ... it's like poetry in motion...

I was making a pair of doors for a pantry. Frames of WA Blackbutt and panels of American White Ash.
The door stiles were made, including the cutting of the panel grooves and the mortices in the stiles.The top, bottom and mid rails were cut including the tenons, which were just slightly oversized in thickness.

The photo here shows the haunches of the tenons have been cut. The tenons are then trimmed with either a No78 rebate plane or a No140 rebate block plane until the joint is a nice firm fit. Each joint is individually fitted in this way - 6 joints per door. Once the joints have been individually fitted, the door is put together on a "dry run" to check there is no wind (twist) in the door and that all the shoulders pull up nicely. 

The waste removed from the tenons while cutting the haunches are then used to make the wedges. This pic shows a heap of wedges which have been made.


The panels are given their final sanding as they are individually fitted in their housings. As per classic frame and panel construction methodology, the panels float within the groove which houses them on all four sides when the surrounding frame is assembled. The panels are pre-finished with a coat of polish to seal them, prior to the final assembly.
Here one of the doors is being glued up. The panels are inserted, the top, mid and bottom rails are in place, and the remaining stile is about to be added after the glue is added to the joints. The joints are pulled up with sash cramps, and the wedges are driven into the tapered ends of the mortices. The cramps are then removed.
This pic shows the pair of doors standing up together while the glue in the joints dries. Then the protruding wedges will be cut off flush. The doors are to be a rebated pair. The rebating was then done using the table saw. The remaining task is to create the "bead" down the rebate, a traditional way to make it visually appealing.
 To create the bead, a scratch stock was made up using a scraper which has been ground to the required profile and then mounted in a wooden holding block. In this pic the shaping of the bead has commenced.
Here the bead has been completed. Looks pretty good, eh? Traditionally the bead could also have been cut using a moulding a plane of the appropriate profile. These days it would more commonly be made using an electric router! I reckon there is something far more satisfying in making the scratch stock for the job and then doing it by hand. No noise except for the slicing and cutting of the wood fibres.

Here they are, the completed rebated pair of joinery doors to the pantry under the staircase. Still to get handles and the timber louvres in the opening above, the doors mark the transition point between the American White Ash staircase and the adjacent WA Blackbutt kitchen cabinets. It works well.

Like I said at the start of this post, there is something beautiful and wonderful about a traditional wedged mortice and tennoned door. They are a joy to make. However, thesedays doors like this are more likely to just have dowelled joints or glued spindle moulded joints. The latter relies entirely on the glue, with virtually no mechanical aspect to the joint.

In contrast, the traditional wedged mortice and tenon door can last for centuries due to the nature of the joints. For those of us who do not want to play the "throw away society" game, this proven technique ticks all the right boxes for sustainability and responsible use of resources.

Monday, September 20, 2010

Earth Carers Woodworking Program a Great Success!

A mob of Earth Carers came together in July at Perth City Farm for a 4 day wood working program with a focus on the recycling of timber which was previously destined for land fill.  I normally run these kinds of workshops with a maximum of 12 people, but this time I had around 20 people in each session! This took a fair bit of extra organisation, but Perth City Farm was a great venue where there was plenty of room for  group sizes that big.

The Workshop Program looked like this:

Thursday 22nd July 2010: 5.30-9pm    Make a Kitchen Chopping Board.
A great opportunity to learn and use some basic woodworking skills, particularly using saws, planes and scrapers. Turn some recycled/re-used timber into a beautiful and functional kitchen heirloom!
Friday 23rd July 2010: 5.30-9pm    Design and Make a Wooden Spoon.
Take some recycled/re-used timber, imagine a beautiful and unique spoon, and then create it using a range of traditional woodworking hand tools!
Saturday 24th July: 10am-4pm    Bring new life to old tools.
Here is a chance to bring along some old tools, and learn how to restore them to good condition. Do you have some old tools that belonged to an old family member? Got a bargain from a garage sale? Do the planet a favour - Don’t buy a new cheap tool when a better quality old tool can be brought back to life! We will repair, sharpen and rejuvenate a range of tools including planes, chisels and saws – and then we will use those tools to create some nice stuff out of recycled/re-used timber. Note: This workshop will involve learning the safe use of bench grinders and other electric sharpening equipment.
Sunday 25th July: 10 am- 4pm     Create something beautiful from timber once destined for landfill.
Let your head go! From the array of recycled/re-used timber available (and any you bring with you), create something beautiful, lasting, decorative and/or functional. You will learn to use some of the wide range of traditional woodworking tools which are provided, and take home your wonderful creation. If you are stuck for ideas, Greg will have plenty of suggestions, tips and techniques. Ah… you can hear, feel, and smell the wood as you work it…

Gathering the resource.
The morning of Day One, I drove around in the City of Joondalup filling my ute with a vast array of timber gathered from a vergeside rubbish collection. These "bring out your dead" events are both a bower bird and recyclers' paradise and a terrible reflection of our wasteful consumerism. 

I had also obtained from a furniture importer several cartons of furniture which had falled from a great height from a forklift.While the cabinets inside were damaged, there was plenty of useful timber and fittings in there.
This was further supplimented with some packaging materials which had been picked up from the verge of  the light industrial area near my home, and some other materials I had collected from a renovation site.  Did someone mention bower birds earlier? A treasure trove of timber viewed as waste and previously destined for land fill - now to be put to new uses...

A few pics from the workshops.
The following gallery shows some of the participants in action as they learned to use some basic hand tools and used those tools create their projects. We weren't too fussy about sticking to the script. If you just had another idea in your head of what you wanted to make, then you could just do it!

It was a fun environment to be in, with lots of people busily putting their energy and enthusiasm into their projects. Some found a few muscles they'd forgotten about (hand planing and sawing are good for that), some brushed up on skills they hadn't used for many years, and many gained some new skills and understandings they had never had the opportunity to develop before...  

Thanks to the three Regional Councils (Waste Management Authorities) who jointly funded the event, to the amazingly wonderful Peg Davies for arranging it, to Perth City Farm for providing the great venue, to Tracey and John for assisting me over the weekend, and of course to the Earthcarers who participated with such enthusiasm and passion for a more sustainable and less wasteful world.