
 My existing benches, used by adults and secondary students, are fantastic. They are solid and made for serious woodworking. However they are heavy and need to be assembled. Each bench is held together by 4 bolts. I have made shorter legs sets to enable young children to be able to use them.
 This pic shows the two types of benches I have been using - the 2-vice model and the 4-vice model. Shown here in the process of being set up ready for a program with secondary students.
Meanwhile, I have been researching benches specifically for kids - and the results of my research so far have been disappointing. So I was thinking... how about supermodified saw stools? The important criteria for kids benches me are: easily portable, stackable, stable, able to fit inbetween the wheel arches of my ute, solid enough to not bounce when hammering, room enough for two kids, and two small vices per bench. So after some planning, I made a couple of prototypes - two because I needed to test out the "stackability".
Meanwhile, I have been researching benches specifically for kids - and the results of my research so far have been disappointing. So I was thinking... how about supermodified saw stools? The important criteria for kids benches me are: easily portable, stackable, stable, able to fit inbetween the wheel arches of my ute, solid enough to not bounce when hammering, room enough for two kids, and two small vices per bench. So after some planning, I made a couple of prototypes - two because I needed to test out the "stackability".
 So here is what I came up with in the experiment, and I reckon they are little beauties! A bit like sawstools with a widened top. Note the small shelf under as well.
 Of the two small benches I made, only one has the two vices fitted so far. I need to find more of them!!They are second hand 6 inch vices made for kids. Old ones, of course, sourced from markets and garage sales. Both Australian made, one by Carter and the other by Silex.
Note the little Record #0110 block plane on the bench. It was my first plane, given to me by my father. I still use it regularly in my workshop today. I recently said to my Dad: "I love this little plane, and use it all the time. Do you remember that you gave it to me when I was only nine. It's such a good tool - except it is a real pest to adjust." He laughed and said: "That's probably why I gave it to you!"
These little planes are really good for kids to use, as well as for adults!
How's the stackability factor? I was very pleased the way that worked out. Now that the experiment seems to have worked pretty well, I think I will have to make about 8 more of them! I will also need to make some extensions for the legs so I have some flexibility with the height. I made one of these 2 inches shorter than the other.

 It must be time I started rounding up the timber to make the rest of the batch...
Not sure how I am going to resolve the vice issue. They're not easy to find.
 The two halves of the top are removed here, showing the damaged frame.
 Rebuilding the Table Frame.
 This pic shows one of the side rails with the tenon smashed off it. Rather than replace this whole side rail, I cut out a piece of it and housed in a new piece which would include the missing tenon. The next pic shows the result...


 Here the frame is being re-attached to the two halves of the top. As I was using only slotted traditional wood screws, the good old "Yankee" spiral ratchet screwdriver came in very handy for fixing the table buttons. They still can outclass the cordless drill/driver for screwing in slotted screws. When repairing the frame, I often used a slotted bit in a brace, for much more purchase. Wonderful!
 The extension mechanism's threaded rod needed straightening, so I did that as best I could using a metal vice and an anvil. Much better. The threaded nut is cast brass or bronze, with the manufacturer's inscription: J & A, F'cray, V. I did a bit of googling for info about "J&A" in Footscray Victoria, but I have not found any info at all. Does anyone out there know anything about this foundry or manufacturer? It might help to date the table... At this stage I am guessing that the table was made in Perth sometime between 1900 and the 1920's.
 We had a very nasty storm the other day in Perth. At least $100 million in damages across the city. At the time we had moved the table into our house from the workshop area, to make sure it would be safe. The pic above shows the table where I left it in our living area - completed and waiting to be returned to the customer. The rags under the feet are to protect the jarrah floor from drag marks and to reduce friction when the table is extended and wound back in again.
 The measuring, marking and preparation of the angled components required good accuracy.


 The plywood bases were glued to the 50mm HD foam, and then the surplus foam trimmed off.
 Students next helped each other apply the 12mm peeled foam to their seats.
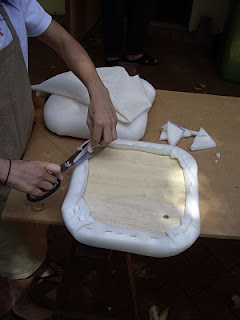


 A great job done by the students. Well done, Gang!!

