Friday, May 6, 2011

External Stairs from Recycled Timber.

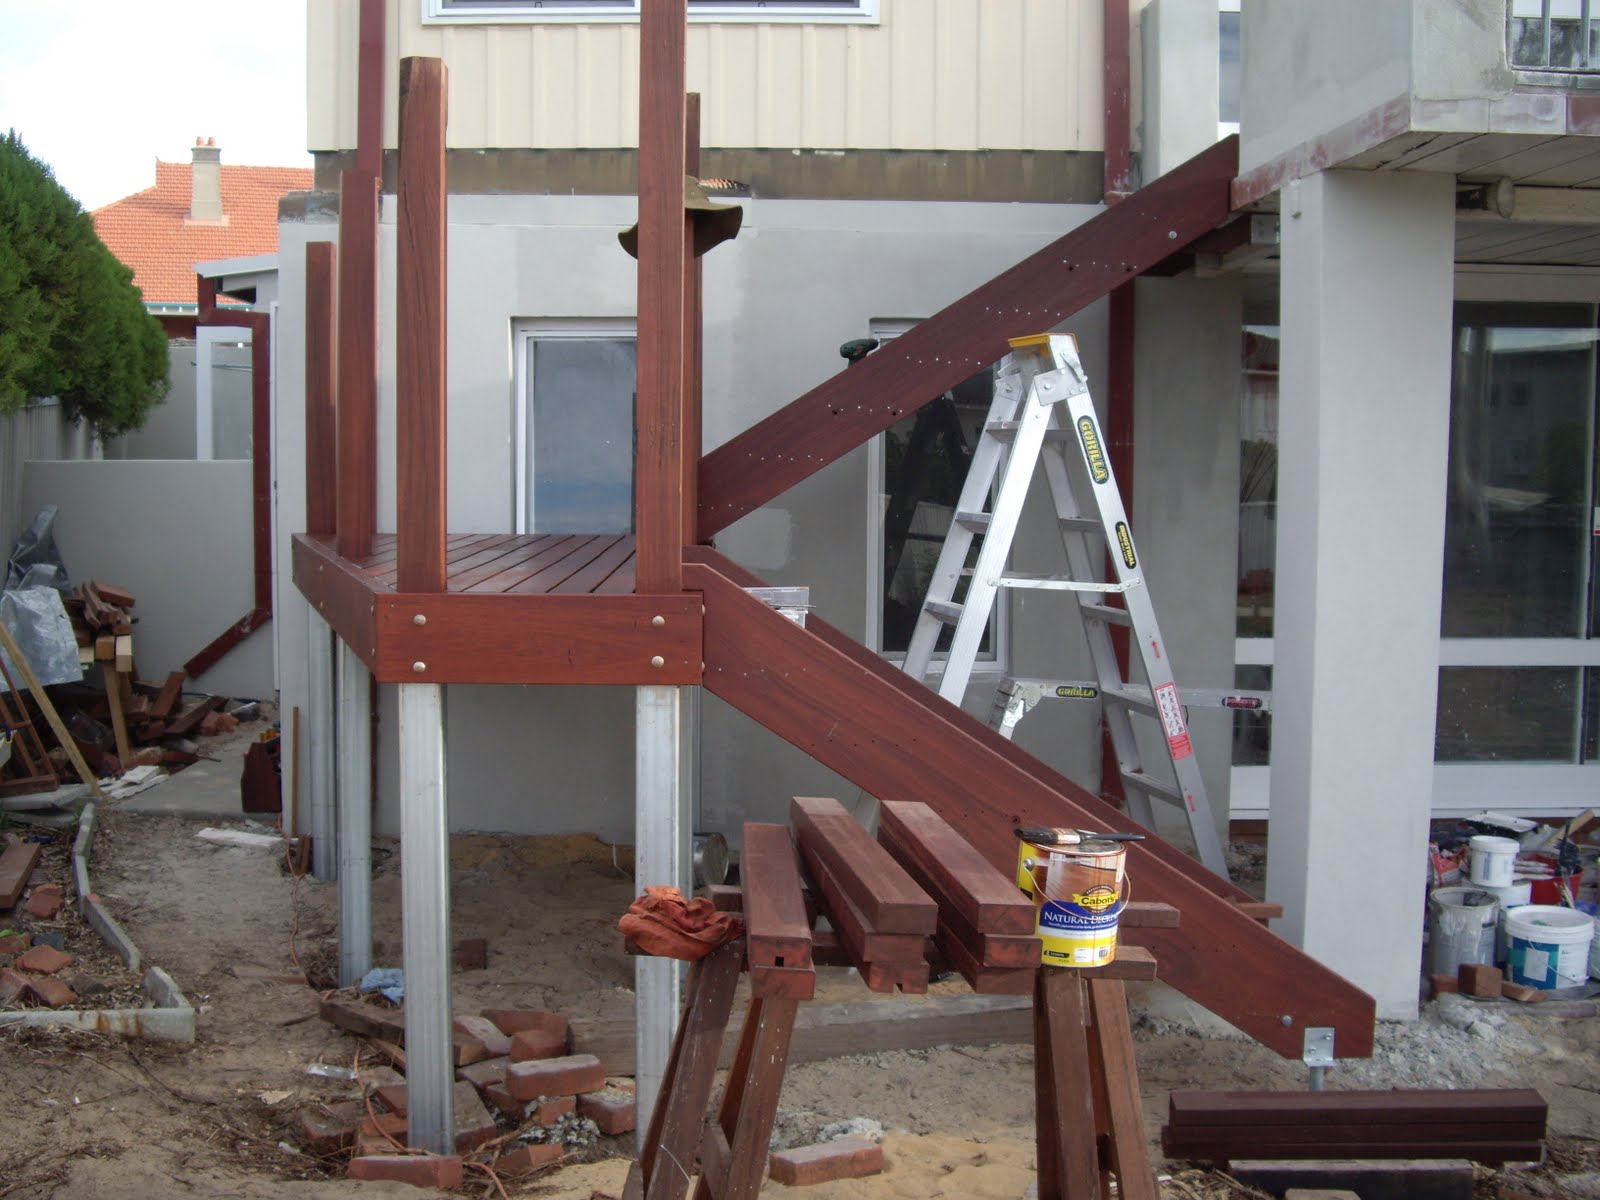
Aahh!... another set of stairs...   Amid all the different types of woodwork I do, what I enjoy about building stairs is the brain challenge they provide - particularly in the planning and setting out phase. One of my latest jobs has been to build a set of external stairs for a client. The task was to plan and build a set of stairs which would fit into a particular space on an existing building which was undergoing significant renovations. The stairs would comply with the Building Code of Australia, and made primarily from recycled jarrah.
That's the space available to build the stairs ... in front of the red brick wall.
View from the top looking down. The structure would have to keep 1.5m off the fence line.

Planning the job.
Having taken measurements on site, it was then down to the planning stage - which always involves doing scale drawings on my trusty drawing board. I have never got into CAD drawing on the computer. I still like the old "Technical Drawing" techniques using a T-Square and pencils on a drawing board.
The first place to start with planning a set of stairs is to know the total Rise - the distance from the top floor level to the bottom ground level. In this case, allowing for the new ground level which will be built up to the same height of the underside of the back door sill, the total rise will be 2.5m. This divides readily into 15 steps, each with a rise of 166.67 mm. That rise fits within ergonomic convention. The next thing to determine is the "Going" - the horizontal depth of each step from nosing to nosing. The accepted rule is: (2 x Rise) + Going = 585 (or up to 625mm.)   I decided to have a Going of 260mm, which fits within the range OK.
With the Total Rise, the number of steps, the Rise and Going all established, the length of the flights can be determined. Drawing this to scale would give me the angle of the stringers and help me to visualise how it will fit within the space. A landing will need to be included, as this divides and separates it into two flights going in opposite directions. There also had to be the required minimum standard headroom where the lower flight approached the ground while coming under the top balcony.
After a lot of drawing, calculating, brain-waves coming in the dead of night, meetings with the client and 3 drawing versions later, I believed we had hit on the answer of how to make it fit in the space available and my client was happy too.

Gathering the timber and starting the construction. 
The treads would be easy. Three sticks of timber dressed to 90 x 45 (and nearly 900 long), with gaps of 8mm between, would give a stair tread of  286. With a 260mm Going, there would be a 26mm overhang of the nosing over the back of the tread below. Nice. These sticks would be ex 4"x2" jarrah. In domestic buildings these were normally used for floor joists, rafters and often ceiling joists. Much of the 4"x2"s I had in my stocks came from a house built in 1930. After seasoning for 80 years, this stuff is dry!

4" x2" material cleaned up and ready to be machined to size.
  As much as possible, gum veins were avoided in the selection process, the timber docked just overlength, de-nailed, scanned with a metal detector, scrubbed down with a wire brush, straightened and squared over the buzzer, and machined to the required 90 x 45 through the thicknesser. Three of these per stair tread.

The stringers were a problem. After searching round the salvage yards, I would be unable to find the jarrah suitable to make the stringers. (Stringers have the treads housed into them and make up the sides of the stairs). So I had to buy the material new. The required 10" x 2" jarrah I purchased was pre-dressed and what they call prime grade. Scary stuff really, as I had to pay over $650 for the 4 sticks I would need in order to make the 2 pairs of stringers! Ouch!

The decking would be easy. By ripping 4"x2" jarrah sticks down the middle, the two halves are each machined to 90 x 20mm.  A number of these I was able to make at 3.2m long, enough to go the full length of the decking. The arrisses were shot off with a block plane, and the decking boards pre-coated with oil.

A 4"x2" piece of jarrah ripped down the middle and opened out. Fantastic colours and interesting nail holes coming in from the edges. It will be machined into beautiful recycled jarrah decking. 
  The top plate or apron of the landing would be ex 8"x2" jarrah, dressed to about 45 x 190mm, and the landing floor joists were ex 6"x2" jarrah from salvage. The landing would be supported by 6 galvanised steel legs set in concrete, and the jarrah posts above would be machined to 100x100mm. These took a lot of hunting down - from salvage yards and other sources. I was fortunate to get 4 posts from an old 6"x6" jarrah power pole! The 120 x45mm handrails would also be obtained from the 6"x2"s.
All nails and other fixings used would be Hot Dipped Galvanised. The finish to be applied to the finished timber would be Cabot's Natural Decking Oil.

The construction process started with making a set-out board of the stringers, giving me the angles and dimensions of the tricky ends of the stringers. This info was then transfered on to the stringer material and the two pairs of stringers were then made at my workshop and pre-finished with a couple of coats of oil.
The Stringers were laid out in pairs, marked out, and the tread housings cut.
The treads were then all made and cut to size ready. The two flights would be too heavy to lift if assembled, so I decided to do the assembly on site. With the flight components made and the landing materials organised, I moved to the site to build the landing. When the setting out on site was completed, the holes were dug for the steel posts. Using lots of big cramps and big sticks of timber, all the prepared posts were suspended in their holes, plumbed and held in the right positions. My son Ben was giving me a hand that day, and it was a big day! Ben operated the electric cement mixer and we did the concreting job. Six posts, rock solid. The following day I would do the concreting of the final two, supporting the base of the lower flight.

One of the steel posts suspended and cramped in position in its hole, awaiting the concrete.

The top stringers were also suspended/supported  in place to ensure the landing position was correct. While working from the drawings, sometimes it is good to check "in the flesh". 

The lower flight stringers fixed in place, with metal spiggots at the base set in concrete. The concrete will later all be buried under sand and brick paving.
 Completing the landing.
With the steel posts set in concrete and the landing apron or top plate being bolted to the steel as the jarrah posts were inserted into them, the floor joists were then added. These in place, the decking was then nailed down.

Decking nailed down and completed. That's a cake of soap on the stair tread - to lubricate the 4" galvanised nails used in landing construction.

Top flight treads fitted in place. Handrails and balustrading still to be added.

Landing done. Stringers in place, most treads installed. Time to cut posts to height and add balustrading. 
The jarrah posts were installed "over-long", so that they could be cut to a finish height after the transitions had been worked out - ie. where the flight handrails meet the landing handrails at the newel posts. These transitions would be calculated and modified ensuring a smooth transition as well as compliance with the minimum requirements under the Building Code of Australia (except for the lack of infill under the balastrading, which someone else would be doing.) While the scale drawings would give a good indication, the measuring and marking of the real thing in place would be most accurate. 

Making and Fitting the Handrails.
With the landing decking completed, it was time to get on with the handrails. The customer hadn't quite decided what balustrading to have - but will probably have stainless steel horizontal wires. That's someone else's job. Other than the posts below, I don't do steel. Out of interest, to comply with the BCA, balustrading must not be able to have a 125mm (5") sphere pass through any part of it. Horizontal handraisl must be a minimum of 1000mm high, etc. At the commencement of the job we had agreed I would only to install the newel posts and handrails, so that was what I was doing. I had made the handrails from ex 6"x2" jarrah ceiling joists. Nice straight sticks too, which I had machined into 120 x45mm. This gives a 10mm overhang on each side of the 100mm posts.
One of the newel posts at the transition from landing to top flight. That's the tenon on top awaiting the handrail which will be housed onto it.
The posts were cut to length with tenons on top, and the corresponding housings cut in the underside of the the hand rails. The interesting part was the angled corners of the landing handrails. In one of these brainwaves I have in the dead of night, I resolved how to do the joint... a beautiful mortice and tenon joint. In fact, a stub tenon with a haunched tenon either side of it. And it worked a treat!. All this was done on site. My trusty tenon saw cut the tenons on top of the all the posts, and the tenons on the ends of the handrail returns on the landing. Good to see a saw live up to it's name. I was going to take photos of the joint components before I glued it up and fitted it to the posts ... but once again I was so hooked into what I was doing that I forgot and just assembled and glued the joint. Sorry about that...  Love that glue - Titebond III.

Nice mortice and tenon joint! 27 degrees off 90. There's a long haunch and a stub tenon in there.

That's the other corner. Another very tidy joint, the same as the other end.
Anyway, I was very pleased. The haunch mortice was cut with a slot cutter in the router, and the deeper mortice for the stub tenon was chopped by hand. The tenons were all cut by hand. It was a winner.

Job completed.
When I had completed construction, I brushed the whole structure down and gave it one more final coat of the oil finish. It looked like a million dollars. I then gathered up my tools, cleaned up the site, took a few pics, and drove away. Satisfaction is such a nice warm feeling. Here's a few pics:


View from the top looking down and across.

View down the top flight.

View of the bottom flight from above.

The ground level is yet to be built up and brick paved. The height of the bottom step allows for this. 

This pic puts the stairway in context. Soon there will be a swimming pool in the foreground!

View from the ground level back door.The galvanised steel legs will be painted a colour similar to the jarrah. 
On the joys of jarrah.
Jarrah is such a beautiful timber, and I am lucky that I have been working with it all my life. Jarrah (Eucalyptus marginata) is only found naturally in the southwest of western Australia. I understand there is only about 6% of the original forest remaining. Such a significant timber since European colonisation began here 1829. Until a couple of decades ago, in Western Australia just about every part of a timber framed house from the stumps to the ridge piece were all made from jarrah. It is a is very strong structural timber, very durable in the weather and in the ground, and a very high quality furniture material. Beautiful grain and rich reddish brown colours. The all round dream timber. Yep, I love the stuff.

Much of this stairway was made from recycled jarrah. This material had come from an assortment of buildings and other uses, much of it from a house which was built 80 years ago. All over it, there are the echoes of the former lives of this timber. Rows of nail holes along a tread nosing, testifying to a past life as a floor joist, with the nail holes even showing the width of the old floorboards which were once nailed to it. A couple of old checks in the side of a newel post, speaking of a former life as a verandah post on a building. The residual jaw marks from an old pair of floor cramps, telling of the time that piece of stair tread was once a floor joist. Other pieces were once rafters or ceiling joists, and the spacing of nail holes can often speak of these former lives. It is the echoes of the former lives of this timber which is so fascinating in something made from recycled timber. It is also why I don't fill the old nail holes. Let them speak.

Working with pre-worked timber also gets me thinking about the tradesmen who worked this timber when it was green. That's how these building were always constructed. Green jarrah, while heavier, is easier to work with - and easier to nail. No need to pre-drill the nail holes like I had to! These guys built the houses only with hand tools. There were no power tools. Most of the saw mills were steam driven, and life was different. Simpler times, moving at a slower pace, when tradesmen took pride in their tools and their work. It wasn't just about money and having a job - it was a vocation. An identity. A way of life.

I tip my hat to those guys, and hope I did them proud in the way I re-used the timber they first worked.

Sunday, May 1, 2011

Another Earth Carers Woodworking Program.

Over the weekend of 30 April - 1 May, I had the pleasure of working with another group of Earth Carers. This event was funded by the East Metropolitan Regional Council. The EMRC is the regional local government body working on behalf of six member Councils located in Perth's eastern suburbs. Waste Management is one of the EMRC's key responsibilities. The Earth Carers have completed a wonderful free course in waste minimisation and management. More info available at  http://www.emrc.org.au/earth-carers.html .

Passionate about recycling, reducing waste, and reducing consumption, these EMRC Earth Carers had the opportunity to learn about trees and timber, and acquire some basic woodworking skills. The timber we used was primarily all timber removed from the land fill stream: packaging material, industrial waste, material rescued from kerbside collections, and timber salvaged from skip bins. What a treasure trove of resources! It was an amazing array of timbers from all over the world.

Day 1: Such a wonderful array mostly of kitchen chopping boards, made with beautiful timbers from all over the planet.

The concept is simple : It's one thing to see discarded timber as a valuable resource - it's another thing to know what to do with it. Hence the idea of empowering people with some basic skills to be able to utilise that wonderful timber resource.


Transforming a rough piece of packaging timber into a beautiful kitchen chopping board. This piece of American White Oak took a lot of planing! Nice pile of shavings!    
 Day One we made kitchen chopping boards, and on day two we carved wooden spoons. The main skills learned on the first day of the weekend program were hand sawing and hand planing - the basic stuff of woodworking hand skills. On Day Two we made wooden spoons and spatulas. The main skills were timber selection, and the use of a much wider variety of hand tools, including of gouges and mallets, curved scrapers and spokeshaves, coping saws and english bowsaws, rasps and more. Both of these activities help develop a real appreciation for timber and the traditional tools used to work and shape it.

Hollowing out the bowl in the spoon blank with a gouge and mallet.
Paring the spoon bowl smooth with a gouge.

Using a curved scraper to complete the hollowing out of the spoon's bowl. 


Cutting the curved outline to shape with an english bowsaw.

The wooden spoon activity is one of my favourites, and is always very popular. It is a fantastic way to learn to work with the grain rather than against it,  to get to feel the wood as you work it. The funny thing is that there is often a difference between the planned spoon and the finished item. A bit of wild sawing here, an over-zealous bit of spokeshaving there... and next thing you know the handle now has a curve, or the bowl has taken on a different shape! At the finish there are no two spoons the same - and a wonderful array of  individually handcrafted beautiful spoons!


Day 2: A beautiful range of wooden spoons and spatulas.
 It was a great weekend. Lots of fun, a happy and enjoyable bunch of Earth Carers, and lots of energy and enthusiasm. For some it was the first time they'd done anything like this... for others it was the second time and a chance to build on their skills. Either way these bods will never look at a discarded piece of timber the same way again.
Congratulations to the gang for a job well done!

Wednesday, April 20, 2011

More wonderful Woodworking by Earth Carers.

I recently had the pleasure of running another 4 day woodworking program for graduates of the Earth Carer's Course, funded by the Mindarie Regional Council. The MRC is one of the Waste Management Authorities responsible for waste management across 7 of the local government areas in the Perth Metropolitan area. The Earth Carer's Course produces people who are wised up about recycling and waste, and passionate about reducing our consumption and waste of resources. More info about the course here: http://www.mrc.wa.gov.au/Community/Earth-Carers.aspx

Held at Earthwise in Subiaco again, we offered a range of workshops - basic woodworking for those who had not done any before, and (for the first time) workshops at an "intermediate" level, for those who were hungry to learn more skills. Once again, the focus was on recycling wood which had been previously destined for land fill, and in equipping people to do that recycling by learning basic woodworking hand skills and techniques.

This was the program: 

Thursday evening: 6:00 – 8:30pm. Introductory: Make a kitchen chopping board. Learn the basics of using a hand plane and hand saw while you create a beautiful wooden chopping board from salvaged timber.

Friday evening: 6:00 – 8:30pm. Introductory: Carve a wooden spoon. Learn to work in harmony with a piece of salvaged wood in order to create a wonderful and functional wooden spoon from it. Along the way you will enjoy learning to use a range of traditional hand tools. A great way to learn to “read” a piece of wood and work with the grain rather than against it.

Saturday all day: 8:00am – 4:00pm. Intermediate: Make a handy pair of saw stools. An essential companion to the hand saw, saw stools also make handy household aids for painting, for extra seating at BBQs, portable workbenches, and so much more. While making this traditional and sturdy pair of stools, you will learn the important skills of marking out, cutting and fitting housing joints, using a chisel, using glue and screws, and so much more. A great way to expand your woodworking experience.

Saturday evening: 6:00 – 8:30pm. Intermediate: Make a pair of book ends. Here is a great opportunity to discover that woodworking classic - the dove tail joint. It will be hard to wipe the smile from your face when you have created this traditional joint by hand. It’s all about careful marking out, careful sawing, and good chisel work. Despite the mystique we give this joint these days, it used to be a basic and common jointing method. Discover this joint and add it to your repertoire!

Sunday all day: 8:00am – 4:00pm. Intermediate: Make a small garden bench seat. Using salvaged timber we will use some basic jointing techniques and fasteners to create a simple bench seat for your garden. Another great opportunity to apply your sawing skills, you will also learn those important marking and measuring skills to cut the joints, use a chisel, and use bolts and other fasteners.

As is too often the case, I was so busy teaching that I hardly took any photos of the workshops in action. However, here a few pics some of the workshops in action:

By creating a full scale drawing of the bench seat ends on a set out board, the dimensions and angles can be taken off with a rule and a sliding bevel and transfered onto the pieces of timber for the legs. 

For some it was the first time they had used a drill and used nuts and bolts. Making an end for the bench seats. Nice cross-halving housing joint!

Fixing the legs and braces to a sawstool. Cut and fit the housings, then glue and screw. A whole new experience for some. Photo by Rebecca.

Plenty of marking out and doing the saw cuts for making the cross-halving housing joints.
 
Chopping the housing joints. A good chance to learn some chisel skills.

Both the sawstool and bench seat projects provided great opportunities to develop sawing skills with a tenon saw.

Applying Orange Oil to a completed.Silky Oak kitchen chopping board. Timber once part of a discarded bookcase.

Special thanks to the legendary John Isherwood for his assistance through the workshops.  Shown here in action.

Some of the participants with the garden bench seats they have made. Also on display one of the pairs of saw stools. The seat tops were pieces of wandoo floorboards. The participants first had to remove the tongues and grooves with a jack plane. 
Certainly it was a very successful program once again. It was great to offer a wide range of new skills to people in the "intermediate" groups. Thanks to the Mindarie Regional Council for having the foresight to offer these workshops to Earth Carers - and the the Earth Carers for their passion and enthusiasm.

We must significantly reduce the amount of wood which ends up in landfill. Recognising the value and potential of this important resource is part of the solution. People learning the practical skills of how to recycle and re-use this wonderful resource is another key part of the solution. I reckon we did well on both fronts...

Tuesday, April 19, 2011

Wonderful West Australian Blackbutt.

One of my favourite timbers to work with would have to be Blackbutt. Western Australian Blackbutt, to be precise - Eucalyptus patens. A very hard, dense and light coloured timber, the tree grows naturally in the wetter areas of the jarrah forest in the south west of Western Australia. Around the edges of swamps and watercourses, and in low lying areas. A tiny proportion of the original forest now remains. With most of these remnant trees now locked up in National Parks and stream reserves, it is not as readily available as it used to be. Fortunately, my mate Terry at Heritage Sawmillers http://www.wahardwoods.com.au/ can still get hold of a few logs every now and then. That is where I obtain most of my Blackbutt timber.

For those who like the technical stuff, Blackbutt is a hard wood. The Air Dried Density (at 12% moisture content) for WA Blackbutt is 930kg/m3, compared with 530kg/m3 for Douglas Fir, and 700kg/m3 for European Oak. (Source:  Wood in Australia, Keith Bootle, 1983, published by McGraw Hill.)
Yep, it's hard and dense!

A blackbutt kitchen.
I don't make kitchen cabinets any more as a rule, but I did build one recently over a period of months for Tim and Bec. You know, it's family. Long ago, I did a lot of kitchens for customers, but my construction methods have always been different to the modern cabinetmaking industry norm. While the insides (shelves, backs and dividers) might be the normal white melamine faced MDF board, my kitchen cabinets are different in that I
A shot of the cabinets under construction, showing the internal framing.
always use solid timber framing.

It is a method I learned from Harry Kornoff when I worked for him back in the early 1980's. Thanks, Harry! These are kitchens built to last, with not just timber framing but solid timber doors and panelling too. While I have done plenty of solid timber benchtops on these kitchens, Tim and Bec were having one of those black granite-look tops.   


A few pics of Tim and Bec's kitchen:
 
The black granite tops and the Blackbutt doors and panelling go together very nicely.

The jarrah floors also look good with the Blackbutt cabinets.

That's an appliance cupboard in the corner on the benchtop.

Nice looking kitchen, eh?
One of the things I love about WA Blackbutt is the variation in the colours in what is normally a pretty pale yellowish brown timber - but the timber itself has other interesting properties which I appreciate. The extractives in it (the naturallly occurring chemical compounds which give any timber's heartwood it's colours and other characteristics) mean that it has a natural waxy-ness about it. I know from experience that Blackbutt shavings on a concrete floor make for a dangerously slippery surface. Stacks of freshly machined Blackbutt pieces are prone to sliding off each other. However this natural waxy-ness combines with the high density of the timber to make WA Blackbutt absolutely wonderful to carve. It is one of my favourite timbers to use for carving wooden spoons. That waxy-ness also makes for great drawer sides and drawer slides. I have also used it for making extension table mechanisms. While some people claim the natural waxy-ness prevents good glue adhesion in joints, this has not been my experience over many years of playing with this wonderful wood.

A few more pics featuring WA Blackbutt:

WA Blackbutt spoons I made some years ago for a customer. Sorry about the grainy picture. 

WA Blackbutt Table, titled "Four Foot Long". (Circa 1990).


WA Blackbutt panel (with carved detail shown) in the front of a Font I made for the Leeuwin Barracks Chapel, 2009. The Altar and Lecturn are also made from Jarrah with the feature Blackbutt front panel.


WA Blackbutt drawer sides in this Hall Table (2007) contrast nicely with the jarrah, highlighting the dovetails.

... By the way, did I mention how much I love working with WA Blackbutt?

Thursday, April 14, 2011

Recycling packaging timber into kitchen utensils.

Timber is being used to freight goods all over the world every day. As packing cases, crates, dunnage, and other forms of packaging. Viewed as low value timber, some if it is just that - but some of it is absolutely beautiful stuff just waiting to be utilsed and given a higher value life. When I am teaching woodworking hand skills, one of the first projects we do is to make kitchen chopping boards, often from this material. I do a lot of work with recycled and salvaged timber. Part of what I also hope to do is to help people understand our incredible wastage as we dump so much timber into landfill. Nice wide pieces of packing crates offer wonderful opportunities to use sawing and planingskill to create beautiful and functional items. Why not?

Check out the pic of this treasure trove of timber at a Waste Management Facility. A wood dump, predoninantly comprising of packaging and dunnage. For a person who is keen on recycling timber, this pile contains exciting possibilities and great potential. I pulled some aweom wood out of this pile which I recycled, wood which had come from all over the planet. Some of it was known to me, and much of it is of species unknown to me.Someone once asked how we know that the packaging timber has not been treated with nasty chemicals, as we are using it for food purposes in it's new life. It is a perfectly valid question. So for your interest I thought I would explain how I usually tackle this matter in relation to the safe recycling of packing materials. There are international agreements pertaining to the prevention of the spread of nasty stuff around the planet. So I usually look for the appropriate symbol which is often found somewhere on the exterior of the packaging. 
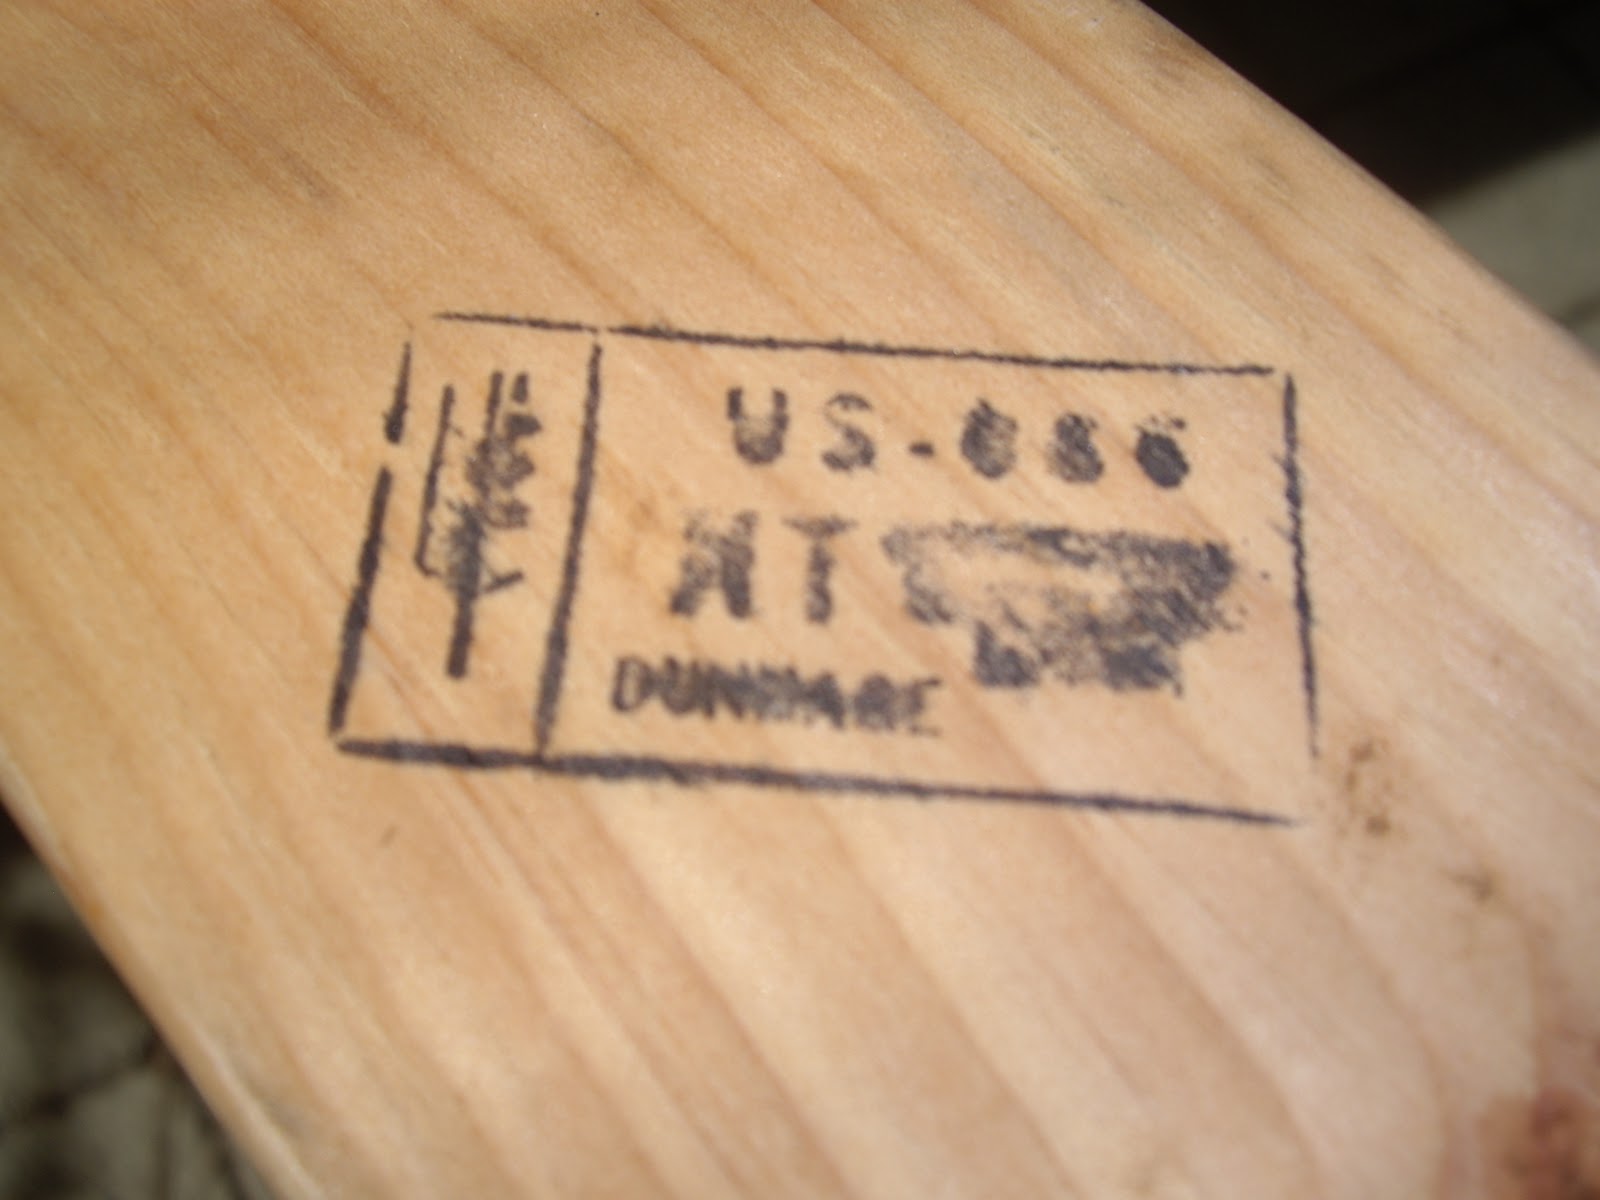
This symbol is the ISPM 15 mark. Some of this information below I obtained from the Australian Government's Quarantine and Inspection Service.

ISPM 15 is the 'International Standards for Phytosanitary Measures Publication No. 15 (2009): Regulation of Wood Packaging Material in International Trade'.

ISPM 15 was developed to address the global spread of timber pests by regulating the movement of timber packaging and dunnage in international trade. ISPM 15 describes phytosanitary measures to reduce the risk of introduction and/or spread of quarantine pests associated with solid timber packaging material (includes dunnage).

The United Nations Food & Agriculture Organisation (FAO) addresses plant quarantine through the International Plant Protection Convention (IPPC). The IPPC is an international treaty administered by the FAO and implemented through the cooperation of member governments. Australia is a member or 'contracting party' to the treaty.

Timber packaging and dunnage bearing the ISPM 15 mark is certified as having been subjected to an ISPM 15 approved treatment.

An ISPM 15 compliant mark looks like this:


What the IPPC certification symbol means:
  • XX: represents the two letter ISO country code (e.g. AU for Australia, US for United States, NZ for New Zealand, GB for United Kingdom).
  • 000: represents the unique certification number issued by AQIS to the treatment provider or wood packaging manufacturer. Inclusion of this certification number ensures that the wood packaging material can be traced back to the treatment provider and/or manufacturer.
  • YY: is the treatment abbreviation where:
    • - HT is the code for heat treatment to a minimum of 56o C for a minimum of 30 minutes
    • - MB is the code for methyl bromide fumigation.
The letters 'DB' represent debarking. DB may be added to the abbreviation of the ISPM 15 approved treatment. For example, 'HT DB' represents heat treatment and debarking and 'MB DB' represents methyl bromide fumigation and debarking.

More of this info can be obtained from the following website:
http://www.daff.gov.au/aqis/import/timber/ispm-15-faq#What

Methyl Bromide is worrying stuff. Methyl bromide is a broad spectrum fumigant toxic to fungi and other micro-organisms. I am told that all garlic imported into Australia is required by the Australian Department of Agriculture to be fumigated with Methyl Bromide! Meanwhile, effective 18th March 2010, the European Union have banned the use of Methyl Bromide as a container fumigant. So Australian Quarantine (AQIS) will apparently no longer recognise certificates of fumigation from the EU where Methyl Bromide treatment has been used.
Methyl bromide is the most potent ozone depleting substance still in use today. In 1991 it was identified internationally as a chemical which contributes to the depletion of the ozone layer. Accordingly, the Australian manufacture and importation of methyl bromide was to have been phased out completely by 1 January 2005. However, the uses of methyl bromide in quarantine pre-shipment (QPS) and as a chemical feedstock are currently exempt from the phase-out. Hence it continues to be used in many places around the world as a fumigation method for timber packaging and dunnage, and is an approved treatement under ISPM 15. (except in the EU now?)


If the timber from packaging has been heat treated, then I generally reckon it is OK for recycling as kitchen chopping boards, cooking spatulas, chop sticks, bowls, and wooden spoons.. If it has been treated with methyl bromide, then I will not use it for food purposes. However I will use it for furniture and other wooden items. Incidentally, man-made wood derived materials, like plywoods, particle boards, MDF etc (which were bonded together using heat, pressure and glues) are not required to bear an ISPM 15 mark. The manufacturing process kills off any fungicides, insects or other nasties which may have been harboured in the raw materials prior to manufacture.

So next time you are pulling apart a pallet or crate to utilise that wonderful resource of timber or sheet material, keep an eye out for the ISPM mark. Now you will know what it means, and know a bit more of it's story. I hope that this info has been helpful to those who wonder about recycled wood.


Most of the chopping boards made by this group were made from packaging.

Sometimes a real gem turns up in the packaging pile. I am no expert on North American timbers, but I believe the stick in the picture below is American White Oak. The ISBM 15 Compliance Mark stamped on it tells me me it's from the USA and it was Heat Treated. Delicious.

What a score! A piece of American White Oak, 8"x1" x 6' long. (200 x 38 x 1850mm)
So next time you see a pallet or crate in the skip bin or on the rubbish tip, have a close look at it. There is a chance you may need to liberate it into it's next life as a kitchen utensil... If it is an exotic piece of timber, look for the ISPM 15 Compliance Mark. If you can find one, it offers both useful information and intrigue!