Tuesday, March 30, 2010

In search of the ideal kids' workbench.

As I prepare to commence running woodworking activities with kids in Primary Schools, I have been exploring the best type of benches to make and to use for the programs.

My existing benches, used by adults and secondary students, are fantastic. They are solid and made for serious woodworking. However they are heavy and need to be assembled. Each bench is held together by 4 bolts. I have made shorter legs sets to enable young children to be able to use them.

This pic shows the two types of benches I have been using - the 2-vice model and the 4-vice model. Shown here in the process of being set up ready for a program with secondary students.

Meanwhile, I have been researching benches specifically for kids - and the results of my research so far have been disappointing. So I was thinking... how about supermodified saw stools? The important criteria for kids benches me are: easily portable, stackable, stable, able to fit inbetween the wheel arches of my ute, solid enough to not bounce when hammering, room enough for two kids, and two small vices per bench. So after some planning, I made a couple of prototypes - two because I needed to test out the "stackability".

So here is what I came up with in the experiment, and I reckon they are little beauties! A bit like sawstools with a widened top. Note the small shelf under as well.

Of the two small benches I made, only one has the two vices fitted so far. I need to find more of them!!They are second hand 6 inch vices made for kids. Old ones, of course, sourced from markets and garage sales. Both Australian made, one by Carter and the other by Silex.

Note the little Record #0110 block plane on the bench. It was my first plane, given to me by my father. I still use it regularly in my workshop today. I recently said to my Dad: "I love this little plane, and use it all the time. Do you remember that you gave it to me when I was only nine. It's such a good tool - except it is a real pest to adjust." He laughed and said: "That's probably why I gave it to you!"
These little planes are really good for kids to use, as well as for adults!
How's the stackability factor? I was very pleased the way that worked out. Now that the experiment seems to have worked pretty well, I think I will have to make about 8 more of them! I will also need to make some extensions for the legs so I have some flexibility with the height. I made one of these 2 inches shorter than the other.
It must be time I started rounding up the timber to make the rest of the batch...
Not sure how I am going to resolve the vice issue. They're not easy to find.

Monday, March 15, 2010

New Life for a Beautiful Old Table.

The job I have just complete was to re-build an old table. This beautiful oval extending table is a family heirloom - but has had a hard life too. The owner approached me, keen to have the table repaired and the missing extension leaf replaced. So I picked up the table from their home and have begun the rebuilding task.

The two halves of the top are removed here, showing the damaged frame.

The damage was extensive - more than I realised when I put the table in the back of my ute. It was when I started to investigate the table closely in the workshop that the true situation became evident. See the pic above! A jarrah table with cabriole legs, the extending mechanism is of the winding type with a crank handle. The end rail which houses the winding "socket" was smashed into 4 pieces. Of the 8 primary joints in the frame, 7 of these were broken. In most of these, the tenons were broken off inside the legs.

Rebuilding the Table Frame.

The table had been repaired before, long ago. However these repairs had failed too, so I pulled these joints apart as well, removing the metal brackets used in that old repair. These tenons had been broken also.

This pic shows the top of a leg, showing a typical broken tenon. The other broken tenon I have removed already from the mortise which has been cleaned out.
I have made two new ends for the table frame - as one was smashed into 4 pieces and the other was split through the middle and with the tenons missing on each end.
This pic shows one of the side rails with the tenon smashed off it. Rather than replace this whole side rail, I cut out a piece of it and housed in a new piece which would include the missing tenon. The next pic shows the result...

This side rail had a new section added which included a new tenon. Here the screws are being added to reinforce the glued lap joint. Note the slotted countersunk screws being used, in keeping with the original table. How long since you saw Nettlefords 9 gauge screws, Woodies?

Pulling apart the table gives away the secrets of how it was made. It was obviously made in a workshop environment, a combination of machine work and hand work. It is clear dado blades in a table saw were used to cut the table button grooves and the sliding mechanism grooves in the long side rails. A table saw was used for cutting one cheek of the tenons, and hand sawing cut their shoulder. The back face of each tenon was the back face of the rail. A mortising borer (probably on the end of a table saw spindle I reckon) was used to cut the mortises in the legs, as evidenced by the round ends in the mortises. Hide glue was used to assemble the table - most of which had held despite the abuse - hence the mortises had snapped off rather than the glue giving way. The table buttons were fashioned by hand, and yellow pine angle blocks were used to shore up the inside corners of the frame. Glued and nailed. The glue on these blocks had failed on many of the joints - it was the nails which mostly held these in place. The jarrah had been stained to a dark walnut colour on the visible faces. The curved corner wings of the cabriole legs were glued and nailed in place, with a dowel also used with each of these on the far end of the table. Very simple construction and mechanism. I will add new corner blocks to the 7 joints that I rebuild, as well as replacing the two ends of the frame.

One of the re-built corners around the leg. With the top corners of the cabriole "wings" broken off and missing, you can see here how I am gluing in small blocks which I will then shape to complete the curves at the transition point.


This pic shows one of those missing top corners of the cabriole "wings" now in the process of being shaped to complete the nice flowing transition to the leg.


The table frame here is rebuilt and prepared ready for staining and finishing. I moved the frame out of the workshop into the patio, where there would be better light for the staining and finishing. To get the new jarrah to match the old finish, after some trials I used a walnut flavoured wiping stain to get the colour up and then applied several coats of shellac over the lot. This was followed by a dark furniture wax -with a hint of walnut flavour in it as well.

Here the frame is being re-attached to the two halves of the top. As I was using only slotted traditional wood screws, the good old "Yankee" spiral ratchet screwdriver came in very handy for fixing the table buttons. They still can outclass the cordless drill/driver for screwing in slotted screws. When repairing the frame, I often used a slotted bit in a brace, for much more purchase. Wonderful!
The extension mechanism's threaded rod needed straightening, so I did that as best I could using a metal vice and an anvil. Much better. The threaded nut is cast brass or bronze, with the manufacturer's inscription: J & A, F'cray, V. I did a bit of googling for info about "J&A" in Footscray Victoria, but I have not found any info at all. Does anyone out there know anything about this foundry or manufacturer? It might help to date the table... At this stage I am guessing that the table was made in Perth sometime between 1900 and the 1920's.

Making the new Extension Leaves.
Now that the rebuilding of the table has been completed, it was time to get onto making the missing extension leaves. The table extends about 18 inches to the limit. Instead of making one wide leaf (which are a pest to store) I made two narrower leaves, as these are easier to store, not too heavy, and more versatile.

The challenge with these jobs is obtaining the right material to match the old. Lots of old furniture was made from timber finished to 7/8ths of an inch in the old language (22mm). Somewhere along the way, someone out there in the timber industry decided that 1" rough sawn timber would be dressed to 3/4" (19mm). The standard dressed sizes for jarrah in Western Australia for decades has been ex- 1" to 19mm and ex-1 1/2" to 30mm. It's a lot of wastage when you think about it, but I guess that reflects one of the down sides of high volume mechanisation. The only way to get 22mm thick dressed timber is to dress it yourself - either from 25mm rough sawn stock or to boil down 30mm dressed sticks - even more wastage and very expensive!

However there is one more alternative. Salvaged timber. I frequent my local salvage yard where I often buy timber which I recycle, and keep an eye out for those rare goodies which come in from time to time. Some months ago, I came across some old shelving which had come out of an old house which had been demolished. At the time I had snapped it up, as these were jarrah boards 2.7m long and 250mm wide. I bought 2 sticks at 22mm thick and 2 at 33mm. So one of these 22mm sticks gave me the timber I needed to make the two leaves. Lucky I hadn't used it already! Fancy that - 7/8" thick nice wide boards and about the same vintage as the table! Just perfect.

Sorry, there are no photos of the making of the leaves - I was too focused on what I was doing to remember to take any pics!

Making the new leaves was easy. Trying to match the colour was a real challenge... but then, it almost always is with restoring old furniture. I had several goes with a range of different stains but just couldn't get a perfect match. Three times I got the finished polish on and decided it wasn't good enough - so had to take it all off and start again! What I have settled with is a bit reddish in tinge, but actually it looks really nice in the centre of the table. I will never guarantee to be able to do a perfect colour match - for good reason!

We had a very nasty storm the other day in Perth. At least $100 million in damages across the city. At the time we had moved the table into our house from the workshop area, to make sure it would be safe. The pic above shows the table where I left it in our living area - completed and waiting to be returned to the customer. The rags under the feet are to protect the jarrah floor from drag marks and to reduce friction when the table is extended and wound back in again.
This next picture shows the table with the leaves removed and sitting on top.


What a delightful privilege has been to give new life to a wonderful old piece of furniture. In many ways, furniture and people have a lot in common...

Job done - and the table's story continues to unfold...

The story of the table is echoed in the way that it has been made, the battle scars and stains in the top and the frame, the marks of the earlier repairs which were made to it long ago, the old-looking new extension leaves, the memories embedded in it of the family which have passed it down the line, and the new structural repairs which I have just undertaken. This and more all adds up to create the story of the table - which gives it it's character and identity.

I am told that the family are looking forward to gathering around the table to have morning tea on the morning I will be delivering it back to it's proud owners. A new chapter of the table's story begins...

Saturday, March 6, 2010

Another Successful Woodworking Activity with the Belmont Alternative Learning Program.

I recently completed my third program with the students at the Belmont Alternative Learning Centre. (BALC)

The projects I offer sequentially introduce new skills and reinforce previously learned skills, which the participants apply in the building of their projects.
Last time I worked with the BALC students, they each made bedside tables. This time, the project involved some more tricky skills and maths, as the participating students each made a bar stool. In addition to angled legs and components, this project included the upholstering of the tops, which the students also undertook themselves.

Making the Bar Stools.
The following sequence of pictures help tell some of the story:

The measuring, marking and preparation of the angled components required good accuracy.

The use of dowelling jigs still requires care and accuracy for a good result.


The glue-ups are always a high pressure event as we race to beat the fast drying glue!


Glue-ups are best done with people working in pairs. Once clamped up, the excess glue is cleaned up.


The glue-up takes place in two stages: the two ends are glued up first, and when these are dry they are then glued together. This glue-up has been completed and cleaned up.

The upholstered tops first needed their plywood bases to be prepared.

The plywood bases were glued to the 50mm HD foam, and then the surplus foam trimmed off.

Students next helped each other apply the 12mm peeled foam to their seats.
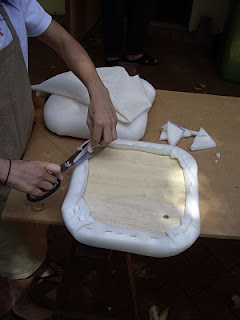
The surplus peeled foam was then trimmed from the underside.

The calico was then stretched over the foam layers and fixed to the underside of the base.

The final task in making the upholstered tops was the trickiest – fixing the black vinyl cover.
This required considerable patience to get the corners right!

The students applied Danish Oil to their completed frames.

Once the frames and seats were completed, they were screwed together, completing the project.

Some of the participants with their completed stools.

A great job done by the students. Well done, Gang!!

Each time we have worked together, the BALC students have used their basic woodworking skills and learnt and applied new skills. It is a sequential process. What will be make next time? It will be interesting to see... I suspect we may make something which will benefit the local community. A bit of carpentry. Let's see what happens next term!


Tuesday, February 16, 2010

The Joy of Woodworking Activities at the June O'Connor Centre.

During January I had the pleasure of running a four day woodwork program at the June O’Connor Centre in Joondalup, as part of their Day to Day Living (D2DL) Program. Around 12 participants and one staff member took part in the program. Over this time the participants each produced a kitchen chopping board and a bedside table. Despite the heat and cramped conditions, there was plenty of enthusiasm and laughter throughout the very successful four day workshop.


The June O'Connor Centre provides wonderful facilities via 5 centres across metropolitan Perth. From their website: "June O'Connor Centre (Inc) is dedicated to developing the awareness and support for people in the community suffering a mental illness. " www.joc.com.au

I set up my portable benches and tools, and we took over the art space at the Centre. We also spilled out into the area at the back in the adfternoons when we had some shade there. This area we used for glue-ups and for polishing.
Some of the gang at the end of Day 1, with their completed kitchen chopping boards.

Through this very enjoyable program, the participants learned and applied a number of traditional woodworking hand skills to make their kitchen chopping boards and bedside tables.

Vicki cleaning up her table frame prior to joining it to the top.


Stuart cleaning up surplus glue after completing his glue-up of the frame.

The participants used several types of planes, scrapers, saws, cramps, and measuring tools. The only power tools used were cordless drills for the drilling. A range of timbers were used, including Jarrah, Marri, Sugar Gum, Sydney Bluegum, Spotted Gum, Sheoak, Vitex, and New Guinea Rosewood. The making of the frames included cutting the rails and shooting the ends square, making the dowel joints, and gluing the frames up. Making the tops included shooting the butt joints and cutting and planing the tops to size. Pocket hole techniques were used to connect the tops to the frames, and used Cabot’s Danish Oil as the finish after the final scraping and sanding.


Some of the gang at the end of Day 4 with their completed tables.
These activities enable just about anybody to be able to use tools and make things they would never have thought of as possible previously. It is very tactile, physical, creative and satisfying. It gets people talking, working together, laughing and inspiring one another. Nice, eh?!
The participants at the June O'Connor Centre in Joondalup had a great time - and so did I!!


Friday, February 12, 2010

Rebuilding termite eaten joinery.

I was recently approached by clients in Northbridge, who live in their 1903 semi-detached cottage. Joe and Anne's front door joinery had been eaten out by termites some time ago. The joinery was fairly standard, consisting of a 5 foot long 12" x 3" jarrah sill, jarrah stiles and mullions, headerand transom, with 2 leadlight sidelights, 3 top lights, and 2 wooden panels below the mid-rails.


Assessing the damage.
Amazing little things, termites. They had travelled up the joinery via the softwood beading and mouldings, eating out much of the jarrah transom just above the door, some upper areas of the jarrah mullions and stiles, and a significant portion of the jarrah sill. Most of the leadlight panes were held in place only by many layers of paint which covered the eaten out beading and mouldings.


After removing the security fly door, front door and leadlight panes, I was then able assess the extent of the damage. My task was clear - replace as much of the joinery as possible and rebuild it in situ as it was not going to be possible to remove the whole piece of joinery. I was up for a very interesting challenge!


Fortunately the four mullions/stiles and the header would all be able to be used, as most of the damage was surface damage. The termites had been after the softwood beading and mouldings. However the sill and the transom would need to be replaced, plus the wooden panels and all mouldings and beading.


Replace and rebuild.
First I cut out the sill (no easy feat) and replaced it. The only suitable material I had been able to find was find was a 10" x 3" piece of wandoo. It was heavy! I added a piece of jarrah to make up the width, under the door. The tenons on the bases of the mullions were still in good condition, so I was able to cut the sill to house it around them. The result was a very solid new joint between the mullions and the sill. Nice.


These pics show the sill being chopped out, and the new sill installed.
The next task was to replace the transom. Once this was done, I made new mid-rails and fitted these. Then the bottom rails of the side panels were constructed, and the panels made up and installed.


This pic shows the new transom under construction on the portable bench. There was a lot of hand work to do on site to make and fit the components.

After the refurbished joinery was cleaned up, the leadlight panes were put back in place and the beading mitre cut and nailed in place. Then the finishing mouldings were added around the wooden panels and in other places as required. Beads were added full length down the inside walls, and other finishing touches including sealants were added to hold together the render and mortar which was frittering down the openings adjacent to the joinery.

Re-hanging the security fly door was a challenge, as the opening was now slightly different to what it was when it had been installed. I had squared up the joinery, so there was a bit of trimming and fine tuning to do to re-hang both the security door and the front door. However the net result was a very nice job. It was all as solid as it would have been when the house was built in 1908.


This pic shows one of the completed wooden panels with new mid-rail above, mouldings added, beading completed and leadlight panes re-installed. All old nail holes and surface termite damage have been filled, so it's ready for painting. That's up to Joe and Anne now...

This pic shows the job almost complete. The joinery has been re-built, the security door re-fitted and hung. Now it was just a case of re-hanging the front door and cleaning up.
I am looking forward to seeing it all with a new coat of paint.

Honouring the original makers.
When I do jobs like this, working with old joinery and furniture, I always find myself thinking about the blokes who built the stuff in the first place. It was evident that most of the work was done by hand, including the dressing of the timbers. This was apparent due to the variations in the dimensions of the timber over their length - including the sill and the stiles and mullions. The bottom wooden panels had obviously been added on site by the carpenter/joiners who installed them, as they had used some of the flooring as the bottom panels. The floors are kauri pine, and the termites were not too keen on this. So there was mostly only surface damage to the panels. I replaced these with new jarrah panels. So here we are just over 100 years later - I hope my rebuild of this joinery has done the original tradesmen proud.
New life for damaged material.
After I finished the job, in my workshop I was able to re-use enough of the timber in these panels to make Joe and Anne a beautiful kitchen chopping board with breadboard ends. A nice touch to use some of the old damaged joinery and give it a whole new life again . Now that's a low carbon solution! Timber is a wonderful low-energy high-carbon material which can be re-used again and again for centuries, so long as it does not rot or is not totally eaten by termites!

Wednesday, January 27, 2010

Visit to the Alexandria Seaport Foundation, Virginia.

While in the USA in November, I was delighted to visit the Alexandria Seaport Foundation, in my quest to check out youthworking programs which use woodworking activities.
This pic shows me outside the ASF's floating office.


Some background info from their website:

Doing Big Things with Small Boats!
Through the building and use of wooden boats, the Alexandria Seaport Foundation helps at-risk youth turn their lives around and provides families, community groups, and schools with meaningful educational, social, and recreational experiences. Full-time apprentices earn their GED and prepare for a career in the building trades. The latest additions to our program include vocational training in green construction, a summer program, and an afterschool program.


Special thanks to the legendary Joe Youcha, the hands-on Executive Director of the ASF, for meeting with me and showing me around the workshops. An inspirational guy with a very exciting set-up. One of the wonderful things about this program is the use of volunteers from the community, who work alongside the young people as they build the boats together.


This pic shows Joe Youcha (right) chatting with one of the young participants, who was working on varnishing this beautiful wooden boat he had helped to build.

Prior to the Global Financial Crisis, the ASF had a very high success rate in transitioning the young participants into the mainstream workforce. With high unemployment in the USA now, these outcomes are more challenging to obtain - however the organisation through its wonderful commitment to its participants is exploring other creative ways to assist the trainees to find ways into the workforce with their woodworking skills.

There is a lot of complex maths involved in setting out the hull of a wooden boat. The ASF program has developed very effective ways of teaching mathematics to young people who may have been able to make sense of it in school.


This pic shows the guys working on the preliminary setting out being done for another boat hull.


Beautiful boats made in a very positive learning environment. This program was very exciting, and I was so pleased to be able to check it out!

The website for the Alexandria Seaport Foundation is definitely worth having a look at:

http://www.alexandriaseaport.org/


For more great info and pics about the ASF, check out the Meyer Foundation Annual Report via this hyperlink: http://www.meyerfoundation.org/annual07/seaport#/images/annual/seaport/sp10.jpg

Wednesday, December 2, 2009

Visit to Covenant House's Artisan Woodshop, Washington DC.

It was a pleasure to visit the Artisan Woodshop program, run by Covenant House, while I was in Washington DC recently. This program is a job training initiative focusing on teaching woodworking skills to youth at risk including homeless young people.


Over a 4 month period, they learn not only a range of woodworking skills, but they also develop many of those employability skills employers require.
Learning just to be reliable and turn up for work is such a basic and critical attitudinal skill which the young participants acquire during their training.

Up to 8 young people participate in the program at any one time, and are currently making table and chair sets which are then given to needy families in their communities. The trainees are paid the minimum wage while they are engaged in the program.

In this picture Greg is chatting with Kevin, a program participant. It was a delight to hear Kevin speaking about how his view of furniture and timber has changed now that he understands how furniture is made and the effort which goes into making it. Like most woodworkers, he now finds himself picking up furniture to see how it is put together. That is a good sign! Thanks to Kevin - keep up the great work, mate, and I hope you find some work as a result of your enthusiasm and the training you've received!


Special thanks to Training Instructor Justin Couch, for generously giving his time to spend with Rosemary and myself.
It was great to hear from Justin about the background toe the program and the way the program has modified along the way. His manner with the young participants is clearly one of those ingredients which helps make the program work well. Justin and I are pictured here together.

The US economy has been hit hard by the repercussions of the global financial crisis, so finding employment for the trainees is a very tough challenge at the moment. I wish the staff at Covenant House and the Artisan Program and the young participants the best of luck as they respond to this challenge. Check out their blog at www.chdcartisans.blogspot.com for more info.

As a woodworking youthworker myself, it was inspiring and encouraging to learn about this fantasic program.