
Sometimes it is a nice change to leave behind the workshop environment and the making of fine furniture to indulge in a bit of carpentry. You know, the rough stuff...
I was recently in Violet Town, two hours north east of Melbourne, Victoria, building extensive decking, pergolas, and a verandah for some good friends, Kaye and Ro. From the ground up, the task would be completed with the laying of nearly a kilometre of decking!
With just over two weeks to do the job, my plan was to tell the story on this posting as I go. However the problem was I was often so busy I forgot to take pictures! It was an ambitioous task in many ways.......
Straight into it!
I flew into Melbourne arriving at 11.30am, and was picked up by Ro. We drove the 2.5 hours to Violet Town, arriving on site just in time to help unload the big truck delivering the timber, concrete stumps, and other hardware I had ordered a few days beforehand using my copy of the plans. What timing! After the truck had gone, it was straight into starting the setting out. After all, the man with the digger was due to come the following day to drill the 41 holes for the stumps and 24 holes for the verandah/patio post spigots! Yep, I had to hit the ground running.
Day 1, and I was up with the magpies early in the morning, setting up the "hurdles", levels, and string lines to define the two primary building areas. At the front of the house a verandah with decking was to be built, with a floor area about 6m x 3.6m. At the rear of the house I would be building a decking area 7m deep, 4.8m wide at the furthest end, and 7.8m wide at the house end. A pergola was to be built over this whole area, with the pergola extending a further 6.9m down the side of the house and 3m wide. It was a very big job!
The digging of the stump holes.


Day 1. The setting out of the the hole locations was mostly completed just in time. The guy with the digger, a Dingo with a big auger, arrived and got stuck into the boring of the holes for the front verandah, which I had marked on the ground with marking paint. The architect's specifications required the concrete stumps to be at least 500mm in the ground, on 200 x 350mm diameter concrete sole plates. Thus the auger had to drill 350mm wide holes 800mm deep.
It seemed so easy for the machine, despite the fact that the ground is extremely hard clay when dry! Unfortunately, the material mostly fell back into the holes, so we had to dig out the holes, mostly by scooping by hand with a metal bowl. It is a good thing I have long arms, to get down to the bottom of those 800mm holes!
Day 2, and the building inspector came, as arranged, to ensure the holes were deep enough. After he gave it a quick look and got sticky mud on his leather shoes, I got the OK to proceed with the project.
Kaye and I spent some time rigging up big tarps over the verandah area and that part of the back decking area closest to the house. Rain was on the way. These tarps would prove to be very helpful over the next couple of weeks!

With the holes dug, the next step was to set up the bearers in position with the stumps attached and hanging from the bearers. The 900mm long stumps each had either a piece of 6mm steel rod or a piece of M10 galvanised rod protruding from the top. Using the laser level, the top of each stump was leveled at the required height by building props under the bearers at intervals. With the bearers set up in this way in the appropriate locations, the concrete was poured into the holes, thus both creating the sole plates and setting the stumps in the correct pozis and heights. I chose to use this method as it would enable me to gently get onto laying the joists in a couple of days rather than having to wait the required 4 to 5 more days for the concrete to set hard enough before bashing away fixing the joists to the bearers.

After the building inspector had visited, the rest of Day 2 was spent setting up lines of bearers and stumps. This involved the making up of "bearer sandwiches", as the required timber was not available, so twice the number of sticks at half the thickness was sent, with the expectation that I would nail them together to create the specified 90x70 bearers. Time consuming. I also am very unimpressed with the quality of the treated pine. There are many places where I have made up a sandwich of 3 pieces, in response to my concerns about the number and placement of knots. A decking area which is big enough to hold over 60 people will be taking a huge load. True to form, I would rather over-engineer than skimp on the materials. Give me hardwoods any day!! Mind you, it is so easy to drive a 4 inch galvanised nail all the way into pine... by the way, no nail guns here. Just good honest hammering with my trusty big old Cheney claw hammer.
Day 3, and with all 5 bearer/stump lines of the front verandah area and 2 of the bearer lines of the back decking area set up during the day, we did the first run of concreting. Thanks to neighbour Pat for keeping the supply up from the mixer and to hired help Shaun for keeping that barrow moving! Meanwhile Kaye and I continued dealing with water and mud problems and getting the remaining 3 long bearer/stump lines set up ready to go.
 This would be the first of 5 concreting batches over the project.
Mud, mud and more mud.
With the rain and the water from the roofs pouring into the area, the decking area at the back of the house turned instantly into an incredibly sticky quagmire. After the holes were dug, the rain arrived. That extremely hard ground, predominantly brown clay, quickly transforms into very sticky mud. Sticking to my boots up to 3 inches thick, it got painful for the feet. It was a bit like trying to work in ski boots. Other times, my feet got stuck in it. Yuck. Quite time consuming as well, as the mud slows down movement considerably.

Kaye here is getting dramatic (she was a bit excited) after we had set up the first 2 lines of bearers/stumps for the decking area, ready for the concrete.

Mud. It's not easy working in it! - or walking in it.
Time flies when you're having fun!
Well, I have been working huge hours, from dawn to into the evening every day, in order to meet my deadline. So flat out, that I have been forgetting to take pictures! Not just once, but just with regularity...
When I wrote this, it was the end of Day 12. Here are a few pics to show where we had got to at that time.

The front verandah joists have here being laid after the concrete has been poured around the stumps and given a few days to dry. The posts are also in place.

The verandah has walls of the house on 2 sides, and the 2 open sides have steps going all the way around. This pic shows the step structure being made, prior to the concrete being poured around the spigots which help support this external structure.

Not a very clear pic, but here I am shovelling concrete from the barrow into the holes for the spigots. the bottom step fascia will be added after the concrete has dried. The verandah rafters are up, but the blue tarp is still over the whole structure to scare the rain away...

While it hadn't rained for days, after the initial deluge, the water was still sitting around and the quagmire was not drying up! This pic shows the start of the joists being laid on the bearers for the back decking area.

Another shot of the first decking joists being laid. The huge blue tarp is very useful when it rains, but only covers one third of the area. However, it doesn't like the wind.
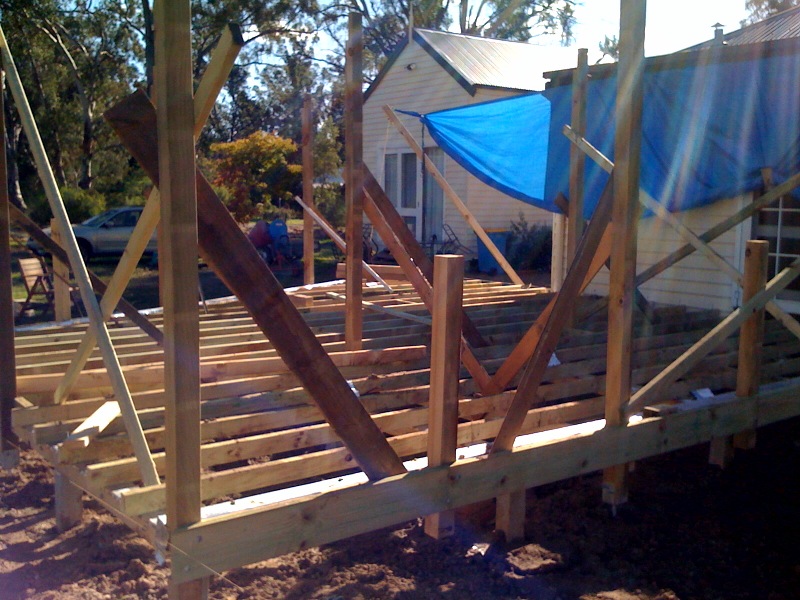
Jump forward a few days, and here most of the joists are shown in place on the decking area, and half of the decking pergola posts are in place, propped plumb while yet another batch of concrete dries around the spigots at the base of the large posts. The fascia board in the foreground has been added, but has yet to be added all the way around.
We had a frost the other morning. Unusual experience for me. I started work that morning when all of the timber had beads of ice all over it.

Back pergola takes shape.
Soon it was Day 14. The previous night I laid the first 5 runs of decking on the widest end of the deck, to start the process and do the tricky cutting around the plumbing, posts, etc. Merbau 70mm reeded decking. There was nearly a kilometre of the stuff to lay, but it is clear by this stage that I would not get it all down before my flight out of Melbourne. The laying of the deck was pretty straight forward, though it was complicated by the 22.5 degree angle of the right and end of the structure. So every board meeting that long side would need to be cut and fitted to this angle.

Prioritizing the tasks remaining.
Once I had faced the fact that I would not make my deadline for the completion of the project, I began working through a priority list, based on what would be more difficult for someone else to complete after I had gone. There is a local bloke who would do the small jobs outstanding, so Kaye and Ro have approached him to do the finishing off. He came one evening to catch up with me. So while I got the laying of the decking started on the back deck area, I would not get much more of this done. It was more important to get onto the pergola which is above this structure. As with every day, I continued to work into the dark each evening, with the aid of a head torch and other lighting!

One of the biggest problems with working into the evening was the dew which settled as soon as the sun went down! This moisture had a particular affinity with power tools, but was also very fond of my hand tools.
Considerable Progress before Time Ran Out.
Much unfolded over the following flew days as I worked through the priority list. Here are a few pics to show the results:

This pic shows part of the rear decking, with the props holding the posts plumb. The props would be removed when the purlins and battens are added to the structure. Each post was plumbed using a pair of traditional plumb lines. Most of the 90x90mm posts were closely related to bananas, so a spirit level was pretty useless. The string lines would give the true picture of plumb, for the top in relation to the bottom.

Another view of the rear deck, from the far corner.

All the beams were up, but only a few of the purlins... when I ran out of time.

Well, I got a couple of the purlins up...

Nice straight joist laying, eh? Jeez there's still a lot of decking to go down!!

The rear decking is going to be a pretty impressive structure once it's completed. I reckon it will be a very useful gathering point for the neighbourhood. Bummer I didn't get to finish it. Over to you, Trevor!

Making the wrap-around steps for the front verandah was a big task in itself. Thanks to neighbour Howard for coming over to help me get it finished. In the pic Kaye is applying the paint to the step woodwork, prior to the decking being laid on the steps. The step structure was supported by verandah spiggots and the verandah structure, keeping it all up off the ground.

Another shot of the painted step timbers. Note the first few decking timbers are laid at the far end of the verandah proper.

Here we are getting ready to start laying decking in the steps. Checking the spacing.

This pic shows the verandah corner after the top step has been laid. I used this task as an opportunity to train up Kaye in how to lay decking. She got the hang of it pretty quickly.
The 70mm Merbau decking was predrilled before being nailed. The hot dipped galvanised deformed shank nails were driven in skewed and offset, in textbook fashion. Deformed shank nails, sometimes called spiral or ring shank nails, are nails with ridges or spiral grooves along the shank, the part of the nail which penetrates the wood. These nails have a much better holding power than nails with a smooth shank. When you drive the spiral shanks in, they rotate, screwing their way into the joist. If you bend the shank in the process, it is pretty challenging to follow the head - but they ripped the merbau timber to bits if you tried to pull them out, too. Best policy?... always hit them straight!
Another task - hang a few fly doors!
Kaye and Ro had purchased three fly doors, hoping that I would hang them while I was in town. On my last morning, Day 16, I hung the 3 doors before getting onto fixing the decking to the top step with Kaye.

The front fly door in place after being hung. I'm told it will be painted white.

The pair of fly doors I hung on the side entrance. Even in the cold of winter we were plagued by flys, so these doors will be most welcome! No wonder Kaye and Ro were keen for me to get them hung...
Having hung the 3 doors, it was then back onto tying up some of the loose ends before we had to leave for Melbourne. My time was almost up.
Out of time...So what was left incompleted?
Other than the decking to be laid, the only outstanding work on the verandah was to put up the roof battens, the barge, guttering and downpipe, and the polycarbonate sheeting.
Other than the decking to be laid, the only outstanding work on the rear decking/pergola area was pretty much to complete putting up the pergola purlins and battens, the side pergola posts, purlins and battens, the hand rails on the decking area, and to re-fit two sets of steps and build a third pair. Local chippie Trevor will pick these unfinished tasks up as he can fit them in. Kaye is hoping to tackle the decking... it will keep her busy for some time I reckon!
Well, it was an ambitious project in the time available - slowed down with the mud, grano-work, rain, plumbing dramas, mud, and more sticky mud. I reckon I did pretty well to get so much done in the period.
I hadn't done much carpentry for a while, so I really enjoyed swinging my trusty hammer and doing all that very physical work. Mind you, after driving in around 1500 big nails (3" & 4" galvanised bullet-heads) over the period, not including the decking nails, my arm muscles were starting to scream by the last day! There were some real brain challenges as well, with the joints on the angled side of the rear decking and the wrap-around step on the front verandah. However the net result is pretty flash!
Thanks to the wonderful neighbours who dropped in at times to help out. Thanks too to Kaye and Ro for inviting me to take on this task, for their hospitabilty, great food, friendship, and of course the Wild Turkey and Cola they provided me each day as the sun was disappearing. Aaahh, "Turkey time"...
There is even talk about possibly returning later in the year to do another project. If that happens, I will look forward to enjoying Turkey Time on the back decking under the pergola, willing the wisterias to grow up and over the structure in order to create a truly wonderful gathering place in Violet Town.


