Monday, June 27, 2011

Pre-schoolers enjoy a woodworking experience.

Last week I had the pleasure of conducting a woodworking activity at All Saints College, at Bull Creek here in suburban Perth, Western Australia. I had two groups of 24 pre-school children, each for an hour. For this activity, it was an opportunity for free creative play. I supplied a great heap of low kid-sized benches (enough for 24 children), two dozen hammers, a range of nails on each bench, and a huge pile of timber pieces for the kids to use. It helps to have the right kind and size of hammers. I have a post about hammers for kids on my other blog, which may be helpful to some readers wanting to encourage kids to get woodworking.

The timber pieces I supply for these activities I bring pre-cut into smaller pieces of a wide range of sizes and shapes, made up mostly of pieces of pine, plywood, thin MDF and some dowelling. This is the resource the kids use to create their amazing objects. I also have a separate "sawing station" set up, where kids can use saws to cut pieces to their required length. I keep the sawing station separate from the benches with kids this age, as it is easier to supervise. Some kids just love using the saws, and will happily spend their time sawing up pieces of timber! Again, my other blog has a post offering info about kids using saws. The hand drill also came out. Drilling is also done under supervision, and some kids just love it. If you need more info about kids drilling, you may like to check my post on the matter.


One of the classes of pre-schoolers, with their wonderful creations.
 Pre-schoolers are the perfect age to commence learning basic woodworking skills. Great for building confidence, hand-to-eye co-ordination, problem solving skills, spacial relations, and so much more.
Free creative play with pieces of wood and appropriate tools offers an opportunity for kids to start to learn some basic tool use while letting their imagination free to make their own toys and mementos.

Special thanks to the great staff and parent helpers who assisted me on the day, and thereby increased the value of the activity for the children participating.  The kids sure had a great time.

...This stuff is really all about developing life skills, isn't it? Now there's an investment in the future!

Saturday, June 25, 2011

Getting started on a break-fronted Art Deco style bookcase.

A customer has being doing a big renovation to her house, which dates from the end of the Art-Deco era. Tragically, too often these days the timbers removed from these older houses are disposed of, going into landfill - a terrible waste. This is Western Australia, so the timber in these older houses is almost all jarrah (Eucalytpus marginata). Fortunately, my customer Norelle had the sense and foresight to tell the builder she wanted to keep the timbers, in order to use them for other projects around the home. I count it a privilege to have been entrusted with the job of using these timbers to create a big break-fronted Art-Deco style book case for the new living room in the old house.  Nice.

Planning the job.
Having met with Norelle, and checked out the huge pile of timber under plastic in her front yard, we discussed ideas for the design and other important matters, like the dimensions and how to make the piece of furniture fit in with the rest of the house. I went home, did some research and drawing work, and a few days later presented the drawing to Norelle. She was pleased with the drawings, and gave me the go-ahead to proceed when ready. A couple of months later, I was ready to get started.


The concept plan with suggested measurements.
 Getting started.
I began by doing the sorting, docking, and de-nailing of the timbers in the front yard of Norelle's house, as I ratted through the timber pile.
The larger of the two piles of timber. My resource to work from...
The timbers are predominantly a mixture of: floor joists (4"x2"s), rafters (4"x2"s), heavier floor joists and verandah top plates (mostly 8"x2"s), and hanger beams (9"x1 1/2"). Working off a few sets of saw stools (have I ever mentioned how valuable these are?!), I did all the docking of the sticks just oversize, using a trusty panel saw. This would make the handling and machining of the timbers easier once I got the material back to my workshop.

Some of the nails and other metalwork removed from the timbers.
There was a lot of de-nailing of the docked timbers to do also. A wide variety of nails, mostly - plus some screws, bolts and coach-screws. Once back at my workshop, the sticks would be scrubbed down with a wire brush and checked for any further nails with my trusty metal detector - before being machined. This was not the straightest bunch of sticks I have encountered, telling me the timber had come from trees which where not the straightest trees in the forest. The bends and turns in the trunks of the trees, as reflected in the grain, is apparent in the timber which has seasoned over many years after construction, and dried with corresponding echos of those original twists and turns. Machining these was not going to be much fun.

The 8" x 2"s and 9" x1 1/2"s are far too wide for me to flatten over my beautiful old Woodfast 6 inch buzzer. While I have a 15 inch Thicknesser, the creation of the first flat side on these wider sticks has to be done by hand in the absence of a big buzzer. My trusty Stanley No.5 1/2 jack plane and I were working hard on the long 3.0m sticks, with the aid of a pair of winding sticks - but it worked a treat. Mind you, some of the more badly distorted sticks felt the bite of my old electric plane when I had to remove a serious amount of waste! The 9" x 1 1/2" sticks were so badly distorted, I would be unable to get a flat 3.0m length at 25mm thick, the required thickness pre-glue-up. So I had previously docked these into 1.2m lengths, ready to make into shelving. They were still really wild sticks! So to flatten them I made a cradle to which I attached by screws the ends of the short wild sticks, such that the twists and bows were suspended on the average. Creating a sort of lowest common denominator. The whole cradle was then passed through the thicknesser until a flat face was created. After being unscrewed from the cradle, each stick was then put through the thicknesser to the required 25mm. Most of these sticks made it, too. Their previous wild behaviour revealed the most beautiful figure and grain patterns in these nice boards. The cradle method was good for the wide 1.2m sticks, but would be no good for the 3.0m sticks. These would require lots of grunt with the jack plane and or the electric plane in order to establish that first flat face. Thankyou winding sticks! One thing about old painted timbers - it's hell on the machines' knives. After I had put all the big sticks through the thicknesser, it's knives were pretty shot! Time to sharpen those and the buzzer knives again.

Making the vertical ends panels.
Firstly the timber for each of the four end panels was selected, and the edges prepared ready for jointing. The front edge piece on each panel is a heavier section than the panel behind it, as these front edges are to have a nice art-deco type rounded profile shawed from them. All the edge butt joints were to be strengthened by the use of a 1/4" x 1" plywood tongue, with the grooves cut by a slot cutter bit in the router. They were then glued up using a heap of sash cramps and with the wonderful Titebond 3 glue.

One of the narrower end panels cramped up.
With the panels glued up, the next thing to do would be to create the nice curved front edges. With this done, the next step was to dock the end panels to length. The shaping of the rounded edges, with a 40mm raduis curve, is a story in itself, told previously in this post: Several steps to create nice a nice curved edge.
Some of the end panel off-cuts, showing the curved built-up front edges and the tongues.
The end panels were docked at 2665mm long - just under 9 feet long each.
Making the shelving. 
Meanwhile, the timber for the shelf panels were being made. The timber was selected with the aim being to match the colour, grain and figure as much as possible. Using the same tongue and groove method using those beautiful 1/4" ply tongues, the shelves were glued up.

Selecting the timber for similar colour, grain and figure. 
Three of the glued up shelves. Awesome timber, eh? Such nice wood!
The shelves are now glued up, ready for ripping to final width and docking to length. However, first the end panels would need to have their housings cut ready to take the tops, bottoms, and fixed shelves. That story will be told in a future post.

Keep an eye out for further posts as this project unfolds...

Saturday, June 18, 2011

Several steps to create a nice curved edge.

They say variety is the spice of life... so my work load is pretty spicy!
I am currently making a big Break-Fronted Art-Deco Style Bookcase from recycled timber. My customer Norelle has been doing a big renovation on her house, which was built during the Art-Deco era here in Perth, Western Australia. The timbers removed from the house were fortunately saved, as Norelle was keen to have them recycled into furniture rather than going into landfill which is tragically too often what happens around here.

This piece of furniture is going to be a stunning feature in the living room. At 3.3m long (about 11 feet) and 2.8m high (over 9 feet) it will take up a big piece of wall. It will be made up of three sections each 1.1m wide, sitting on a plinth, and topped with a crown mould which echos a detail in the neighbouring architraves' tops. The nice curves on the face edges of the end panels and the break-front panels will help give it that art-deco feel. These will also be reflected in the plinth and the crown mould.

The Challenge.
It's those curves which were the challenge before me. When the 25mm thick end panels were glued up, these included a broad edge strip which beefs up the front edge to 50mm. A butt joint strengthened with a spline of 1/4 inch ply. The splines were also used to joint the middle end panels to bring them to the required 300mm width. Nice. I would normally cut the groove on my table saw, but as the sticks were so heavy I used a 1/2 " x 1 " slot cutter in the router.
It is this broad edge strip which would enable me to create the desired curve. See the plan below:

Having glued up the end panels, the challenge was to create the curve with a 40mm radius. I don't have a spindle moulder (shaper) with a whopping great 40mm radius cutter, and such a cutter would be too big for a router. So it would come down to a combination of hand and power tools to create the curve. There were 4 end panels to shape the curve on, each along more than 9 1/2 feet of hardwood.

Background to the timber I'm using.
The timber is I have to work with is jarrah (Eucalyptus marginata), which was used for almost all domestic housing (and everything else) here for over 150 years. The timber removed from this house which I have to use for the job is mostly made up of hanger beams (9" x 1 1/2"), heavy joists (8" x 2"), and rafters (4"x2").

The timber pile in my customer's front yard. I selected, docked and de-nailed right here.
The selected timber docked and stacked in my front yard ready for cleaning and machining. 

The timber recycler's machine's best friends: a wire brush and a metal detector!
Preparing and machining the timber for this job is a story in itself, which I won't get into here. However, the result was a bunch of boards about 8" wide and 26mm thick, at either 4 feet long or 9 1/2 feet long. The short ones are for shelves, and the long ones for the end panels. There's a number of 4"x2"'s at 9 1/2 feet long, ready to transform into a heap of V-joint lining board (for the backs of the cabinet) and to make the front edges of the end panels. The 4"x2"s also gave me the 40mm x 50mm sticks to be glued to the front edges, in order to create the beautiful Art-Deco rounded edges - the curves I needed to shape.

Jarrah is a beautiful timber. Here in Western Australia, about 80% of the timber I use today is still jarrah. Twenty years ago it made up about 95% of the timber I used. I know the stuff very well. The difference is that twenty years go almost all of that timber was new - whereas now days about 90% of what I use is recycled. The supply is rapidly dwindling, the dimensions available are getting smaller, and the cost of new timber is spiralling upwards. I suppose I am also very committed to good stewardship of the resource which is already out there... but that is another story worth writing about sometime. I digress.

As a comparison, European Oak has an ADD (Air Dried Density, at around 12% moisture content) of about 700kg/m3 - a little less than North American Rock Maple at 730kg.m3. Jarrah has an ADD of around 820kg/m3. (Source: "Wood in Australia", K.R. Bootle, 1983).

Preparing the panel ends ready for shaping.
Doing big glue-ups is always a challenge in my tiny workshop - especially when it is raining and I can't spill outside the workshop door! I have to plan my glue-ups and other processes, but I am helped by the wonderful properties of the Titebond 3 glue which I use for just about everything. The short open time is the price you pay for the short cramping time. If I keep the cramps on for 2 hours, I can do 3 or 4 glue-ups in a day.
One of the narrower end panels being glued up. The left stick is just protection and to spread the cramping pressure.

Cleaning off the surplus glue, topside, with my trusty Record 0110 block plane.
A cabinet scraper cleaned surplus glue from the underside of end panels. Note built up front edge.
With the end panels prepared (and "over-long" - not docked to length yet) now the challenge would begin. How do you create a nice consistent curve with a 40mm radius along the front face edge of these four end panels? It was going to be a multi-stage process...

Tooling up for the job - making the scraper-gauge.
There would be several things I would make in order to create a consistent curve.  The first thing was what I would call a scraper-gauge, a bit like a scratch-stock.
Start with a block of wood. Cut a 40 x40mm rebate out of it on the table saw. Save the offcut.

Use a bit of sawblade or a scraper to mark out a 40mm radius on the corner. Cut and grind to shape.
Drill or punch holes in metal, and fix to block in right pozzie with binding head screws.

Screw the off-cut onto the side, offset about 3 inches. The inner surfaces are flush. Tool ready.
Let the shaping begin!
Three more special gadgets were made to help with the task ahead, and then it was time to commence.

Firstly, my small power saw was set up to cut off some waste at 45 degrees, tangential to the curve.
 
A wooden guiding jig screwed to the base plate of a power saw, to cut a tangent at 45 degrees. 
Nice little Squirrel Tail Plane with a concaved base helped remove more waste.

A curved cabinet scraper made from a saw blade and the scraper-gauge ensured curve accuracy.

Curved sanding block made from scraps, about 41mm radius to allow for paper thickness. This completed the curve.

The finished article - what a nice curve, along the whole 2.9m length. Delicious!

So there you have it. Not such a challenge after all. It was a multi-stage process, but with a combination of tools both off the shelf and custom-made, the task was completed beautifully. Other than the initial 45 degree cut with the power saw, the shaping was all done by hand. One down... three more to go...

Stay tuned for more stories in the making of this bookcase.

Just a parting thought... about that nice little squirrel tailed plane. A variation on the Stanley No.100. It was made by my late Uncle, Ray Miller, who passed away a few weeks ago. A very clever and talented woodworker and boat builder, he was very skilled at metalworking also, and was renowned for his ability to make specialised tools and jigs. His passing was a loss to the woodworking world, especially the tall ship building fraternity in Fremantle, as well as to his family. He had given a set of three of these small planes to my father some years ago, and now Dad has given them to me.

I am now the next custodian of these beaut little planes, and they continue to be used to make things of great beauty.  

Monday, June 6, 2011

Hats off to a talented Milliner.

I like to think I can make just about anything from wood. As a professional woodworker I am fortunate to get lots of opportunities to test myself against the diverse and interesting range of jobs to do for my customers. One of these customers is a very talented Milliner who creates amazing ladies hats for her international clientele. Julie Anne Lucas Millinery produces around 200 ladies hats each year - and of course no two hats are the same! While Julie lives and practices her art here in Perth, the majority of her hats are made for clients attending the three prime events on the international horse racing calendar: the Melbourne Cup, the Dubai World Cup, and Royal Ascot. I have just made my 5th hat block for Julie, and it was the most challenging yet.

Heart Shaped Block.
The previous time I'd made a hat block, Julie had presented me with a plaster cast of the shape for the wooden block she wanted me to make.

The plaster cast (damaged) and the completed wooden hat block.
From a block of Yellow Pine, I carved the required hat block based on the plaster cast. It worked well, and was a fairly straight forward project. I look forward to seeing the group of hats Julie will craft with this block. 
Recently Julie sent me a couple of pics of one of the hats made from the heart shaped block.

View from the front.
Side view.
I understand there will be a few more hats in the next collection made using the heart-shaped block. I look forward to seeing the range of art work Julie will produce.

"Top Hat" Style Block.
The most recent hat block I've made, the most challenging yet, was a far more complex project. This was going to test my problem solving skills! Julie had presented me with an existing block, with details of how she wanted the new block to be different to that one. My task was to interpret these requests and create the new block. Due to the shape,  it would have to be a "puzzle block" - able to be pulled apart in order to remove it from inside the hat once the hat has been made around it. It was an interesting task, but it worked a treat.

The completed Top Hat style Block.
Making the Block.
OK, so you want to know how I made it? Firstly, I had previously laminated up the top section of the block from several pieces of clear pine. I then screwed the bottom piece onto the block. This just happened to be a nice piece of yellow pine, and was screwed on so that it could be removed later. Measuring the base of the demo block, I calculated the position of the centres I would use to create the oval base. The block's oval shape was then cut oversize on the bandsaw.

Centres? Yes... the block would be turned on the lathe on 3 centres. The first centre position shaped the front and back ends of the block. The second centre position shaped one side, the third centre position shaped the other side, and putting the block back onto the centre position again tidied up the ends further.

View from the bottom, showing how the oval base is shaped by using 3 centres.
This turning on 3 centres is done at a my lathe's slowest speed, to prevent the lathe from dancing around the workshop floor! The final sanding of this balanced elliptical object while it rotates on the lathe is reminiscent of those alleged weight loss machines with the wide vibrating belts from the 1970's - your upper body and jowls bounce around while holding the sandpaper to the spinning block! However it nicely eased the transitions of the curves (on the block) into a nice oval shape. It had me wishing my beautiful Woodfast MC908 lathe could turn at even slower speeds! The lathe and I have done a lot of work together since I bought it in 1988. Top of the line at the time, now good lathes have electronic variable speed controllers. Can I retro-fit one to my old friend? I wondered this as every bit of flesh on my upper body wobbled and shook on the final sanding operation. Not a pretty image, eh? ...but memories of those old machines did amuse my twisted sense of humour.

With the desired hour-glass shape made flowing up from the oval base, the block was removed from the lathe. The base was screwed to a cradle, to enable the top of the block's sweeping curve to be cut on the bandsaw. The top was then sanded to the final sweeping shape. 

The shaped top of the block, which is still here screwed to the cradle.  
 With the block unscrewed from the cradle, the base was then unscrewed from the top section. To create the "puzzle block", the top section would now be cut into 5 sections on the bandsaw. The centre piece of the top block was then glued and re-screwed to the base. The 4 remaining pieces were then held in place while the holes for the joining dowels were drilled down from the underside of the base, using the drill press. The dowels were fitted and glued into place, and the pieces lightly sanded ready for finishing. To seal the pieces, I brushed on a coat of Shellac - hence the yellow appearance of the finished block.


The completed block in its 5 pieces.
The block's pieces fit around the centre quite snugly on their dowels, and it holds its shape really well. Once a hat has been built on the block, the base is removed. This also removes the centre piece, and enables the remaining 4 pieces to be removed from the hat. A nice "puzzle block" hat block, to make some very feminine top hat style hats. 

Another view of the completed hat block.
 While I enjoyed the challenge of creating this hat block, I am particularly looking forward to seeing the magic that Julie will create in her beautiful and elegant hats for women using this interesting piece of woodwork. Meanwhile, if you haven't already, checked out her website for a glimpse of what Julie can do, here it is: http://www.jalmillinery.com.au/Collection
... yep, I take my hat off to her.

Sunday, May 22, 2011

A bargain box of saws!!

I had a few good wins at the local markets this morning. An English made Stanley No.5 for $30 in good condition, a nice old metal drill box (1/16 - 1/4" in 1/16th increments) for $1, a beautiful English made "Whitmore" 6" wood vice for $18 (I am always on the hunt for these vices - great for kids' benches), plus a few other goodies. However the bargain of the day was a plywood toolbox full of saws. Nine saws, in fact. The box and contents for the princely sum of $20. Even if only 3 of the saws were any good, it was still the bargain of the day.

The toolbox with the 3 saws worth using. Minus the other 6 more dodgy saws.
Of the 9 saws which came in the beaut tool box, 6 had plastic handles and were of very low quality. Scraper material if I'm lucky. However, the remaining 3 saws are worth putting back into service. Here's the specs of these 3 saws:
  1. Disston tenon saw, more modern type. 10 inch blade, 13 point. Good condition.
  2. Small panel saw. 13 3/4 inch blade, 10 point. Just needs cleaning up.
  3. Big rip saw. 26 inch blade, 5 point. It's had a hard life, but is restorable for use.
Help with identification and information, please!
I would really value input from any saw buffs out there who are reading this blog post.

The small panel saw.
This one is a mystery, but will be very useful to me. Small, the blade is only 13 3/4" long. It looks like a beech handle, but the medallion is interesting... it has the Disston symbol, but no wording on it. Well, not all the Disston symbol. The border only to the familiar "Scales" picture, the round circle of dots, but that's it...

The beech handle of the small panel saw. 

The small saw's Medallion has a version of the Disston symbol, but no text.


What's that interesting "tooth" on the back of the blade near the toe?
 OK, all you saw experts out there... maybe you can help me out. I would love to know more about this saw. Please feel free to post a comment with any info you can offer about this nice little saw.

The Big Rip Saw.
Yes, it's had a hard life, as evidenced by the handle. But the blade is in quite OK condition.


The big saw's original nuts are missing ... so is this the original handle?


The big saw's medallion. Interesting!
 "Warranted Superior" is a common name on many older saws. The thing I note about this one is the coat of arms, which includes a crown, a lion and what looks like a gazelle. It also has a latin inscription. Does the crown indicate that it is English made?

Once again, any information or suggestions about these two saws will be most appreciated. Please feel free to offer info via a Comment.

So why bother about the details on these saws?
These saws will be cleaned up, repaired where necessary, sharpened, and put back into service. So what's the big deal to me about the background on the saws? The most important thing is that they cut well. I am not a collector, but a user. The many people I teach woodworking hand skills to will be using these saws. It is the history which fascinates me, and I find lots of people are interested in the history of the saws they use with me.
I resist the terrible "throw away saw" mentality which seems to prevail in the timber trades today. These plastic handles things are made of inferior steel with hardpoint teeth which cannot be sharpened. Sure, they are cheap and they cut like champions while sharp - but are discarded into the skip bin when dull. Crazy, eh?
Instead I encourage the cleaning up and putting back into service good quality saws which have been made to last for generations. It's much better for the planet and better stewardship of the original craftsmanship which went into the design and production of these saws originally. 
Call me a tool nerd, but old tools are much more interesting than those shiny plastic handled things, which are better used as "burger flippers". Call me a weird tool nerd, but I also feel a sense of connectedness with the tradesmen who used the old saws before me. I'm part of a succession of people who have had the privilege of using these beautiful tools to craft wonderful things with timber. These saws have soul. Feel the vibe... 

I look forward to receiving any thoughts and input about these two saws.

Meanwhile, I'll be cleaning up that nice toolbox ready to put it back into use. I can't believe it came full of saws for the total of $20. Bargain! Yep, I'm still smiling... 

Saturday, May 7, 2011

Kids enjoying woodwork at the Mosman Park Eco-Fair.

It was a great day today. The Mosman Park Eco Fair was organised by the wonderful group of people from the Mosman Park community, including bods from St Lukes Anglican Parish in Mosman Park, and they all did a fantastic job too. There was a wide array of stalls, displays, speakers, and activities. I was there doing woodwork with kids all day. It was flat out all day!
Nice work!

Kids love using the brace and bit! 

Looks like a lidded box under construction.
 This activity was just pure creative play. There were no set projects. Just benches, hammers and nails, a few other tools, and a mountain of wood. All the timber was derived from factory waste, packaging, roofing off-cuts, etc - which would normally all have been heading into the waste stream. Better to recycle and redistribute it back out in to the community in hundreds of things the kids have created and taken home!

The "sawing station" in use - textbook technique, too! Well done, Kiddo.

Kids very quickly learn to use the vices.
 During the day we went through a huge pile of timber. I have a big box of wood there for the kids to rummage through, and I keep topping it up throughout the day. The wood is predominantly soft stuff, to make it easier for the kids to hammer nails into - bits of pine, plywood, dowelling, etc.

Here's a palacial residence under construction.

Some of these kids hung around for hours, making stuff.

Nice aeroplane.
 Parents derived a lot of pleasure from seeing their kids enthralled and engaged in their woodworking projects.  Kids derived lots of pleasure from using the tools and creating stuff which came into their heads. The pounding of 20 hammers went on all day.

My task was to wander amongst the seven benches, give advice on tool use and problem solving, offer encouragement and praise, and keep up the supply of timber, nails, and tools. Very busy all day. All around me were kids engaged in creative play, experiencing the joy of wood. That was, after all, the whole idea...

Thanks, St Luke's and other Mossie Parkers, for turning on this great day for the wider community.

Friday, May 6, 2011

External Stairs from Recycled Timber.

Aahh!... another set of stairs...   Amid all the different types of woodwork I do, what I enjoy about building stairs is the brain challenge they provide - particularly in the planning and setting out phase. One of my latest jobs has been to build a set of external stairs for a client. The task was to plan and build a set of stairs which would fit into a particular space on an existing building which was undergoing significant renovations. The stairs would comply with the Building Code of Australia, and made primarily from recycled jarrah.
That's the space available to build the stairs ... in front of the red brick wall.
View from the top looking down. The structure would have to keep 1.5m off the fence line.

Planning the job.
Having taken measurements on site, it was then down to the planning stage - which always involves doing scale drawings on my trusty drawing board. I have never got into CAD drawing on the computer. I still like the old "Technical Drawing" techniques using a T-Square and pencils on a drawing board.
The first place to start with planning a set of stairs is to know the total Rise - the distance from the top floor level to the bottom ground level. In this case, allowing for the new ground level which will be built up to the same height of the underside of the back door sill, the total rise will be 2.5m. This divides readily into 15 steps, each with a rise of 166.67 mm. That rise fits within ergonomic convention. The next thing to determine is the "Going" - the horizontal depth of each step from nosing to nosing. The accepted rule is: (2 x Rise) + Going = 585 (or up to 625mm.)   I decided to have a Going of 260mm, which fits within the range OK.
With the Total Rise, the number of steps, the Rise and Going all established, the length of the flights can be determined. Drawing this to scale would give me the angle of the stringers and help me to visualise how it will fit within the space. A landing will need to be included, as this divides and separates it into two flights going in opposite directions. There also had to be the required minimum standard headroom where the lower flight approached the ground while coming under the top balcony.
After a lot of drawing, calculating, brain-waves coming in the dead of night, meetings with the client and 3 drawing versions later, I believed we had hit on the answer of how to make it fit in the space available and my client was happy too.

Gathering the timber and starting the construction. 
The treads would be easy. Three sticks of timber dressed to 90 x 45 (and nearly 900 long), with gaps of 8mm between, would give a stair tread of  286. With a 260mm Going, there would be a 26mm overhang of the nosing over the back of the tread below. Nice. These sticks would be ex 4"x2" jarrah. In domestic buildings these were normally used for floor joists, rafters and often ceiling joists. Much of the 4"x2"s I had in my stocks came from a house built in 1930. After seasoning for 80 years, this stuff is dry!

4" x2" material cleaned up and ready to be machined to size.
  As much as possible, gum veins were avoided in the selection process, the timber docked just overlength, de-nailed, scanned with a metal detector, scrubbed down with a wire brush, straightened and squared over the buzzer, and machined to the required 90 x 45 through the thicknesser. Three of these per stair tread.

The stringers were a problem. After searching round the salvage yards, I would be unable to find the jarrah suitable to make the stringers. (Stringers have the treads housed into them and make up the sides of the stairs). So I had to buy the material new. The required 10" x 2" jarrah I purchased was pre-dressed and what they call prime grade. Scary stuff really, as I had to pay over $650 for the 4 sticks I would need in order to make the 2 pairs of stringers! Ouch!

The decking would be easy. By ripping 4"x2" jarrah sticks down the middle, the two halves are each machined to 90 x 20mm.  A number of these I was able to make at 3.2m long, enough to go the full length of the decking. The arrisses were shot off with a block plane, and the decking boards pre-coated with oil.

A 4"x2" piece of jarrah ripped down the middle and opened out. Fantastic colours and interesting nail holes coming in from the edges. It will be machined into beautiful recycled jarrah decking. 
  The top plate or apron of the landing would be ex 8"x2" jarrah, dressed to about 45 x 190mm, and the landing floor joists were ex 6"x2" jarrah from salvage. The landing would be supported by 6 galvanised steel legs set in concrete, and the jarrah posts above would be machined to 100x100mm. These took a lot of hunting down - from salvage yards and other sources. I was fortunate to get 4 posts from an old 6"x6" jarrah power pole! The 120 x45mm handrails would also be obtained from the 6"x2"s.
All nails and other fixings used would be Hot Dipped Galvanised. The finish to be applied to the finished timber would be Cabot's Natural Decking Oil.

The construction process started with making a set-out board of the stringers, giving me the angles and dimensions of the tricky ends of the stringers. This info was then transfered on to the stringer material and the two pairs of stringers were then made at my workshop and pre-finished with a couple of coats of oil.
The Stringers were laid out in pairs, marked out, and the tread housings cut.
The treads were then all made and cut to size ready. The two flights would be too heavy to lift if assembled, so I decided to do the assembly on site. With the flight components made and the landing materials organised, I moved to the site to build the landing. When the setting out on site was completed, the holes were dug for the steel posts. Using lots of big cramps and big sticks of timber, all the prepared posts were suspended in their holes, plumbed and held in the right positions. My son Ben was giving me a hand that day, and it was a big day! Ben operated the electric cement mixer and we did the concreting job. Six posts, rock solid. The following day I would do the concreting of the final two, supporting the base of the lower flight.

One of the steel posts suspended and cramped in position in its hole, awaiting the concrete.

The top stringers were also suspended/supported  in place to ensure the landing position was correct. While working from the drawings, sometimes it is good to check "in the flesh". 

The lower flight stringers fixed in place, with metal spiggots at the base set in concrete. The concrete will later all be buried under sand and brick paving.
 Completing the landing.
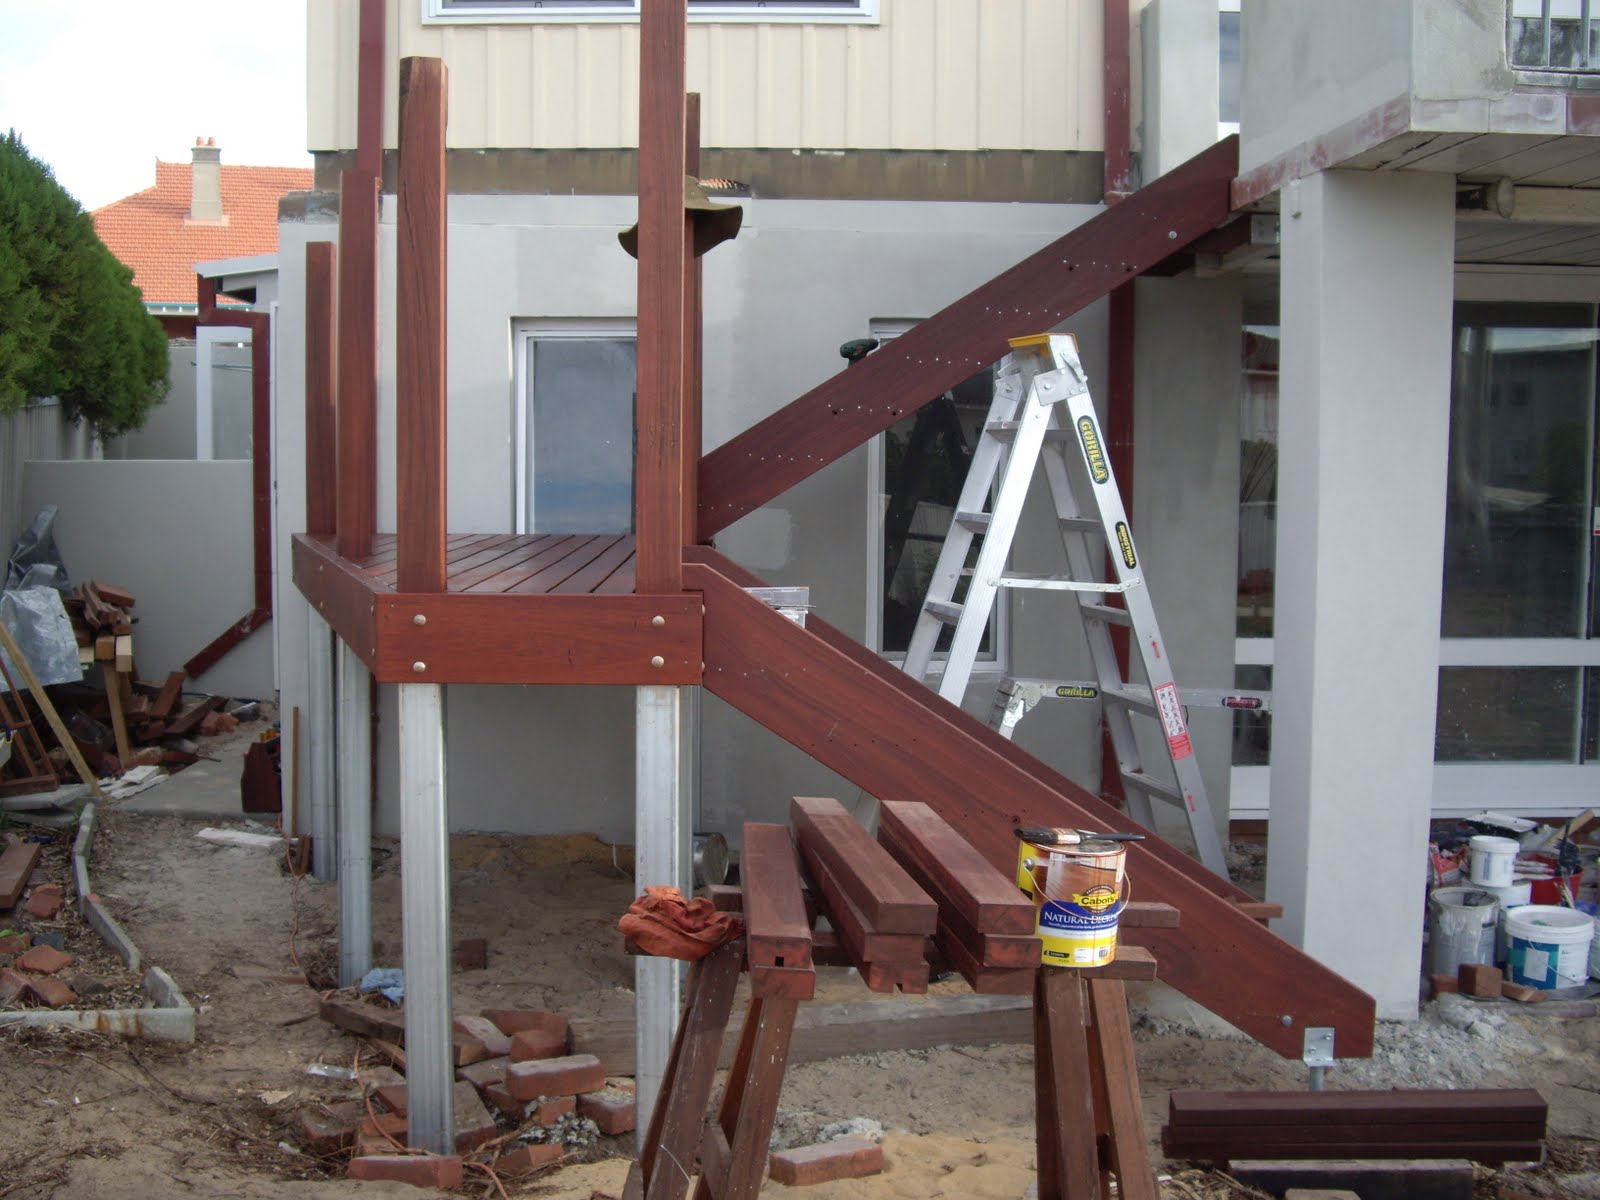
With the steel posts set in concrete and the landing apron or top plate being bolted to the steel as the jarrah posts were inserted into them, the floor joists were then added. These in place, the decking was then nailed down.

Decking nailed down and completed. That's a cake of soap on the stair tread - to lubricate the 4" galvanised nails used in landing construction.

Top flight treads fitted in place. Handrails and balustrading still to be added.

Landing done. Stringers in place, most treads installed. Time to cut posts to height and add balustrading. 
The jarrah posts were installed "over-long", so that they could be cut to a finish height after the transitions had been worked out - ie. where the flight handrails meet the landing handrails at the newel posts. These transitions would be calculated and modified ensuring a smooth transition as well as compliance with the minimum requirements under the Building Code of Australia (except for the lack of infill under the balastrading, which someone else would be doing.) While the scale drawings would give a good indication, the measuring and marking of the real thing in place would be most accurate. 

Making and Fitting the Handrails.
With the landing decking completed, it was time to get on with the handrails. The customer hadn't quite decided what balustrading to have - but will probably have stainless steel horizontal wires. That's someone else's job. Other than the posts below, I don't do steel. Out of interest, to comply with the BCA, balustrading must not be able to have a 125mm (5") sphere pass through any part of it. Horizontal handraisl must be a minimum of 1000mm high, etc. At the commencement of the job we had agreed I would only to install the newel posts and handrails, so that was what I was doing. I had made the handrails from ex 6"x2" jarrah ceiling joists. Nice straight sticks too, which I had machined into 120 x45mm. This gives a 10mm overhang on each side of the 100mm posts.
One of the newel posts at the transition from landing to top flight. That's the tenon on top awaiting the handrail which will be housed onto it.
The posts were cut to length with tenons on top, and the corresponding housings cut in the underside of the the hand rails. The interesting part was the angled corners of the landing handrails. In one of these brainwaves I have in the dead of night, I resolved how to do the joint... a beautiful mortice and tenon joint. In fact, a stub tenon with a haunched tenon either side of it. And it worked a treat!. All this was done on site. My trusty tenon saw cut the tenons on top of the all the posts, and the tenons on the ends of the handrail returns on the landing. Good to see a saw live up to it's name. I was going to take photos of the joint components before I glued it up and fitted it to the posts ... but once again I was so hooked into what I was doing that I forgot and just assembled and glued the joint. Sorry about that...  Love that glue - Titebond III.

Nice mortice and tenon joint! 27 degrees off 90. There's a long haunch and a stub tenon in there.

That's the other corner. Another very tidy joint, the same as the other end.
Anyway, I was very pleased. The haunch mortice was cut with a slot cutter in the router, and the deeper mortice for the stub tenon was chopped by hand. The tenons were all cut by hand. It was a winner.

Job completed.
When I had completed construction, I brushed the whole structure down and gave it one more final coat of the oil finish. It looked like a million dollars. I then gathered up my tools, cleaned up the site, took a few pics, and drove away. Satisfaction is such a nice warm feeling. Here's a few pics:


View from the top looking down and across.

View down the top flight.

View of the bottom flight from above.

The ground level is yet to be built up and brick paved. The height of the bottom step allows for this. 

This pic puts the stairway in context. Soon there will be a swimming pool in the foreground!

View from the ground level back door.The galvanised steel legs will be painted a colour similar to the jarrah. 
On the joys of jarrah.
Jarrah is such a beautiful timber, and I am lucky that I have been working with it all my life. Jarrah (Eucalyptus marginata) is only found naturally in the southwest of western Australia. I understand there is only about 6% of the original forest remaining. Such a significant timber since European colonisation began here 1829. Until a couple of decades ago, in Western Australia just about every part of a timber framed house from the stumps to the ridge piece were all made from jarrah. It is a is very strong structural timber, very durable in the weather and in the ground, and a very high quality furniture material. Beautiful grain and rich reddish brown colours. The all round dream timber. Yep, I love the stuff.

Much of this stairway was made from recycled jarrah. This material had come from an assortment of buildings and other uses, much of it from a house which was built 80 years ago. All over it, there are the echoes of the former lives of this timber. Rows of nail holes along a tread nosing, testifying to a past life as a floor joist, with the nail holes even showing the width of the old floorboards which were once nailed to it. A couple of old checks in the side of a newel post, speaking of a former life as a verandah post on a building. The residual jaw marks from an old pair of floor cramps, telling of the time that piece of stair tread was once a floor joist. Other pieces were once rafters or ceiling joists, and the spacing of nail holes can often speak of these former lives. It is the echoes of the former lives of this timber which is so fascinating in something made from recycled timber. It is also why I don't fill the old nail holes. Let them speak.

Working with pre-worked timber also gets me thinking about the tradesmen who worked this timber when it was green. That's how these building were always constructed. Green jarrah, while heavier, is easier to work with - and easier to nail. No need to pre-drill the nail holes like I had to! These guys built the houses only with hand tools. There were no power tools. Most of the saw mills were steam driven, and life was different. Simpler times, moving at a slower pace, when tradesmen took pride in their tools and their work. It wasn't just about money and having a job - it was a vocation. An identity. A way of life.

I tip my hat to those guys, and hope I did them proud in the way I re-used the timber they first worked.