Showing posts with label kids woodworking. Show all posts

Saturday, December 9, 2017

Senni Makes a Spear.

Senni Makes a Spear
Experiencing the Joy of Woodworking at the Heritage Woodcraft Centre,  October 2017


The Heritage Woodcraft Centre in Canning Vale is the home of The Joy of Wood, where I, a skilled Cabinetmaker/Joiner, offer workshops and tuition for people of all ages in traditional woodworking hand skills and techniques. This includes many programs and workshops for children.  I have been conducting woodworking activities in schools, festivals, public workshops and private workshops for nine years. The private tuition is also used to provide occupational therapy for people with cognitive and physical disabilities.

The value of hand tool woodworking for kids.

When kids learn to use traditional hand tools, there are many benefits beyond the production of the project which they are justifiably proud of. Creating with the hands is a tactile, sensual process involving both macro and micro muscle movements.  The activity helps build body awareness, hand-to-eye coordination, balance, problem solving skills, spatial awareness, practical numeracy skills, and much more. There is an important connection between the hands and the eyes, with mental and physical health benefits flowing from the active muscular use of the hands and body in the creative process.

Working wood with traditional tools will also touch on lessons in and awareness of history and biology,  as wood is such a wonderful natural material made up of a variety of fibres and cells. Many of the tools the children use are over 100 years old, and can interact effectively with the wood when in the hands of a child who is provided with positive instruction and encouragement.

From Making a Sword and Shield to Making a Spear.    

Senni, nearly six years old, had previously come to Private Tuition at the Heritage Woodcraft Centre, on two occasions. On his first visit, he had made a wooden spoon in a two hour session. 
 

The next occasion, in another 2 hour session he had made himself a Sword and Shield.  


Senni took his Sword and Shield home where it was painted.
For a return visit, Senni had said he was keen to make a Spear.

The Process for Making the Spear
A nice straight grained piece of 24mm square Oak about 1500mm long was prepared beforehand, ready for him to create a shaft, along with a few other pieces ready for various Head/Blade options.
The process began with a discussion about spears, their types and shapes, seeking to find what design/type of spear Senni would like to make.   We arrived at an agreed design.


The spear would have a tapered shaft, with the head at the heavy end to aid its flight, and Senni was keen to have a sharpened end on the shaft rather than an added wooden blade or head. With the path ahead determined, we commenced the making process.

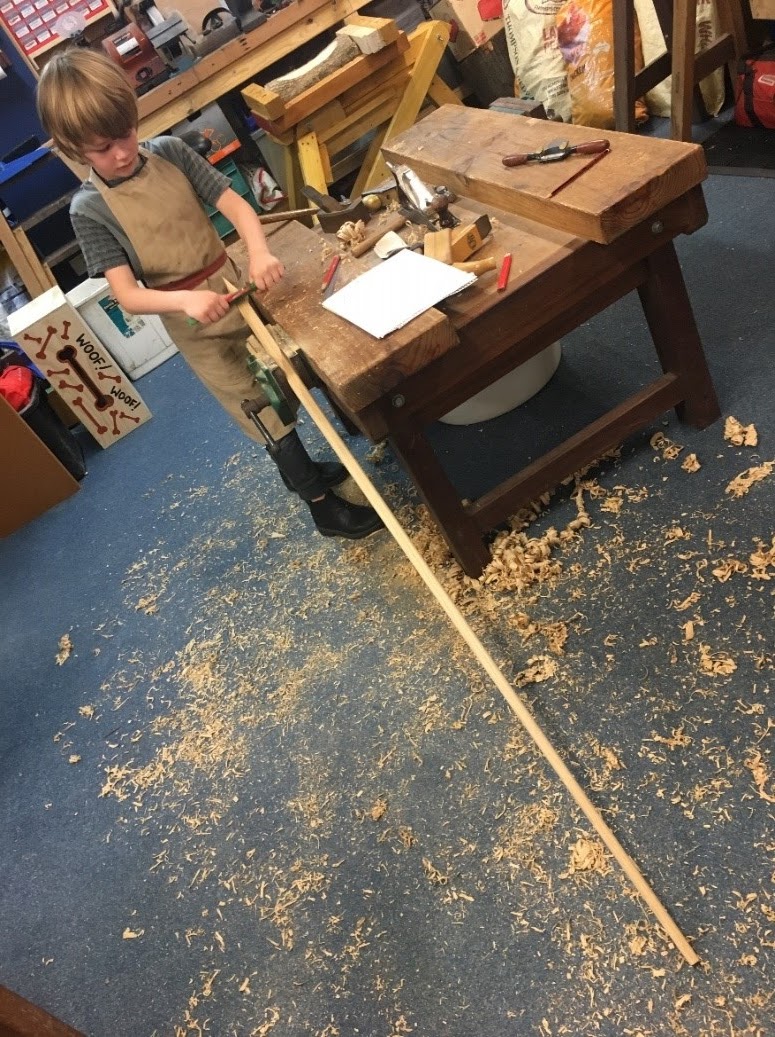
I explained to Senni how to plane a taper in the long stick, so we started out by hammering some supports into the bench top to aid the planning. He would need two hands to do the planning.


A variety of planes, of different types, weights and sizes were offered, in order to find the one which best suited Senni’s small hands and developing co-ordination and strength. While perfect for a spear shaft, Oak is tough, so the right kind of very sharp plane would make it more achievable for Senni. He and I took turns as we planed each side, with me providing Senni with on-going coaching and encouragement.

Using a hand plane correctly is a complex process involving subtlety of touch, pressure, and movement - a shifting of weight from the front hand to the back hand while pushing the tool forward along the piece of timber. It involves maintaining balance in the body through the feet and in this case movement of the feet as Senni walked the length of the spear shaft while applying pressure to the tool before him.  Planing a taper is particularly complex conceptually, as it involves doing a series of overlapping planning actions, starting from what will be the small end of the shaft with each action going right to the end. In this way a taper is effectively created over the length of the piece of wood. This process was to be repeated on each of the 4 sides

With the shaft planed into a tapering square section, it was time to round the taper. This was done by Senni using a Spokeshave.  He had used these before in both the spoon carving and in making his sword and shield.


The Spokeshave is such a fantastic tool for kids to use. It involves both macro and micro muscle movements in the hand and arms, balance in the feet and legs, and attention with the mind to create the desired form.

Senni worked away with the spokeshave taking the taper from a square to the round.


The sharpening of the head end was a three stage process – first sawing off the waste, then planning it into a square section which rapidly tapered to a point, then the rounding of the head to a tapering round section.


The correct hand position and grip on the tools greatly aids their effectiveness. At the Heritage Woodcraft Centre, we teach kids how to use real tools to make real things. This information on how to hold and use these tools is centuries old, and in the past the correct methods were always stressed to the students. In a world where most things were made by hand, the process had to be effective, efficient, and physically right for the body. These days we call it ergonomics. In the past it was just common sense and the Wisdom of the Ages.


Senni was rightfully pleased with his accomplishment.


It is a very positive thing for a child to learn by experience that making things takes effort. In this case the effort was both physical and mental. It was 2 hours of physical effort which Senni had to invest in for the making of his spear. Along the way he used and experienced a number of different hand tools, and was challenged with several mathematical concepts. Senni did a great job.


The final finishing of his spear, the sanding and oiling, would be done at home.


Note: Some might ask why a nearly 6-year-old boy should be allowed to make and have a sharp pointed spear.  This project was both sanctioned and witnessed by his Mother, who took many of the lovely photos. While learning that making things takes effort, and learning how to use some traditional tools to shape a piece of wood into a desired shape, Senni will also be learning how to safely handle his spear. Learning to responsibly handle and safely play with potentially dangerous things is the kind of learning we have removed from our children in the modern digitised world.  


This young man is fortunate in being provided a broader education of greater depth than most other kids his age.  I count it a privilege to have been included in this process.
Yes, I love offering private tuition to people of all ages and all walks of life...

Greg Miller, T/as The Joy of Wood.


Teaching Space: The Heritage WoodcraftCentre, rear of 31 Canvale Road, Canning Vale, Western Australia.

greg@thejoyofwood.com.au  Look also for the Joy of Wood on Facebook and Instagram.

Thursday, August 14, 2014

Pre-School creations at St Marks Anglican Community School

Recently we did a woodworking incursion at St Mark's Anglican Community School, in Hillarys, here in Perth, Western Australia. This is the third year I have gone to the school to work with the Pre-primary students.

We had two classes of 30 kids - 5 year olds - and they had a ball! It was great to see the amazing things they created. It was our normal set-up for "Free Creative Play" in a school context. Across the 14 small benches we had 30 cross-pein hammers. On each of the benches were a pair of pincers, pencils, and nail containers with assorted nail sizes. The Sawing Station was set up with 8 assorted tenon/carcass saws at various heights appropriate to the size of the kids. There was a big pile of softwood pieces in various shapes and sizes for the kids to use, which we kept topping up.

After a briefing/demonstration about safe and efficient tool use, the kids get to make whatever they like from the material available.
One of the two tables of completed creations.
It was good to have a heap of parent helpers along to assist the kids, and they often get to learn a few tricks and techniques with hand tools too. Of course, the parents are asked to not "take over" (something Dads are notorious for) but to just hold things and generally help while the kids creativity goes wild. Thanks to those parents adn the wonderful staff for helping make it a great day.

What are the benefits for 5 year olds doing woodwork?
The benefits are numerous, but here are just a few:
  • Using any hand tools, but exsecially the saws, requires some body awareness. Sawing involves so many macro and micro muscle movements. Getting your body and body parts in the right position makes a big difference to the ease of sawing, When things "click into place" for a child using a saw, it is empowering and encouraging for them. They love it.
  • Skills for life. As kids we learn from experience, observation and reinforcement. Learning how to use a hammer or a saw is something you can take with you into the rest of yoru life. If a kid goes home from school that day and asks their parent(s) if there is a hammer in the house, that's a great thing. Hopefully the parent(s) will let their kid use it and give them a bunch of nails and a few peices of wood.
  • Working out how to put things together involves problem solving. So kids creating things with pieces of wood and a few hand tools will develop problem solving sklls - and problem solving builds resilience.   
  • Making things with pieces of wood helps the kids develop spatial relation skills, as they work out how to fit things together. Comparing pieces, cutting to size, choosing the right nail size, finding the right piece in the big bin of pieces - all these processes in the making of something help the brain develop spatial relation skills.
  • The encouragement and satisfaction derrived from completing the making of something is affirming and very positive. The resulting positive feedback the child receives from others around them helps to build self-confidence. Once again, self-confedence helps to build resilience.
  • In a press-button instant world, it's great for kids to experience the reality of something requireing some physical and mental effort, persistence and committment around a tangible, tactile medium and the creatiion of a real thing which can be played with, given as a gift, or displayed as a decorative item of momento. The creation which keeps on giving.
We do quite a lot of work with really young kids. They thrive on it, so it is always a pleasure to see them blossoming in the short period that they are at the bench creating something with their own hands.

Great to see this little guy using the small end of a cross-pein hammer, to get at a tricky nail position -  just as I had demonstrated at teh start of the class. Kids are often smarter than we adults give them credit for...

We are never too young or too old to benefit from the joy of woodworking!

Saturday, August 10, 2013

Saw sharpening... a balance between rake, fleam, and set.

At the Perth Wood Show last weekend, I picked up a lovely Canadian-made Disston tenon saw from the second hand tool stand run by the Hand Tool Preservation Society of Western Australia. It's a beauty! However it just needed sharpening...
Yep, a very nice Disston tenon saw, with the handle in very good condition.
I have a few odd Disstons made in Canada. This is a new addition to my Canadian bunch. 

With a three day gig this week at a primary school doing woodwork with the K - 2 students, I needed another sharp saw on hand. I also had another tenon saw needing sharpening for the event -an older Disston saw. So it seemed a golden opportunity to get them both done during a window of opportunity I had on the day before the school program commenced.

The older Disston tenon saw, made in Philadelphia USA.
About the variables in saw filing - rake, fleam, and set.
In a nutshell, RAKE is the vertical angle of the face of the tooth, which also determines the aggressiveness of the cut. If the rake was 0 degrees, the face of each tooth would be straight up and down. FLEAM is the angle of the face of the tooth in relation to the line of the teeth. If the fleam was 0 degrees, the teeth would be filed straight across. Rip saws are commonly filed like this, so that the teeth work like little chisels. Crosscut saws are filed with fleam up to as much as 30 degrees, which makes the teeth like little knives as they slice through the fibres of the wood. Set is the applied by bending alternating teeth either side of the tooth line. Increasing the set widens the kerf cut by the saw, which stops the sawplate from binding in the wood. However, the wider the set the harder it is to push the saw, and the less accurate the cut. Dovetail saws typically have minimal set, which enables greater accuracy.  

These saws are going to be used mostly by small kids. I am still experimenting with filing angles and the amount of set which works best for the little people (age 4 up) who have short arms, limited muscle, and who are often using saws for the first time in their lives. This means that they are yet to get the hang of moving their saws in a dead straight line. The wobbling wrist and arm will tend to make the saw plate bind in the kerf, so a bit more set in the teeth than usual will help to prevent this. The trade off is that they have to remove more material to have a wider kerf, meaning more energy is required. It's a balancing act, and my experimentation is yet to achieve the optimum saw configuration for the little kids. The other ingredient in the equation is the type of material being cut. With the kids, I almost exclusively use softwoods and plywoods. With softwoods you would normally use a greater fleam angle than you would for hardwoods. So, I continue to experiment...

The new saw in the saw vise, ready for sharpening.
After jointing, shaping and setting the teeth, I filed the teeth with a rake of 30 degrees and a fleam of 20 degrees - hence the angles. The kids will be mostly crosscutting in softwoods.

Teeth being filed for cross-cutting, with a rake of  30 degrees and a fleam of 20 degrees. 

Two nice Disston saws, sharpened and ready for action.
I would have between 4 and 6 tenon saws in operation at the school. The picture below shows my standard "sawing station" set up. This 4 saw station is a bit like having 4 bench hooks set up on a pair of sawhorses. It also works really well, for right and left handed students.

The sawing station set up at the school ready for use. 
As I finish this post, I have completed the 3 day gig at the school. Eight classes of students had a great time  making stuff - using hammers, nails, saws, and a  pile of wood pieces. The saws worked flat out for much of that time. Amid all those cutting their pieces of wood to size, there are always a few kids who just love sawing! They might not make much, but they do create piles of little pieces! It's great seeing kids enjoying using tools for the first time. So empowering.


The verdict? For the really little kids, the 4 and 5 year olds, I reckon we might need just a little more set in the teeth...    I'm still looking for the right balance...

Friday, June 7, 2013

Creative fun at Roseworth Primary School.

Today I was doing woodwork with around 110 kids at Roseworth Primary School, spread across 4 classes - mostly pre-primary and Year 3 kids. It was a great day.
Nice plane!
We were doing what I call "free creative play". I had 16 of my small two-vice benches there, each one with hammers, nails, pencils and pincers. I had 6 tenon saws (technically carcass saws) at the sawing station, freshly sharpened. There were two big bins of wood pieces for the kids to dig into, and they supplied the creative enthusiasm. After I did a spiel and demo about safe and effective tool use, it was over to them.
One flying pelican...
There was a steady stream of creations through the day, including aeroplanes, boats, bird houses, dolls furniture, birds and more.
Another nice plane.
For many of the kids, it was their first time handling tools. In these gigs, it's not unusual to find a few kids who spend almost their whole time at the sawing station. They didn't make anything, except a pile of sawdust and lots of small pieces of wood. We had a few of those characters today. Fantastic.
Sailing boat.
Even over a period of less than an hour, it is amazing how quickly the kids' newly acquired skills at hammering and sawing develop. Their confidence develops simultaneously. It is a wonderful thing to watch as it all unfolds. There was something for everyone to learn - including the teachers and parent helpers.
Great house!
Learning to use tools is an empowering experience. There needs to be more of it!  

Saturday, February 9, 2013

March Workshops ... come and join the fun!!

At last, I have finally organised the March 2013 round of public workshops. The delay came about when I was unable to secure my normal venue, Earthwise in Subiaco. However I am happy to have secured an alternative venue - the PVI/CIA Workshop space in West Perth.

What a great line-up of workshops! The ever-popular favourites are there, including Carve a Wooden Spoon, Make a Kitchen Chopping Board, Making Cajon Drums (Parents and kids together), and Make Kitchen Spatulas & Salad Servers. In addition to these, there are a couple of new ones: Make a Small Picture Frame and Carve a WELCOME Sign will be fantastic opportunities to push your woodworking hand skills into new territory. Make a Traditional Wooden Stool is one of two workshops being run at times which may suit people while their kids are at school - an experiment in accessibility. For those wanting to discover the wonders of planes, there is The Plane Facts: Learn to choose, use and enjoy hand planes - an exciting opportunity to really become familiar with the array of traditional planes and to have a play with them! On the Saturday there will be a couple of Woodworking for Kids - two workshops specifically run for kids aged 6-12.

Come share with me in some wonderful adventures in traditional woodworking skills and techniques. Experience the joy of wood!!

Places are limited, so get in quick. Enquiries and bookings via email: adventure@wn.com.au
The two page info flyer is found below in jpg format:


Page 1 of the info flyer
Page 2 of the flyer.


Looking forward to sharing the Joy of Wood with you!
Regards,
Greg.