Showing posts with label Dovetail joint. Show all posts

Monday, May 12, 2014

Drawers and Dovetails. It's a natural.

The kitchen I have been making by stages is completed structurally. It's time to make the drawers, before the doors and drawer fronts are made and hung. These doors and drawer fronts will be made with WA Blackbutt (Eucalyptus patens), as per the framing and end panels.
One section of the big kitchen ready for appliances, end panels, drawers and drawer fronts and doors.
My customer has a huge pile of New Zealand grown pine - either Pinus radiate or Pinus pinasta - which she picked up from a local furniture manufacturer who was closing down. Sadly, yet another furniture maker put out of business by the West Australian public choosing to buy cheap Chinese imports rather than supporting their local industry.  But that's another story...

Somehow, the Kiwi's can grow much nicer pine than we can grow in Australia, especially Western Australia where we grow those same two species. I suspect it's a climate thing as well as a plantation management issue. Anyway, this awesomely nice material, in random lengths of material all dressed to 175x19mm (7"x3/4"), was what I would be making the drawers from. No nasty white melamine!

Preparing the material.
As most of the drawer sides would be wider than the 175mm stock, I would need to glue up the material to make the width. The least wasteful way to do this would be to edge glue up the boards.

One of many bunches of boards glued up, in cramps.
 Once glued up, these wide sections would be ripped down to the required widths to make the drawer sides. These would in turn be reduced down in thickness to the required 15mm (almost 5/8").
The strongest and most reliable jointing method for the boards was to glue them up with a "lightning joint". The two parts are done with a carefully set up single router cutter - one side cut from above, the other side cut from below. The two components fit together, a type of tongue and groove joint, which more than doubles the glue surface area. Nice.

A lightning joint, seen here after the material had been reduced down to the 16mm thickness.
With the material ripped slightly oversize, one edge was shot over the buzzer then these were ripped accurately to width over the table saw. These were then docked to the correct lengths required for the drawer box sides, fronts and backs. It was time to cut the dovetails.

Cutting the dovetails - first the tails.
Tails first, no argument. With the marking gauge set at 0.5mm wider than the drawer side material, a scribe line was made all the way around the front end of each drawer side. This would be the base line for the joints. The spacing of the dovetails were then planned, making sure that the drawer bottom groove would fit behind the bottom tail. The spacing positions were then marked onto an offcut, to make it easy to transfer the marks onto each of the drawer side outer front edge faces.

Transferring the critical marks onto the end of the drawer fronts. 
 Setting the sliding bevel at an angle of 1:7, a very sharp pencil was used to mark out the tails.

Marking the tails from the critical marks, using the sliding bevel. 
 With the tails marked, the next step was to square off from the lines across the end of the drawer sides. This just helps to ensure the cuts made are nicely at 90 degrees through the material.

Marking the lines across the top of the drawer side front ends.


That's what we're looking for. Nice clean lines on two adjacent faces, the waste marked.
With the tails marked ready for cutting, it was time to produce the tails. The drawing of the pencil lines down well below the base line makes it easier for the eye to align the saw plate - in other words, it's a trick which helps cut nice joints.Surplus pencil lines are cleaned when the completed drawer is cleaned up.

Using a nice little Gents Saw to cut the sides of the tails. Very fine teeth, minimal set, filed for ripping. 
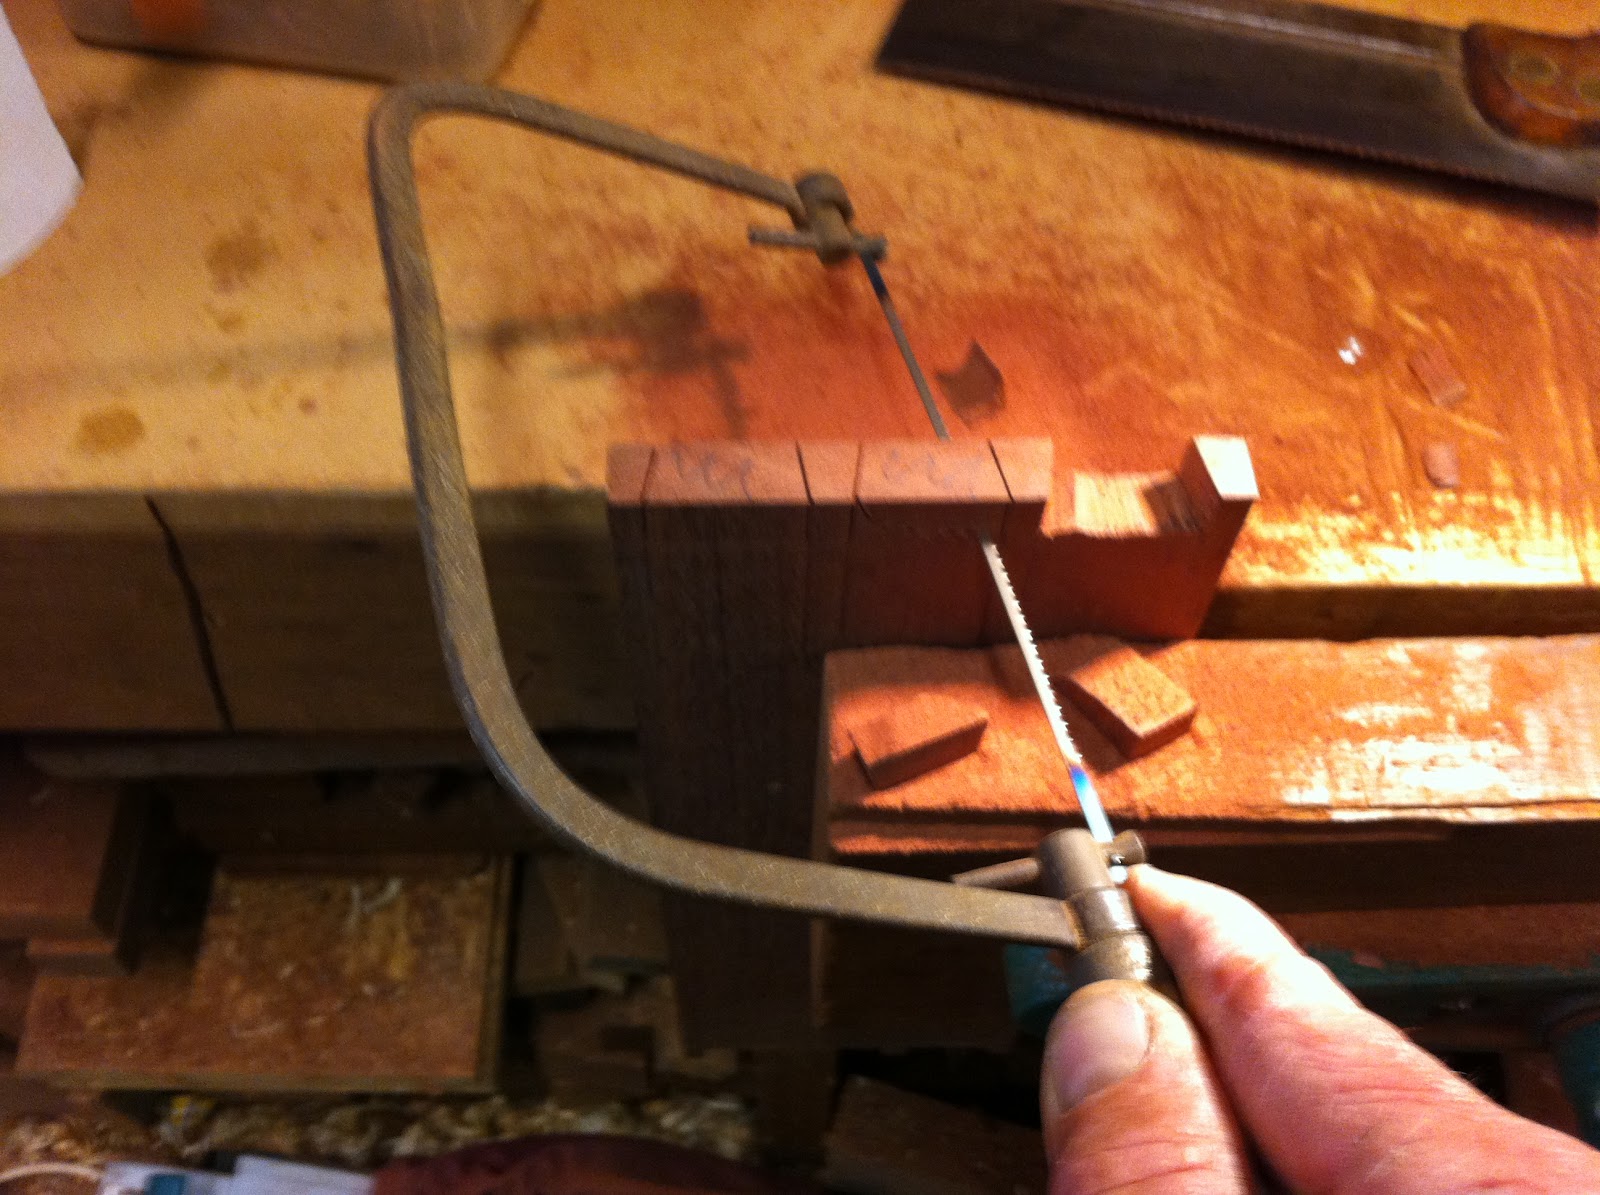
The next stage was to cut out the waste, using a coping saw.  Just down close to the line.

First this way...

Then that way...
 With the bulk of the waste removed with the coping saw, the last of the waste needs to be removed exactly to the scribed base line. With hardwood, this is easily done with a nice sharp chisel. Cheesy pine, on the other hand, even nice NZ grown pine, does not cut well across the end grain, even with a razor sharp chisel.
I did the first few with a chisel, and it was chunking out too much between the scribe lines. This would reduce the strength of the joint, even though it would look like a million dollars on the outside. So another alternative was to set up the bandsaw to cleanly take out the remaining waste exactly down to the scribed base line - without chunking out the end grain. The last little bits remaining at the base of the tails are then taken out with a chisel of a knife.
The stop board fixed at the back ensures the blade stops exactly at the base line.
Using the bandsaw in this way to finish removing the waste after the coping saw is very quick (so long as there is minmal material to remove) and accurate - but in this case it was done to maximise the joint strength in the nice but cheesy pine.
 
Drawer sides with tails cut. Time to cut the housings for the backs and the drawer bottoms, 
Cutting the housing grooves for the drawer backs and bottoms.
With the tails all cut in the drawer sides, it was time to cut the grooves to house the base and the backs.  The groove would also be cut in the drawer box front, even though the pins for the dovetails have not been cut yet. The cutting of the housing grooves would be a table saw job.

The position of the groove to house the drawer bottom is determined by two important things: the thickness of the material to be used in the bottom (15mm, same as the drawer sides) and the specs required by the drawer runners. My customer wants the Hettich brand modern soft-closing drawer runners. The bigger drawers with 50kg capacity and the smaller ones with 30kg capacity. While most of these drawer runners in modern conventional kitchens are used with the pressed metal sides and melamine bottoms, Hettich does make a version specially made for wooden drawer sides. They had to come from Sydney, but eventually they arrived.
The specs for these runners determine the drawer dimensions to fit within the opening in the frame, and the position of the runners which are fitted below the drawers. The drawer sides are required to hang 12mm (1/2") below the underside of the drawer bottom.  

Saw blade protruding 7mm above the table, 12mm between blade and fence. First cut, base and back.
 The groove position at the base would also be done at the back. Easy on the same saw setting.

Inside and outside cuts made. Now to take out the waste between these.

After the saw removed most of the waste, a No70 router plane quickly cleaned up the groove bottoms.
With the grooves cut in the drawer sides and the drawer box faces, it was time to complete the cutting of the dovetail joints. Now to cut the pins. This could have been done before the grooves were cut, but I chose to do it this way around - only because it suited me with the material preparation sequencing.

Cutting the dovetails - now the pins.
This is an important part of hand cutting dovetails, and accuracy will be important to get good joints. With the drawer box fronts held vertically in a vice at the bench, the corresponding drawer side is placed on top and aligned in exactly the right position. Held here, a marking knife is then used to mark along the sides of the tails. 

Transferring the tail marks onto the end of the adjoining member. 
A straight piece of timber is clamped to the drawer box front, to keep it flat. This helps to create a more accurate joint.

Using a pencil and small square to carry the scribe lines down the outside face beyond the scribed base line.

These pencil lines will help enable accurate saw work. 

It's pretty quick to do the cuts - always on the waste side of the scribe lines.

Dovetail pins and tails all cut for this batch of Drawer sides and fronts.
Putting it all together.
The remaining components were made: the drawer backs and bottoms, The bottoms were made each with three boards, held together with tongue and groove joints were they met. I had cut these T&G joints on the table saw.  These boards in the base, and the backs, were housed in the grooves in the drawer sides. The drawer bottom extends beyond the underside of the drawer back. It's a traditional way of doing it - at least here in Australia. With all the pieces made, the drawers could be assembled.
  
One bank of three drawers made and ready to be polished before fitting the drawer runners.

Nice completed dovetails! No filler, no jigs, just good accurate marking and cutting. 
 These are all "through" dovetails rather than "half blind dovetails", because the drawer fronts, to be made from WA Blackbutt, will be fitted onto the front of each of these drawers.

These days Dovetails have a particular mystique about them. However this is really a phenomenon of the modern era, a kind of reaction to the diminished standard of craftsmanship which had become apparent in the later end of the 20th century. Thus the dovetail joint has become a kind of hallmark of quality for the discerning consuming public. Though most people couldn't tell the difference between the hand cut dovetail and the machine cut dovetail, a discerning person can pick the difference.
Contrast this with the past, where the dovetail joint was just a practical, reliable, and strong joint  - mechanically ideal for use in the front of drawers. (and many other situations and functions) They were normally cut by hand by the tradespeople who were just doing their jobs constructing the furniture. No fanfare. Just nice durable joints.

So here we are today. A top quality custom kitchen in the modern idiom needs to have good quality hand cut dovetails to reflect something of that inherent quality. On the practical side, the dovetail joint mechanically remains the ideal joint to withstand the stresses imposed on a drawer being pushed and pulled over decades.

Drawers and dovetails. They are a natural fit.
They are also a pleasure to cut by hand - a very satisfying process. Quality to be proud of...  


Tuesday, June 4, 2013

Toss that dovetail router jig!

Last night I was guest presenter at the North Metropolitan Triton Club.
I called my presentation: "Five Good Reasons to Chuck Away Your Dovetail Router Jig", where I went briefly through the history of the joint and different types of the joint. I followed this with a demo on hand cutting a Through Dovetail Joint. Then it was time for them all to have a go.


I had taken enough tools and timber for 20 people to be making their joints simultaneously. It was a lot of fun, with all the usual traps and pitfalls being experienced along the way, and lots of people being pleasantly surprised with what they achieved. For some it was the first time they'd ever cut a dovetail by hand ... for others it was the first time since they last did it at school half a century ago! A great night.
The Club meets in a high school woodworking classroom. Busy cutting dovetails by hand.
My demo worked well, despite the low light conditions! It's hard to see pencil lines on jarrah in low light. 

A nice contrast, jarrah and pine. Joint straight off the saw a tight fit, no trimming of joint required. 
While it is fun to tease "router-ophiles" about their screaming power tools, on a serious note I was suggesting the potential benefits to their woodworking skill development which the hand cutting of dovetails can offer. Accuracy in marking out and accurate tool use apply across all aspects of woodwork. Then there is the matter of personal satisfaction...
Yes, it was a fun night at the North Metropolitan Triton Club Inc...


Learn the pleasures of hand cutting dovetail joints.
For those people in Perth, Western Australia, I am offering a workshop for the public on Friday night, June 21 : "Unlock the Mystique of the Dovetail Joint". It'll be a lot of fun, and a chance to learn and have a go. Email me for more info if you would like to book in or know more about it.

Sunday, May 12, 2013

Saw sharpening day.

Today was a saw sharpening day. I have a couple of teaching workshops coming up where I will be teaching the pleasures of hand cutting dovetail joints. It was time to get more dovetail saws organised for the bigger groups.
Much of my dovetail saw collection has been amassed (like the rest of my saw collection) over the last few years from antique tool sales, garage sales and flea markets. I am not a Tool Collector, incidentally, for my purpose is to put tools back into service, not into glass cabinets. Many of the priority saws have been piling up in a box awaiting for a sharpening day. That day arrived today.
A few of the saws awaiting cleaning up and sharpening...
Some of the saws needed to be "given a birthday" first: Many needed surface rust removed, some needed a bit of straightening of their saw plate, the odd bit of nut tightening, and a bit of nourishment for the handles. The cleaning up of the saw plate was done with the wire wheel in the bench grinder, wet and dry paper, WD40, steel wool, etc.

When the saws were ready, I donned my magnifying head gear, sharpening equipment, saw vice, and got onto the next phase of the task. Sharpening day was well under way.

What a beautiful array of dovetail saws!! Several of them are well over 100 years old. The brands represented include Sheffield companies like Robert Sorby, Marples, Sanderson Brothers & Newbould, Bowden and then of course Disston from the USA. There are a bunch of other unknown brands present in the pile too, including the inevitable "Warranted Superior"which many companies seemed to use.

The dovetail saws in the pile are a mixture of open handled models, gents saws, and a few closed handled models. I had a few other saws waiting in that pile too, including a couple of old panel saws and small carcass/tenon saws. I'd do them if I had time. Such a beautiful array of saws and all oozing with history.
One of the Gents Saws in the saw vice.
The Gent's Saw. What's in the name? In the 19th century, upper class recreational woodworking gentlemen did not want to appear like the lower class tradesmen, so I understand. Gentlemen required a different style of handle to the tradesmen's saws. Hence the Gent's Saw was born. This style still bears the name to this day.
Sharpening a Gent's Saw using the new Veritas filing guide.
What makes saw a Dovetail Saw? Ideally, they will have a thin saw plate for minimal kerf, minimal set of the teeth, be only 8 to 10 inches long, and be filed with ripping teeth.  Saws are generally filed for ripping (cutting along the grain) or for cross cutting (cutting across the grain). It is the various angles of the teeth which makes the difference. Dovetailing involves cutting along the grain, so the best dovetail saws are filed for ripping - that is, filed straight across. This creates a chiseling action by the teeth - the most efficient and clean way to cut along the grain. Crosscutting teeth are filed on a different angle to create a slicing action on the fibres of the wood. Whatever the style and size of the saws in my pile awaiting sharpening, I was setting them up to be used almost exclusively for dovetailing, so they would all be filed for ripping.  There is a science to getting the shape of the teeth right - but I will save a discourse on that for another post.

In the past I have used a block of wood driven onto the far end of the file as the guide for consistent filing. This was the first time I have used the new Veritas filing guide... and I like it very much.
Looking good. Another saw done. The test cut was good too.
While the filing generally went well, there was one sad story. One of the really old open handled saws had a couple of bad patches of corrosion on the saw plate. There were almost no teeth left on it - I'm sure the previous owner must've been cutting bricks with it! I was having to re-form the teeth on the saw plate. Sadly, while filing a corroded section a small piece blew out. At least the beautiful handle and nuts can be used on another saw.
Bummer. Too much corrosion, so filing caused a blow out. This saw now in the spare parts box.
Keeping the saws sharp.
Some hours later, I had finished filing assorted 10 dovetail saws.
Ten beautiful dovetail saws all cleaned up, freshly sharpened and ready for action
However, the saws would need some protection on their edges to ensure they don't knock against other or against other metal objects, as this bluntens them. I commonly use a piece of 1/2" trickle irrigation tubing slit along much of its length, and held onto the saw with rubber bands made from cross-sections of a bicycle tube. The recycler's solution to protecting the saws' edges.
Protection in place. A pile of ten sharpened dovetail saws.
A good day's work.
It can do your head in, staring hard through your magnifying head gear for hours on end while filing and setting saw teeth. By the time I called it a day, I had filed 14 saws. Ten dovetail saws filed for ripping, three small tenon/carcass saws filed for cross cutting, and a panel saw filed for cross cutting. Sensitive finger tips from too many pin pricks from the sharp teeth, tiredness from concentrating hard for so many hours, and a sore back from so much stooping over the saw vice.

Despite all that, I was very satisfied with the day's achievement. I have never filed so many saws in one day, and I was a few steps closer to getting enough saws ready for the dovetailing workshops coming up in June. It was a good day's work.

At the start of the year, I had resolved that 2013 would be the year that I become very competent at saw sharpening. I reckon things are going according to plan... my skills are improving.
All in a day's work.
Saw sharpening day was a lot of work but very successful. However, I need to do many more such days if I am to make a dent in the huge pile of saws awaiting similar treatment!!  Hopefully my skills will keep improving as I go...  


Friday, August 31, 2012

How to cut tight fitting Dovetail joints. (Recycled Jarrah Cabinet, Part 3).

The big recycled jarrah  cabinet continues to take shape. The top sections of the cabinet will primarily be used for the housing and displaying of ceramic art pieces. The bottom sections of the cabinet will house some serious HIFI and media gear, plus as many LPs, CDs & amps; DVDs and as muchother technology as we can creatively fit within the space available.

I am currently working on the lower section of the cabinet. The longer section is quite deep, and the return is very shallow in depth. In this shallow section, behind the pair of doors, will be two storage bins for good old-fashioned vinyls - LP Records. In an effort to maximise the space available, I have been making another pair of bins to hold as many audio CDs as possible. The space left over will be divided into small shelves to hold more CDs. The bins will be hinged to fold outward in order to access their contents, and these bins will be held together by dovetail joints, with Half-blind Dovetails at the front and Through Dovetails at the back.

Marking out and cutting the dovetail joints.
With the sides, ends and faces of the boxes a consistent thickness, marking out the Through dovetail joints requires the use of only one marking gauge setting - approx 1.0mm wider than the thickness of the material. This leaves a tiny bit to clean off after the glue has dried. I am one of those "tails first" woodworkers.
Marking out the Half-blind dovetail joints, two marking gauge settings are required. One will be as above, about 1.0mm wider than the thickness of the material. The other will be the length of the tails - in this case 3.0mm less than the material thickness of 14mm. These tails will be 11mm long.

The tails are always cut in the sides of drawers and containers. With use of marking gauge, sliding bevel, rule and marking knife, the tails are marked out. In this case, there is a difference in the marking out on each side piece, as the front joints will be half-blind dovetails and the back joints will be through dovetails. Regardless, all the tails are cut first. When doing the marking out, the only pencil lines needed are on the ends and one one face. Note on the pic below that the pencil lines off the sliding bevel are marking the tails deliberately longer than required, extending well below the scribe line which marks the base line of the tails. These long pencil lines make it easier to make sure the saw follows the correct angle. No lines re needed on the other side of the piece.  The bevel was set at 1:6.
A side piece held in the vice ready to do the first set of cuts.
It is always easier for the hand to make cuts vertically than on on an odd angle, so the piece is held in the vice for sawing such that one line of pencil lines is vertical. Once these are cut, the piece is turned in the vice so that next set of lines are vertical, enabling more accurate and consistent cuts to be made.


A nice little dovetail saw makes the cuts with ease and makes a very tiny kerf.
A note for the tool junkies amongst you - that beautiful little saw is English, a Marples dovetail saw. Accurate sawing involves carefully cutting down the waste side of the sharp line, to the base line. It is better to over-shoot this line than to come up short of the line. These are hand cut dovetails, and a good look at old furniture/drawers shows that it was common for these lines to go a little beyond the base line. I have no problem with the odd overshoot with this stage of the joint cutting!

Main cuts for the tails completed, down to the scribed base line.
Once these cuts are made, the waste on the corners is cut off as the piece is turned in the vice. Then the waste between the tails is then cut out using a coping saw.

Use a coping saw to remove the waste down close to the scribed base line.
Once the waste has been removed from between the tails, it's time to chop down accurately towards the base line.
Sneak up to the base line with the chisel. The last vertical cut is done with the chisel sitting right in the scribe line.
I tend to chop out a bit of waste from each gap between the tails on one side, then turn the piece over and do the same from the other side. This reduces the chance of a blow-out on the bottom side to where you are working. It is important to sneak up on the scribed base line, with the last vertical cuts done with the chisel sitting right in the scribe line. If you don't sneak up on it, and you chop into the base line with too much waste still there, the chisel's bevel pushing against the waste will force the chisel back against the base line. The result will be a base deeper in than the base line you can still see across the tails. We are looking for a beautifully straight line for the housings and the base of the tails, defined by the scribed base line. You also need to make sure that there is no high-spot between the two opposite sides. Ideally, we want it to be dead flat - though slightly hollow is OK too. When you do this enough, you develop an eye for it. Meanwhile, if you need to, lay a straightedge or the edge of your chisel across the bottom of the cut-out, to check there is no high spot between the opposing base lines.

All tails cut and ready for the next stage - to transfer the lines over to mark and cut the pins. 
You may notice that the tails are a different length in the pic above. This is because we are cutting Through dovetails at the back of the box and Half-blind dovetails at the front of the box.

Transferring the tails to mark the pin positions - half blind dovetails.
By cramping the side piece to the bench front, or putting it in a vice, I line up the base line with the inside edge of the box front. This should also mean that the scribed base of the housing for the tails, between the pins, are lined up as well. It's easy if I have accurately used the two marking gauge setting in the preparation and marking out of the stock. Like most joinery, it's all in the marking out!

Extending the pin marking lines downwards to assist accurate cutting.
Once again, by extending the scribed pin lines down the adjacent face with pencil lines, this enables accurate sawing of the pin sides. This a helpful technique for both Through dovetails and Half-blind dovetails.
Cutting the pins for the half-blind dovetails means cutting down to the two base lines.
Remember to always cut on the waste side of the line with these joints. With careful marking out, accurate cutting with a nice fine saw with minimal set and narrow kerf, and good waste removal with sharp chisels, the joints should be able to come together firmly without having to do any paring or modification. That's the aim, anyway!

First stage of the waste removal, sneaking up until you can chop right on the scribed base line.
Second stage: Waste between the pins best removed with the piece held vertically with support behind.
Half-blind dovetails are much trickier to cut than Through dovetails - but are more satisfying when they come together nicely!  You do have to be careful not to split the timber around the pins when chopping out the waste between the pins.

Sneaking up on the other scribe line of the half-blind dovetail joints.

Job done. Waste removed between the pins for the Half-blind dovetail joints.

The moment of truth! Hammering the two components together for the first time.

Not bad. You can see where a small amount of paring to the top shoulder, to the tail base line, will bring a tight fit on the end of the adjacent tail end.
With all of the half-blind dovetail joints cut, fitted and pulled apart again, it was then time to cut the tails for the Through dovetail joints. 

Line up the tail base line with the inner face of the other piece, and mark the pin positions with a marking knife. 

Marking knife marks show pin positions for the Through dovetail joints.

Extend the lines down and cut the pins, on the waste side of the lines.

Using a coping saw to remove most of the waste between the pins.

Most of the waste removed, ready for the chisels to do their work.

Waste chopped out. Torn out fibres are not unusual where the chopping meets from each side. 

Another moment of truth. Hammering the joint together for the test fit.

Nice fit! No paring or trimming required. Tight, clean and accurate. Yippee!

Prepare purpose built clamping blocks will help pull up the joint during gluing.

There's nothing like a bit of squeeze-out from nice tight-fitting joints. Beaudy.
Only one of the four half-blind joints (pictured earlier) required any paring to improve the fit. All four of the through cut joints required no paring. It is very satisfying when the joints come together firmly first time straight off the saw and chisel.

With vertical space within the cabinet at a premium, I opted to fit the bases in a way that took up the least amount of space. I rebated the base of each box after assembly, with a router, cleaning out and squaring the corners with a sharp chisel. Ply bottoms 1/4" thick were glued and screwed into the bottoms of the 4 boxes.


Fitting the storage bins into the cabinet.
The storage bins for vinyl LP records, the storage bins for CDs and the little CD shelves taking up the remaining space, will all be housed behind a pair of doors.
The two LP bins I have opted to hinge from the front, using "Florentine Bronze" flavoured piano hinge. I only needed just under 900mm (3 ft) of it, but had to buy in in a 3.6m (12 ft) length. The other option was to buy it in a 35m (115 ft ) roll!! ...I settled for a 12 foot length. To prevent the bins from emptying their contents onto the floor, a stop was fitted for each bin.
Fitting the CD bins above these was tricky, due to the limited space. After some planning and experimentation, I have fitted sliding pins which I made specifically for the purpose.

LP bins and CD Bins will be behind doors. The plinth is sitting on top of the cabinet.
When the bins are slid forward, they pivot downwards on the pins, giving access to the CDs while cleaning the LPs below. A bit of creative thinking gave me some stops which bring the bins to a final open position. Lifting the bin enables it to be slid back on its pins to the closed and elevated position. A good solution, and worth losing sleep over it, this remedy came to me in the wee hours of one morning as I cogitated over the dilemma.
One of the two CD bins in the dropped-down open position.
The pins I made from an M10 threaded bolt, cut 4 into pieces each about 25mm long. Grinding the thread off half of each section, I then cut a screwdriver slot in the end of the threaded part. Having calculated the right location for the pivot point in the CD bins, I drilled a hole and tapped an M10 thread inside the hole with a conventional metal tap. The ground down pin end is just small enough to insert through the threaded hole, and then the pin is turned from inside with a screwdriver, winding the threaded end into the box side until it protrudes into the sliding track the appropriate distance. This method enables the CD bins to be fitted on installation/delivery and be removed at any time as required. It is also the hinging/pivoting method which takes up the least amount of room.

One of the four pins I made from a piece of M10 threaded rod.

One of the two LP bins in open position. It's hinged on piano hinge at the bottom.
The plinth.
The whole cabinet will be sitting on a 4" (100mm) plinth. When making up the plinth, I opted to do half-blind dovetails on the two external corners. Not what I would normally do, it looks pretty good I reckon. I have seen it before in some antiques furniture, and given this cabinet is being made to fit in alongside other antiques, it is a small detail which will work well - if anybody notices!
Gluing up the plinth. You can never have too many cramps - or straightedges...
One of two dovetailed corners on the plinth.
More on dovetail joints.
There is a lot written and said about dovetail joints. These days we give them an importance and mystique which would have seemed very strange in days gone by. In the past these joints were just a practical way of creating a strong joint between two pieces of wood at right angles to each other, without the use of metal fixings. That's just what I did for the joints in the plinth, really. It is also a good way to build strong corners in the 4 bins/boxes referred to in this post.

Sure, you can make pretty flash dovetail joints with screaming routers, fancy jigs, and all that. For me, though, the real satisfaction comes from confidently making these joints by hand - and using no filler. It's just good honest old-fashioned hand tool woodworking. Sensual and satisfying.

The other thing I really enjoy is feeling a sense of connection to past generations of craftspeople who have come before me. In fact, that beautiful little dovetail saw I used has the name of a previous owner stamped in the handle. His perspiration and mine mingle in the patina of the handle. I wonder what he made all those years ago as he toiled at his bench with that saw. I share in the legacy of those who came before me. I am but a custodian, of both tools and knowledge - but also of the simple joy to be found working wood by hand. As a custodian, I also have a responsability to pass all this richness to the coming generations of woodworkers. My hope is that you found the info in this story helpful.