Pages

Tuesday, December 30, 2014

Pete's London Plane Tree - a journey begins.

My cousin works for a Local Government Authority in the western suburbs of Perth, Western Australia. For risk management reasons, this tree was required to be removed from a well established public garden. Peter contacted me and asked if I was interested. He sent me a picture of the tree, and I said I would like the bottom section of the tree, where the pith would more likely be in the centre of the log.
The large lower branches meant the best timber would be below this in the lower trunk. 
I was unable to be there on the day the Arborists removed the tree, but I turned up the following day with the aim of splitting the log section down into quarters with my wedges in order to make the log  more manageable for me to remove it from the site.
The log section awaiting me, and my box of wedges next to it. the rest of the huge tree had been chipped and totally removed from the site. 
London Plane, Plantanus x acerifolia, is understood to be a hybrid between the Oriental Plane (Plantanus orientalis) and the American Sycamore (Plantanus occidentalis). It was first recorded in Spain in the 17th Century. London Plane trees are commonly grown in cities around the world, with lots of these deciduous shade trees being planted around Perth for many years now. I have never had the chance to play with this timber before.

After Peter first phoned me, I did some research on the Net, hoping to know more about the tree and it's timber. I read with interest a cabinetmaker in the UK saying what beautiful timber it was with its lacey grain structure. The lacey grain figure is caused by prominent medullary rays. Would this mean that the timber wound cleave (split) easily? I had hoped so. Hence I arrived on site with my box of wedges with the idea of breaking the log down so I would take it away in manageable chunks.
 
A pencil line marks the chosen line for the first split.
After careful assessment of the log, I chose what I thought would be the best line through the log for the first split. This line must pass through the pith (the centre of the tree). Wedges would be driven into the end of the log all along this line to start the process.
With a line of wedges being driven into the end of the log, the split starts to spread down the side.
As the split starts to extend down the side of the log, bark is removed along the forming crack and wedges inserted and driven in to help the split to extend further along the log. While you hope the split will continue along the line of the fibres, there are other forces and factors at work which may see split jump across the line of fibres. This took place down one side of the log.
Splitting the log is easy in theory... but this log put up a huge fight!
 Despite my hopes about the prominent medullary rays making this timber relatively easy to split, the reality was different. It had a very interlocking grain. The log fought all the way. Even with wedges down both sides of the log, assorted timber levers and more, the log just refused to come apart into the required two sections for a very long time. Through dogged persistence, physical grunt, and the effort of two and sometimes even three of us, it finally gave up the fight. We now had two sections.
At last... the log was split into two very untidy sections.
 With the log now open, we could see why it didn't want to follow the intended line down one side. There was a narrow section of rot inside the log which had hyjacked the cleaving process. Despite this path of least resistence, it had still fought to the end, as evidenced by the tangle of fibres on the face of the right hand section!  Contemplation of a few more hours fighting the log further as each of these two halves were split into halves again brought about a practical idea. Use the electric chainsaw to break down the next two sections! These two halves were far too heavy to be able to lift, so the chainsaw was going to be the way forward. I had other work to attend to!

Two of the resulting quarters were left in their long states. The other two were first cut in half along their length. These were cut into smaller chunks ideal for bowl carving.
 
The cutting of the half quarters was going well for a while, and then the chainsaw was all of a sudden struggling to stay on a straight course, as seen in the left hand cut.
 On finally completing a very rough cut on the left hand cut, a nail was found inside the tree. Further inspection found another nail in the cut second from the left. You can see where the saw started to deviate. I didn't know it, but we had hit the first of the nails there.

The chainsaw killer - nails hidden deep inside the log! You can see how the chainsaw was affected!
 Nails and other foreign bodies are a potential hazard inside many garden and backyard trees.
Another of the nails inside the log.
With the log cut up into manageable sections that I could lift, we loaded the big sections into the ute and away I went. A nice pile of very interesting wood and more challenges ahead...

At home I used the chainsaw to break down the material further, to create a pile of bowl blanks, chair and stool seats, and leg material for chairs and stools. Several times I would sharpen the chainsaw only to hit yet another nail! It was very frustrating - but such are the hazards of working with garden trees.
Some of the booty derrived from only one half of the log. Nice!
Only half of the log was broken down in this way. A couple of friends who are bowl carvers would receive some nice material to work with, and I would still have plenty to play with.
The ends of the sawn pieces were sealed with Titebond III (a great way to use up the gluggy stuff left in the bottom of the big containers of this my favourite glue).
Ends sealed with Titebond III, the glue drying before packing away.
As well as the nice pile of bowl blanks, stool and chair seats and leg material, I still have two remaining quaters of the original big log. These ends were sealed too, and hopefully will remain happy as they wait for me to get to them. I am thinking chair back legs, etc...

While not riven or cleft in the traditional manner, I have derrived a great resource from this one piece of that big tree which would otherwise have been chipped up into mulch like the rest of it.

I look forward to making an array of interesting stuff from this nice timber over the coming months.

Thanks, Cousin Pete!   The real adventure and an interesting journey now begins...

Tuesday, November 25, 2014

A Stool for Annabelle.

A few months ago, my nice neighbours over the road were cutting back a whopping big Cape Lilac Tree in their backyard.  Brad and Aimee offered me as much of the tree as I wanted. I took a big heap of log sections home, just in time for the Green Woodworking workshops I ran in July.

Breaking down a chunk of Cape Lilac. It cleaves apart quite nicely.

At the time, I told myself I would make something for them as a thanks, and thought it might be nice to make their daughter Annabelle a three legged stool.
 
Meanwhile, I have been messing around with a Spring Pole Lathe I have made - based on the machine brought back into existence by legendary US woodworker Roy Underhill, who adapted his model from a 17th century German technical encyclopedia.

My trusty Spring Pole Lathe.
First of the three turned legs.
I have been wood turning on powered lathes since I was 12 years old - but it takes a bit of getting used to the techniques required for these pre-industrial Pole lathe machines! However, I have been having a lot of fun playing with and fine tuning my Spring Pole Lathe so have been making some sets of legs for three-legged stools. The first set I completed would be for Annabelle.

The top for the stool was cut out and then shaped with a spokeshave.
Using a spokeshave to shape the edge of the seat. Held in a bench vice.
Holes were drilled in the underside of the round seat, and after the legs had dried for a few weeks they were returned to the lathe to turn down the tenons to the right diameter - a tad over an inch.
Holes drilled in the underside of the seat ready for the legs.
The legs were then driven into the holes with some glue (Titebond 3). The stool was complete, ready for finishing.
Legs now driven into the underside of the seat.
With the legs fitted, the next step was to level and cut the feet. Then I wrote a small inscription on the underside of the seat before applying a couple of coats of Orange Oil followed by a beeswax mix.


It was time to present the completed stool to Annabelle...
Annabelle and the nice little stool made from her tree...
The tree has not been totally removed from Annabelle's backyard. There is a massive amount of material still there, as a multi-branched collection of coppiced trunks. I'm hoping to score some more next time when more bits of the tree are removed. Meanwhile, this is the best kind of storage for green wood!
The stool perched on a stump of the big tree from whence it came.
These three-legged "milking stools" are a great little project. Easy and fun to make, and a great chance to play with the spring pole lathe. Nice. Thanks, Brad and Aimee for the chunks of your tree.

Saturday, November 1, 2014

The Joy of Sawing for Kids.

We did a lot of school incursions last Term.
Taking the Joy of Wood to kids in primary schools around Perth, Western Australia, we have mostly been working with Kindergarten, Pre-Primary and Year 1 students - kids aged 4 -7, and they love to be creative and make things with their hands.

Sadly, working with tools is not something many kids get to do these days. I reckon that is why kids find it so empowering to use hammers, nails and saws - which is what we do so well.


Sawing is an empowering thing!
It is fantastic how quickly the kids take to the sawing, in order to modify the size and shape of pieces they are assembling as they make their creations.  The sawing station is always very busy. Funnily enough, in every class, there is at least one kid who spends most of their time sawing wood rather than nailing things together! It is always fun to see which one it will be. Sometimes this title will be shared by a couple of kids. There is no gender divide here. The happy sawyer can be girl or boy. They just love the satisfaction of successfully using the saw as they create a mountain of small pieces!
Good stance!
So how do you help kids to get sawing?
A few simple things will make a difference:

1. Provide an appropriate saw. The saws used for these activities are mostly members of the Backsaw family - commonly known these days as Tenon Saws. The saws I used with kids are nice old saws - preferably made before WWII, and even better if they were made before WWI - as ideally they will have nicely shaped and small handles. None of the plastic handled saws in your local hardware store are any good. Get a real saw. The two best saws of the many I have kids using are well over 100 years old. Beautiful and a joy to hold!
Nice action, Kiddo.
2. Teach kids how to hold the saw correctly. Holding the saw with the "three-one-thumb" technique has been taught for generations, for good reason. That index finger pointing forward helps to keep the wrist straight, which makes for better sawing. Kids pick it up pretty quickly, though some may need to be reminded every now and then. Just help them to create a good habit.  The other part of this is helping the kids to adopt a good stance, where the body is balanced and the eye, saw, hand, elbow and shoulder are all on the same plane, enabling a nice straight relaxed sawing motion.
Beautiful saws. Heavy brass backs, small shapely handles, English (Buck), and over a century old.
My best saws for kids to use.
3. The wood must be held still. Not only do we provide the equivalent of a "bench hook" style of sawing position for each saw available to the kids, but we also provide a cramp which is easy for kids to use as an additional aid - as well as coaching the kids how to best hold the timber still.

This one forgot the index finger position, but work nicely cramped still.
4. Provide a sawing bench height which is appropriate to the height of the kids. This one is a no-brainer. I have saw horses of different heights onto which the long double bench hooks are attached. If your body is over the saw, it will be easier to provide the power and nice straight sawing action. As a safety strategy for our big groups of small kids, we have a rule that no tenon saws are to be used on individual benches - they stay at the "Sawing Station". Take your wood to the saws, then take your pieces back to your bench. It's simple, safer, and easier to manage.

Using a sawing station. We have these at diferent heights for different sized kids. 
5. Give kids softwoods to use! This will include most plywoods and pines. For us in Western Australia, the best source of beautiful softwoods is from packing crates out of Europe and North America. Packing crates from North America and Europe are made from various wonderful pine species as well as plywoods, OSB and other. While these timbers are very nice, it's also good to rescue these marvelous packing crates from land fill.By providing softwoods for kids to use, it is more readily nailed and sawn. Reduce the opportunities for frustration, and you increase the likelihood of joy and satisfaction.
So many pieces to choose from...
As well as Tenon saws, there are times we also use Coping saws and Panel saws for some projects. Regardless of the type of saw used, the principles above remain the same.

It's great to watch kids experiencing the joy of sawing wood!

Tuesday, October 14, 2014

Sharing the Joy at the Perth Wood Show 2014.

The Perth Wood Show is always a big weekend, 3 hectic days of it - the culmination of several days of preparation before the event and still more afterwards. This was the third year that I have been there doing woodwork with mobs of kids. Why are there so many kids at the Wood Show? -  it is because the WA Craft Fair is now combined with it in one whoppa event.
Here's the promo:

Friday 01 August - Sunday 03 August

WA Craft Show & WA Wood Show

Two great Western Australian events for the price of one!
Come along to the WA Craft Show and WA Wood Show this August to discover what is new, fashionable and trending in each industry.

The WA Craft Show will include craft excellence and expertise in scrapbooking, patchwork, quilting, cardmaking, paper crafts, machine embroidery and much more.

The WA Wood Show features tools, machinery, exciting new products, displays, demonstrations, leading suppliers and tools for all the trades expo.

Venue: Claremont Showground, Exhibition Centre


My space all set up early Friday morning and ready for the crowds.

Friday and the "Hand Tool Olympics" Experiment.
On the Friday of the Show each year, busloads of Design and Technology students from the high schools normally come in to visit the Show. Each year I have watched them get bored and then the young males start to strut around like young roosters, getting up to mischief at times. Last year, after one of these kids nailed my demo Kitchen Spatula to the bench, I resolved to offer something different. I am a youthworker by trade as well as a woodworker, so I already had a few ideas brewing. The plan would be to hook into all that testosterone and competetive spirit, and channel it into some positive woodworking activity.

After the Wood Show in 2013, I had gone to the "Woodworking in America" Conference in the USA (WIA). There I saw the "Hand Tool Olympics" in action, run by the Mike Siemsen's School of Woodworking. I was impressed, and saw in action the very ideas I had been contemplating for our Wood Show Friday.
The Hand Tool Olympics at WIA2013, USA.
The WIA Hand Tool Olympics in the USA involved 8 skill challenges:
  • Cross-cut a board with a hand saw.
  • Rip along a board with a ripping hand saw.
  • Shoot that ripped edge straight and square, using a plane.
  • Make a tenon to fit an pre-existing mortice.
  • Hand cut a dovetail joint.
  • Bore a perpendicular hole with an auger and a shell bit.
Participants were scored by time and accuracy. A stopwatch gave the time score, and playing cards inserted into gaps give the accuracy score. The lower the total score, the better. The scores were recorded as people took part over the weekend. A good system. With credit to Mike's Team, they also used this as a coaching opportunity for any participants who were not experienced in any of the skill challenges. The tools used for the challenges - very nice quality ones, too - were the prizes for the people who scored the lowest (best) score over the weekend in each skill challenge. There was another big prize for the overall winner. After watching and participating in the event at WIA2013, I sent an email immediately to Mareene, the Perth Wood Show organiser. Something like this would be worth trying with the student at The 2014 Perth Wood Show, and I hoped to give it a bash.
A tenon under construction at WIA 2013. The clock is ticking!
I'm told John Lennon allegedly said: "Life is what happens while you are busy making other plans". Well, as the 2014 Perth Wood Show drew closer,  life was getting in the way of my intention to run a form of Hand Tool Olympics at the show. However, in the week leading up to the Show I finally got a few things organised.
Ripping a board at WIA2013.
On the Friday only, we tried out the concept and ran the Hand Tool Olympics. Offering the opportunity to the passing High School students to participate, we offered three skill challenges:
  • Cross-cut sawing across a 19mm pine board, 250mm wide.
  • Rip-sawing along a line the length of a 19mm pine board, 900mm long.
  • Shooting that ripped 900mm edge, to square and straight, using a No7 trying plane. 
Each participant was scored for time and accuracy in each of the three skill challenges, and their scores recorded and totalled. We found the activity was hungry on our staffing resources, as each participant needed someone to walk them through the process, to time them, to coach them where appropriate, and to score their accuracy. In our little experiment, we had 20 students participate across the three skill challenges - so there were 60 individual skill challenges undertaken.
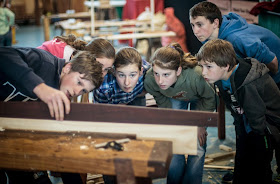
A participant and his companions check progress with a straight edge during the edge planing challenge at .
Thanks to Phil for the great photo.

The verdict?  The trial run on the Hand Tool Olympics for the Friday at the Perth Wood Show was very successful, and has the potential to become a real feature of the Show. It is scary how generally poor the hand skills were across the bulk of the students.  Hopefully developing the Hand Tool Olympics in future years will help to raise the profile and the teaching of hand tool skills in high schools in future. This would be my aim in pushing this whole concept further.
 
Saturday and Sunday - woodworking with kids.
Since the WA Craft Show has been operating in the adjacent pavillion, there have been a heck of a lot of kids around across the twin events. What better opportunity to give kids a chance to have a go at woodworking!
Parents and kids creating stuff together.
We were mostly offering "free creative play" - lots of wood pieces, benches with hammers and nails, and saws at the sawing station. We'll commonly have 25-30 hammers out across the benches, and it's not unusual for people to be queing up waiting for a hammer to become available! Such is the popularity of this activity.
So many possiblities!
Thanks to my wonderful staff Thom, Phil and Megan who assisted me so reliably again as they worked their magic with the crowds.


The Perth Wood Show is a fantastic event, and a "must attend" gig for woodworkers of all levels of expereince and skill in Western Australia. It is, however, heavily oriented towards power tools and machinery. The Joy of Wood and the Hand Tool Preservation Society of WA are the two stand-outs when it comes to hand tool woodworking at the event. We provide a chance for kids to experince the joys of woodworking, and they sell the best tools in the whole place - good old fashioned hand tools. It's a good synergy between the two, really. Many a parent goes to the Hand Tool Preservation guys to buy a pre-loved tool for their kid after seeing the delight and engagement of their kid as they discover the joy of wood. Hundreds of kids had a great time and took home all that they made. 

Yep, we love to share the joy around...

Shooting an edge, Hand Tool Olympics on the Friday.
Another great photo by Phil.

Monday, August 18, 2014

A big day at the Science & Sustainability Community Expo.

It was a beautiful sunny Sunday, and many hundreds of people moved between the numerous stalls and activities at the Community Science & Sustainability Expo, at the Kent Street Weir on the Canning River in Wilson, here in Perth Western Australia. 
Part of National Science Week, this event was based around the Canning River Eco Education Centre. Tragically, we have a Federal Government made up of climate change deniers, who do not believe in science, who de-fund scientific research and who are committed to dismantling anything related to renewable energy! However, despite this tragedy, it is great to know that out there in the community there are hoards of people like you and me who do value science and are committed to reducing our footprint on the planet! It was a joy to be at the Expo today for all that it stood for.

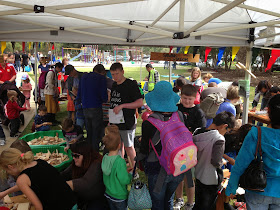
Busy busy. People galore.

Mind you, I didn't get to see a lot of the exhibits, as I was absolutely flat out with the woodworking activity we were running today. Bursting out of our three 3m x 3m gazebos, we had 9 of the small benches out, with 27 hammers out, and 4 saws at the sawing station. For much of the day there was a queue of people waiting for a hammer to become available. I do a lot of festival gigs in the year, so I have a good idea of how much wood I would expect to go through at an event such as this... however today we used up far more than I could have imagined! We all but ran out of the pieces of wood that I take to these events.
Two big drums and 5 bags worth. It was a lot of wood, which generated a lot of pleasure as it was transformed by kids and adults into an amazing array of creations using only saws, hammers and nails. Wonderful stuff.

Parents and kids alike experiencing the joy of wood together.
Hardly room to move.
Part of our broader message.
Wood recycling fits in with the whole sustainability message. All of my benches are made from recycled timber, and all of the pieces of wood the kids use have all been rescued from the waste stream too. These small pieces of plywood and pine are cut up by me. It is a constant process, keeping up the supply for school and festival gigs. A big source of this material is beautiful Yellow Pine from the USA - from packing crates, which I gather up, de-nail, cut up into little pieces and bag up. This lovely material, which we also use for much of the project work we do with kids in schools, is much nicer than any Pinus radiata or Pinus pinaster we grow in Australia due to the closeness of the growth rings. Our climate is too mild and even. The European grown pine similarly has nice close growth rings. I get a bit of that in packing crates too.  

Some things take a serious amount of concentration!
Megan shows a few tricks at a bench.

It is great to see kids and parents creating things together. It is one of the reasons our activity is such an assett to any festival or public event. It helps to build community, invites participation from the passing throng, and sends kids back out into the crowd clutching their aeroplane, dolls furniture, or whatever they have made, with beaming faces. They have also left with a few new skills and experiences up their sleeve.
Then there are the messages: the importance of wood in the broader scheme of sustainable living; the simple pleasures of hand tool woodworking; the benefits of us creating things together away from isolating electronic gismos; and the way using hand tools helps to foster body awareness and hand-to-eye co-ordination.
... and that is just the start of it!   

Thursday, August 14, 2014

Pre-School creations at St Marks Anglican Community School

Recently we did a woodworking incursion at St Mark's Anglican Community School, in Hillarys, here in Perth, Western Australia. This is the third year I have gone to the school to work with the Pre-primary students.

We had two classes of 30 kids - 5 year olds - and they had a ball! It was great to see the amazing things they created. It was our normal set-up for "Free Creative Play" in a school context. Across the 14 small benches we had 30 cross-pein hammers. On each of the benches were a pair of pincers, pencils, and nail containers with assorted nail sizes. The Sawing Station was set up with 8 assorted tenon/carcass saws at various heights appropriate to the size of the kids. There was a big pile of softwood pieces in various shapes and sizes for the kids to use, which we kept topping up.

After a briefing/demonstration about safe and efficient tool use, the kids get to make whatever they like from the material available.
One of the two tables of completed creations.
It was good to have a heap of parent helpers along to assist the kids, and they often get to learn a few tricks and techniques with hand tools too. Of course, the parents are asked to not "take over" (something Dads are notorious for) but to just hold things and generally help while the kids creativity goes wild. Thanks to those parents adn the wonderful staff for helping make it a great day.

What are the benefits for 5 year olds doing woodwork?
The benefits are numerous, but here are just a few:
  • Using any hand tools, but exsecially the saws, requires some body awareness. Sawing involves so many macro and micro muscle movements. Getting your body and body parts in the right position makes a big difference to the ease of sawing, When things "click into place" for a child using a saw, it is empowering and encouraging for them. They love it.
  • Skills for life. As kids we learn from experience, observation and reinforcement. Learning how to use a hammer or a saw is something you can take with you into the rest of yoru life. If a kid goes home from school that day and asks their parent(s) if there is a hammer in the house, that's a great thing. Hopefully the parent(s) will let their kid use it and give them a bunch of nails and a few peices of wood.
  • Working out how to put things together involves problem solving. So kids creating things with pieces of wood and a few hand tools will develop problem solving sklls - and problem solving builds resilience.   
  • Making things with pieces of wood helps the kids develop spatial relation skills, as they work out how to fit things together. Comparing pieces, cutting to size, choosing the right nail size, finding the right piece in the big bin of pieces - all these processes in the making of something help the brain develop spatial relation skills.
  • The encouragement and satisfaction derrived from completing the making of something is affirming and very positive. The resulting positive feedback the child receives from others around them helps to build self-confidence. Once again, self-confedence helps to build resilience.
  • In a press-button instant world, it's great for kids to experience the reality of something requireing some physical and mental effort, persistence and committment around a tangible, tactile medium and the creatiion of a real thing which can be played with, given as a gift, or displayed as a decorative item of momento. The creation which keeps on giving.
We do quite a lot of work with really young kids. They thrive on it, so it is always a pleasure to see them blossoming in the short period that they are at the bench creating something with their own hands.

Great to see this little guy using the small end of a cross-pein hammer, to get at a tricky nail position -  just as I had demonstrated at teh start of the class. Kids are often smarter than we adults give them credit for...

We are never too young or too old to benefit from the joy of woodworking!

Wednesday, August 6, 2014

Enjoying a "Taste of Green Woodwork" Workshop.

At the end of June, I had the pleasure of running another Green Woodworking workshop. This time we used the Vic Park Arts Centre as the venue. On a nice sunny day, it was great to be able to work out in the garden and on the verandah.

Front side of the info flyer for the June workshop.
Calling it "A Taste of Green Woodworking", the ten participants had a choice of either bowl carving or spoon carving. The wood we had to play with was Cape Lilac and Camphor Laurel.

Here are a few pics from the day:

That's me doing a demo on cleaving some Cape Lilac with froe and beetle.
Another lovely spoon taking shape.
Doing a demo on hollowing out the bowl shape with an adze.
A Camphor Laurel Bowl in the making.
The Shaving Horse is a joy to use!
The small bowl carving adze is a beauty.
A moment of contemplation...
Working on the verandah.
There were an assortment of hatchets and adzes to try out.
Shaping the outside of a Camphor Laurel bowl with a hatchet.
Using a Hook Knife to hollow the bowl of a spoon.

It's a very relaxing pastime carving spoons together.
While not every creation was completely finished, it was a great day working green wood together. 
 Pre-industrial woodworking. What a hoot! So interesting - and such fun!

The next Green Woodworking Workshop will be a 2 day affair, on two consecutive Sundays in September. We will be making both a three-legged stool and a spoon over that time.

Here is the front side of the flyer: